Can You Record a Teams Meeting? A Complete How-To Guide
Let's cut right to the chase: yes, you can absolutely record a Microsoft Teams meeting. For any team needing to document discussions, catch up colleagues who couldn't make it, or just have a solid record of what was decided, it's an indispensable feature. That said, it’s not a free-for-all; you'll need the right permissions and a valid license before you can hit that record button.
Why Recording a Teams Meeting Is Essential

For remote and hybrid teams, recording meetings has quickly become standard operating procedure. It's no longer a "nice-to-have" but a fundamental part of working together effectively. Being able to capture conversations, presentations, and key decisions ensures that critical information isn't lost, even for those who couldn't attend the live session.
The shift in how we work made this feature a necessity. The numbers really tell the story: Microsoft Teams users record roughly 1.875 million minutes of meetings every single minute. That staggering figure is a direct result of the massive adoption that saw daily meeting minutes on the platform skyrocket by 200% during the early days of the 2020 pandemic. You can find more fascinating statistics on Teams usage over at ElectroIQ.
Who Can Record and Where It Goes
Before you jump in, it’s crucial to understand the "who" and "where" of Teams recordings. This is a common sticking point for many users. Not just anyone can start a recording, and where the video file ends up depends entirely on the type of meeting it was.
From personal experience, recording complex project discussions is the single best way to create a source of truth. It ensures team members across different time zones or those with packed schedules stay perfectly aligned, eliminating any "he said, she said" confusion later on.
Here’s a quick rundown of the essential things to know before you begin:
- Permissions: As a rule, the meeting organizer and other people from the same company can start and stop recordings. Guests, external attendees, and anonymous users typically don't have this ability.
- Storage Location: This is a big one. For meetings held in a specific channel, the recording goes into a Recordings folder within that channel's SharePoint site. For all other meetings (like private calls or ad-hoc meetings), the file is saved directly to the recorder's OneDrive.
- Notifications: Transparency is built-in. The moment a recording starts, Teams displays a banner at the top of everyone's screen. This ensures all participants are aware they are being recorded.
To make things even clearer, here’s a handy table that summarizes the key details at a glance.
Teams Recording Quick Reference Guide
This table breaks down the most important aspects of recording in Microsoft Teams, giving you a quick summary of what to expect.
.tbl-scroll{contain:inline-size;overflow-x:auto;-webkit-overflow-scrolling:touch}.tbl-scroll table{min-width:600px;width:100%;border-collapse:collapse;margin-bottom:20px}.tbl-scroll th{border:1px solid #ddd;padding:8px;text-align:left;background-color:#f2f2f2;white-space:nowrap}.tbl-scroll td{border:1px solid #ddd;padding:8px;text-align:left}AspectDetailsWho Can Record?Meeting organizers and internal users from the same organization.Who Cannot Record?Guests, external attendees, and anonymous users.NotificationAll participants are notified via a banner when recording starts.Channel Meeting StorageSaved to a Recordings folder in the channel's SharePoint site.Non-Channel Meeting StorageSaved to the recorder's personal OneDrive Recordings folder.
Knowing these fundamentals will help you manage your recordings smoothly and ensure everyone has access to the information they need.
How to Start and Stop a Teams Recording
Alright, let's get into the nuts and bolts. Knowing you can record a Teams meeting is one thing; feeling confident actually doing it is another. I'll walk you through the exact clicks you need, whether you're at your desk or joining a call from your phone.
The process is pretty consistent across devices, but the buttons are in slightly different places. We'll cover the desktop/web app first, then the mobile experience.
On a Desktop or Web Browser
When you’re in a meeting on your computer, Teams keeps the interface clean by tucking away advanced options.
To start recording, find the meeting controls at the top of your screen. Click the More options (...) button to open a dropdown menu. From there, just select Start recording. It's that simple. Teams will immediately display a banner letting everyone know the meeting is being recorded, so there are no surprises.
Once you've covered everything you need to, stopping the recording is just as straightforward.
- Head back to the More options (...) menu in your meeting controls.
- Choose Stop recording.
- A small pop-up will ask you to confirm. Just click Stop recording again, and you're done.
My personal tip? I always say, "Okay, I'm going to start the recording now" right before I click the button. Even with the official notification, that little heads-up is a nice courtesy that helps everyone feel more comfortable.
On a Mobile Device (iOS and Android)
Recording from your phone is just as easy, though the menus are placed a bit differently to fit the smaller screen.
Here’s how to kick it off from your mobile device:
- During the meeting, just tap your screen to bring up the control bar at the bottom.
- Tap the More options (...) icon.
- From the menu that appears, select Start recording.
The same notification banner pops up, and the recording will begin. To end it, you just retrace your steps: tap the screen, hit the More options (...) button, and then select Stop recording. This consistency makes it easy to manage your recordings no matter which device you happen to be on.
Where Do Teams Recordings Go? Finding and Sharing Your Files
So, you’ve just wrapped up a meeting and hit "Stop recording." Now for the million-dollar question: where did the video file actually go? This is a common trip-up for a lot of Teams users, and the answer isn't always obvious because it changes based on how the meeting was created.
Microsoft stores your recordings in one of two places, and knowing the difference is the key to finding your files without a headache.
OneDrive vs. SharePoint: It All Depends on the Meeting Type
The storage location is determined by a simple but critical detail—the type of meeting you recorded.
- Standard or Private Meetings: If you recorded a meeting that wasn't part of a specific channel (think one-on-one calls, group chats, or meetings scheduled from your calendar), the video file lands in a Recordings folder inside your personal OneDrive account.
- Channel Meetings: For any meeting scheduled or started within a specific team channel, the recording is automatically saved to a Recordings folder in that channel's SharePoint site. This is great for team collaboration, as it makes the video instantly accessible to every member of that channel.
This decision tree gives you a quick visual of the recording process itself.
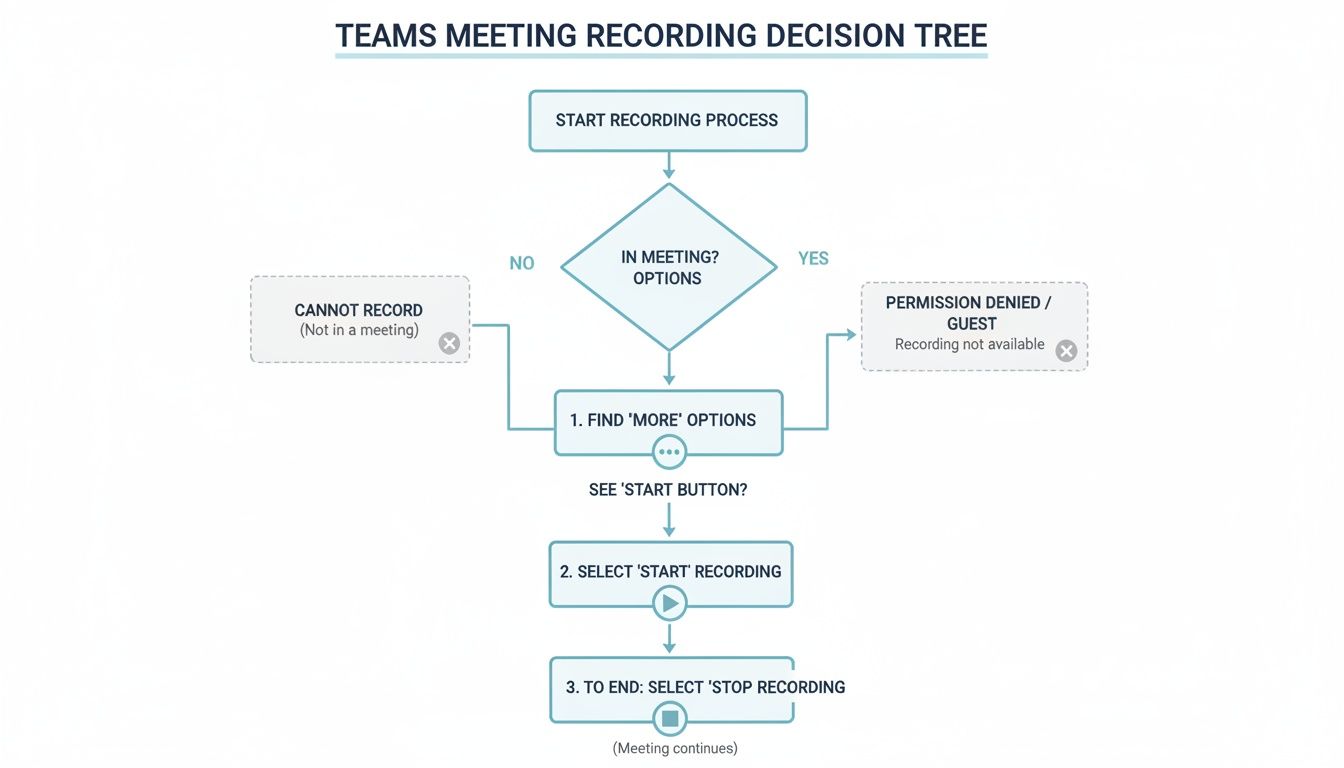
As you can see, starting and stopping a recording is just a matter of a few clicks in the meeting controls.
Sharing, Permissions, and That Pesky Expiration Date
Once you've tracked down your recording in OneDrive or SharePoint, sharing it works just like any other file. You can generate a link, control who can view or edit it, and share it with people inside or outside your organization. For a more detailed guide on the whole process, we've put together an article on how to find your Teams recording.
Now, here's something you absolutely need to know: the default expiration policy. Most Teams recordings are automatically set to be deleted after a certain period, often 60 days. If a recording is important, you have to go into the file settings and manually extend or remove the expiration date. Don't get caught out by this!
I once had to frantically search for a critical project kickoff recording that was just hours from being auto-deleted. It was a close call. Now, I make it a habit to immediately check and change the expiration date for any recording I know we'll need later.
Keep an eye on storage, too. A high-quality Teams recording eats up about 7.65 MB per minute of cloud storage. For a company with 1,000 users, their standard storage might only hold around 2,230 hours of recordings. It doesn't take long for that to become a real storage management issue.
7 Reasons You Can't Record a Teams Meeting (and How to Fix It)
It’s a familiar, frustrating moment: you’re about to start an important meeting, you look for the record button, and it’s either grayed out or completely gone. When you can't record a Microsoft Teams meeting, it almost always comes down to a specific permission or policy setting.
Let's walk through the usual culprits and what you can do about them.
Check Your Role and License First
Before diving into complex IT policies, it’s best to rule out the simple stuff. Your role in the meeting is the first thing to check.
Teams is set up to give recording privileges only to specific participants. Typically, you can't record if you are:
- An anonymous user who joined without signing in.
- A guest from outside the host's organization.
- A federated user from another company's network.
Only the meeting organizer or another person from the same organization as the organizer can start or stop a recording. If you’re a guest, you’ll have to ask someone from the host company to handle it.
Another quick check is your Microsoft 365 license. While recording is a standard feature, your account needs a valid Business, Enterprise, or Education license. If you’re on a more basic plan or your license has lapsed, the functionality will be disabled.
The Big One: IT Admin Policies
If your role and license are correct, the most likely reason you can't record is an IT administrator policy. Your organization’s IT department has the ultimate say over who can and cannot record meetings.
An IT admin can disable recording for the entire company, specific user groups, or even individual accounts. This is a common practice for managing cloud storage costs or enforcing internal data privacy and compliance rules.
With Microsoft Teams now serving over a million companies globally, administrators have to carefully manage these features at scale. They use the Teams Admin Center to assign a "meeting policy" to each user. If your policy is set to block recording, the button simply won't appear for you.
So, what's the solution? Your best bet is to reach out directly to your IT help desk. Explain your role and why you need the ability to record meetings. They can quickly check your account's meeting policy and, if approved, switch it to "Allow."
A Word on Legal and Privacy Issues
Remember, even when the record button is available, that doesn't mean you should always press it. Be mindful of the legal and ethical implications of recording conversations. It’s crucial to understand the rules in your region, which you can learn more about in our guide on whether it is legal to record a conversation without consent.
Recording Problem Troubleshooting Checklist
If you're still stuck, running through a quick diagnostic checklist can help pinpoint the exact problem. I've put together this table to walk you through the process step-by-step.
.tbl-scroll{contain:inline-size;overflow-x:auto;-webkit-overflow-scrolling:touch}.tbl-scroll table{min-width:600px;width:100%;border-collapse:collapse;margin-bottom:20px}.tbl-scroll th{border:1px solid #ddd;padding:8px;text-align:left;background-color:#f2f2f2;white-space:nowrap}.tbl-scroll td{border:1px solid #ddd;padding:8px;text-align:left}CheckAction / ExplanationSolutionUser RoleAre you the organizer or from the same organization?Ask the organizer or another internal user to start the recording for you.License TypeDo you have a valid Microsoft 365 Business, Enterprise, or Education license?Contact your IT admin to confirm your license type and upgrade if necessary.Storage LocationIs your company's OneDrive or SharePoint storage full?Recordings fail if there's no space. Ask your admin to check storage quotas.IT PolicyHas your administrator disabled recording for your user account or group?This is the most common issue. Contact your IT department and request access.Meeting TypeAre you in a 1:1 call instead of a scheduled meeting?1:1 call recording is controlled by a separate TeamsCallingPolicy. Check with your admin.Teams App VersionAre you using an outdated version of the desktop or mobile app?Go to Settings and more (...) > Check for updates to ensure you're on the latest version.
This checklist covers the vast majority of recording issues. Start at the top, and by the time you get to the bottom, you’ll almost certainly have found the reason your record button is missing in action.
Capture Meeting Insights Without the Hassle
While the built-in ability to record a Teams meeting is definitely handy, a raw video file is really just the starting point. The real work begins when you need to pull actual information out of it. Honestly, who has the time to scrub through a one-hour recording just to find that one key decision or comment?
This is where you can move beyond simply having a recording to intelligently capturing knowledge. A much better approach is using an AI meeting assistant like HypeScribe. Instead of getting a huge video file you have to deal with, you get immediate, useful outputs that can save your team hours of work. It’s a complete shift from passively documenting a meeting to actively putting its content to use.
Turn Meetings into Actionable Knowledge
Picture this: you hang up from a meeting, and within minutes, you have a perfect, searchable transcript waiting for you. That's exactly what AI assistants deliver, often paired with sharp summaries and a clean list of action items. This method also neatly sidesteps Teams' native storage limits and those pesky file expiration dates, giving you a permanent and easily accessible record.
- Instant Searchable Transcripts: Forget scrubbing through video. Just search for a keyword and find what was said in seconds.
- AI-Generated Summaries: Get the gist of the entire meeting—the key points, decisions, and outcomes—without re-watching anything.
- Organized Action Items: The tool automatically pulls out tasks and who they're assigned to, so nothing slips through the cracks.
By transforming your meetings from temporary events into a searchable knowledge base, you create a powerful resource for your entire organization. It's a fundamental shift in how teams retain and act on institutional knowledge.
This approach also makes the video itself far more useful. To make long recordings easier to navigate, it helps to understand how to structure them. For example, a great resource like A Practical Guide to Time Stamp Video shows how to help viewers jump right to the parts they need.
Many AI tools do this automatically, breaking up the transcript into chapters based on the topics discussed. You can see how HypeScribe can help you record meetings and transcribe them to learn more.
Frequently Asked Questions About Teams Recording
Even after you've got the hang of the basics, some specific questions always seem to surface. Let's run through the most common queries I hear from colleagues and clients, so you're prepared for any scenario that comes your way.
Consent, Privacy, and Other Common Queries
The topic of consent is, without a doubt, the biggest one. While Teams does display a notification banner when a recording starts, I always recommend verbally announcing it as well. It’s just good practice. This became a huge point of discussion after March 2020, when Teams video calls skyrocketed by over 1,000% and suddenly everyone was hitting "record." You can read more about this massive growth in Teams usage.
Here are a few other quick-fire answers to questions that pop up all the time:
- Can a guest record a Teams meeting? Nope. Recording is restricted to the meeting organizer and other internal folks from the same company. Guests and external attendees can't start or stop a recording.
- What happens to the meeting chat? The chat is automatically saved with the meeting details, but it's separate from the video file itself. It won't appear as an overlay on your recording.
- Can I record if I'm not the organizer? Yes, you can! As long as you're in the same organization as the organizer and your company's IT policy allows it, you'll have the option.
When you start using AI tools to get more out of your meetings, make sure you have a solid handle on AI GDPR compliance. It's absolutely crucial for protecting everyone's data and building trust. Think of it as a non-negotiable part of creating an ethical knowledge base.
Stop wasting time re-watching long meetings. HypeScribe provides instant, searchable transcripts, AI summaries, and actionable insights so your team can move forward faster. Turn your conversations into a powerful knowledge base. Get started today at https://www.hypescribe.com.


