How to Record Meetings and Transcribe Them Like a Pro with AI
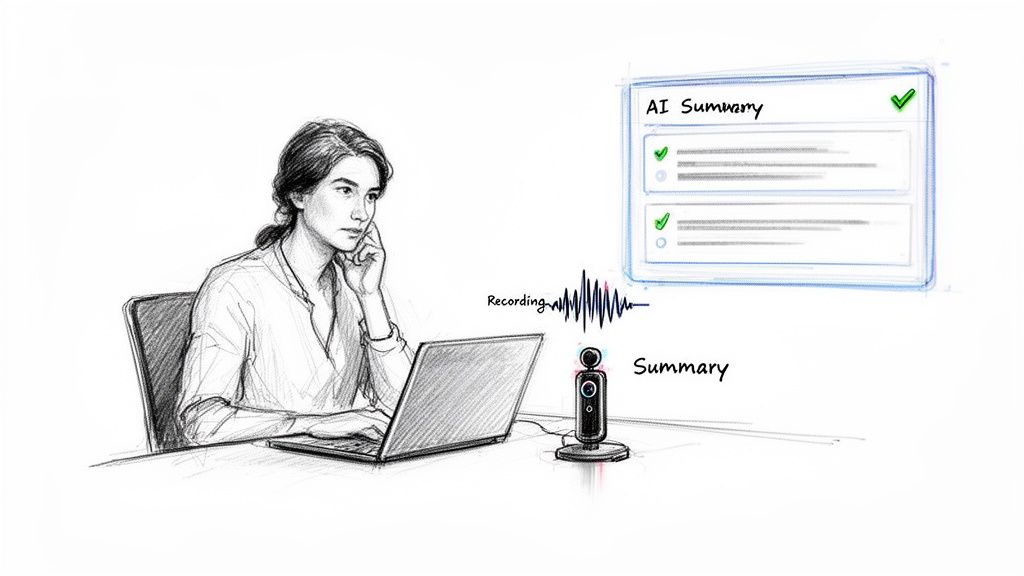
We’ve all been there: trying to contribute to a meeting while simultaneously hammering away at the keyboard, desperately trying to capture every important detail. It’s a recipe for disaster. You end up missing crucial points and can't fully engage in the conversation. The best way to record meetings and transcribe them isn't by multitasking—it's by letting a smart tool like HypeScribe handle it for you.
From my experience, this frees you up to actually participate in the meeting, knowing a perfect transcript, a clean summary, and a list of action items are being generated automatically.
Why Manual Note-Taking Doesn't Work
Taking notes by hand during a live meeting is a fundamentally broken process. You’re constantly trying to listen, process, and type at the same time, which means you’re not doing any of it particularly well. From what I've seen on my own teams, key decisions get lost, nuances are missed, and action items often fall through the cracks.
The notes you end up with are usually a messy, incomplete reflection of the conversation, filtered through your own biases about what seemed important in the moment. Trying to share those with a team member who missed the call? Good luck.
This old-school method just creates more work. Someone always has to spend their valuable time afterward trying to decipher, clean up, and distribute what was captured. It's time for a better way.
A Smarter Approach: Automating Meeting Notes
Forward-thinking teams are ditching manual transcription for AI. Instead of ending up with a dozen different sets of personal notes, they're creating a single, reliable source of truth for every meeting. This is more than just getting a word-for-word script; it’s about turning spoken conversations into organized, actionable information the whole team can use. For teams looking to integrate this into broader customer communication, platforms like supportgpt offer powerful ways to process and analyze this kind of recorded content.
When you automate note-taking, you give everyone on your team permission to be fully present and engaged. They can focus on creative problem-solving, knowing a perfect record is being created in the background.
This isn't just a niche trend. The AI transcription market was valued at USD 4.5 billion in 2024 and is expected to explode to around USD 19.2 billion by 2034. That massive growth is driven by a simple reality: businesses need more efficient ways to capture and leverage their own data.
How This Changes the Game for Your Team
Switching to an AI tool to record and transcribe meetings pays off immediately. It guarantees accuracy, eliminates hours of tedious administrative work, and makes every conversation instantly searchable and shareable.
Based on my direct use, modern tools like HypeScribe go way beyond just turning audio into text. They give you:
- Actionable Summaries: Quickly get the highlights without needing to read pages of transcript.
- Organized Tasks: Automatically pull out action items and assign them to the right people.
- Instant Search: Find a specific decision or comment from weeks ago in just a few seconds.
Let's walk through exactly how to set this workflow up for your own team.
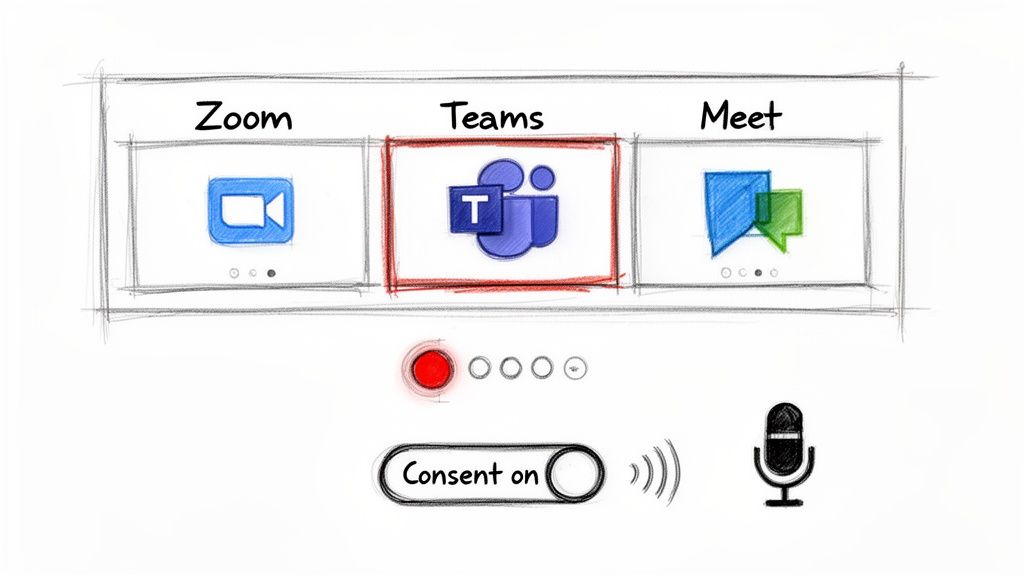
How to Record Meetings on Zoom, Teams, and Google Meet
Before any AI tool can work its magic and give you a brilliant summary, it needs a clean, high-quality recording to work with. I always tell people to think of their recording as the raw ingredient—the better it is, the better the final dish. Let's get beyond just hitting the "record" button and talk about the practical steps that guarantee you capture the best possible audio, no matter which platform you're on.
Think of this as your pre-flight checklist. Taking a moment to follow these small but crucial steps helps you record meetings and transcribe them with way more accuracy. It’s the difference between a clean, useful transcript and a messy, unusable one.
Start with Consent and the Right Layout
First things first: always get consent. Most platforms pop up a little notification when a recording starts, but I’ve found it’s always best practice to announce it verbally. A quick, "Hey everyone, just a heads-up, I'm starting the recording now for our notes," is all it takes to build trust and make sure everyone is comfortable.
Next, you need to think about your recording layout. This is a small choice that has a massive impact on your transcript quality, especially when it comes to figuring out who said what.
- Speaker View: This layout puts the focus squarely on whoever is talking, making their audio the clearest. It’s almost always the best choice for AI transcription because it helps isolate individual voices.
- Gallery View: This is great for seeing everyone's face, but it can turn into audio chaos if multiple people talk or make noise at the same time.
For transcription purposes, I almost always recommend using Speaker View. It provides the cleanest possible audio source for each speaker.
Navigating Platform Specifics
Each platform has its own little quirks for recording. Knowing where to find the right settings can save you a lot of frustrating trial and error down the road.
Recording on Google Meet
Recording in Meet is pretty simple, but you'll need the right permissions. It’s usually available on business or education plans. Once you start, the file automatically saves to the host's Google Drive. For a deeper dive, check out our guide on how to record a Google Meet, which covers all the details on permissions, storage, and sharing.
Recording on Microsoft Teams
Teams offers some really robust recording features, including its own automatic transcription. One of its best features is the "intelligent recap," which can start breaking the meeting down into chapters and key points right away. This gives you a great head start before you even export the file.
Recording on Zoom
In my experience, Zoom gives you the most granular control. You can actually record separate audio files for each participant, which is a total game-changer. It's a bit of a power-user feature, but it's invaluable for getting highly accurate transcriptions because the AI can process each person's audio on its own, without any crosstalk.
Pro Tip: Always check your recording settings before the meeting begins. A quick 30-second check to confirm you have enough cloud storage space and have selected the right audio options can save you from losing an entire meeting's worth of valuable conversation.
When you master these fundamental recording techniques, you’re creating the perfect foundation for any AI transcription tool. You're not just capturing a conversation; you're engineering a clear, high-fidelity asset that will deliver precise summaries and actionable insights every single time.
How to Get Crystal Clear Audio for Accurate Transcriptions
Let's be honest: great AI transcription all starts with great audio. While a powerful tool like HypeScribe can certainly work magic on a less-than-perfect recording, feeding it clean, clear sound is the number one thing you can do to get a transcript that’s practically flawless. Think of it as giving the AI the best possible ingredients to work with.
This isn't about dropping a fortune on a professional studio setup. A few small, deliberate tweaks I've learned to make before and during my meetings can make a world of difference in recording quality—and, in turn, the final transcript. The whole point is to make it incredibly easy for the AI to pick out every word from every speaker.
Tip 1: Upgrade Your Microphone
Your laptop’s built-in mic? It’s there for convenience, not quality. It's usually far from your mouth and picks up absolutely everything: the clatter of your keyboard, the whir of your computer's fan, and every echo bouncing around the room. That messy, distant audio is a nightmare for transcription software.
The single most effective upgrade you can make is a simple external USB microphone. You don't need to break the bank; even an entry-level model is a giant leap forward. It captures your voice directly and does a much better job of ignoring all that background noise. For less than what you’d spend on a team lunch, you can boost your audio quality significantly. That means the AI hears you, not your environment.
Getting clean audio isn't a technical luxury; it's the foundation of a useful transcript. A small investment in a better microphone pays for itself immediately in time saved from correcting errors.
Tip 2: Tame Your Environment
You don't need a soundproof booth to get clear audio. Just being a little more aware of your surroundings can go a surprisingly long way. Before you hit that record button, take thirty seconds to look around and shut down any potential noise-makers that could muddy your recording.
A few quick moves can have a massive impact:
- Pick a smaller room. Large, empty spaces with hard surfaces are echo chambers. All that reverb makes voices sound hollow and hard to distinguish. A cozier space with a rug or furniture will do wonders to absorb that sound.
- Close doors and windows. It sounds basic, but it's the fastest way to block out street noise, hallway chatter, or your barking dog.
- Silence your notifications. Kill the alerts on your computer and phone. Those unexpected pings and dings aren't just distracting for you; they create weird little audio artifacts that can confuse the transcription.
To help you remember these key points, here’s a quick checklist you can run through before your next important call.
Audio Quality Checklist for Optimal Transcription
This table breaks down the simple things you can control to get the best possible audio, ensuring your transcription is as accurate as it can be.
FactorWhy It MattersActionable TipMicrophone ChoiceBuilt-in mics capture too much background noise and make you sound distant.Use an external USB microphone. Even a budget-friendly one is a huge improvement.Room AcousticsEcho and reverb in large, empty rooms can muddle voices, making them hard to decipher.Record in a smaller, carpeted room with furniture to absorb sound. A closet works in a pinch!Background NoiseUnexpected sounds (notifications, traffic, pets) create audio "clutter" that confuses the AI.Close doors/windows, silence all device notifications, and ask others to be quiet.Speaker ProximityThe closer you are to the mic, the clearer and stronger your voice signal will be.Position your external mic about 6-12 inches from your mouth for the best results.Speaking DisciplineWhen people talk over each other, their words get tangled, making it impossible to transcribe accurately.Establish a "one person at a time" rule at the start of the meeting.
Taking a moment to run through this list can be the difference between a transcript you can use immediately and one that needs a ton of manual cleanup.
Tip 3: Establish Clear Speaking Etiquette
The final piece of this puzzle is simply managing how people talk during the meeting. When everyone is talking over each other, it's nearly impossible for even the smartest AI to separate the voices and transcribe their words correctly.
Try to encourage a "one speaker at a time" rule. It doesn't have to be rigid or formal. A quick, friendly reminder at the start of the call—"Hey everyone, just so our recording and notes are super clear, let's try to speak one at a time"—usually does the trick. This not only makes your transcription tool's job easier but also just leads to a more focused and productive conversation for everyone involved.
When you record meetings and transcribe them using these audio best practices, you're setting yourself up for success. Once you have that clean audio file, getting it ready for analysis is the next step. Our article on how to get audio from video walks you through that process.
How to Turn Recordings into Actionable Intelligence
You've captured a high-quality audio file—that's the first win. But the real magic happens next. This is the part where you stop just having a recording and start creating a real asset for your team. Using a tool like HypeScribe, this entire process is surprisingly simple, transforming what used to be a mind-numbing, hour-long task into something that takes just a few minutes.
Honestly, you don't need any technical skills to get this done. The platform is built for speed, whether you're dragging a file from your desktop, pasting a link from the cloud, or even using the built-in recorder for a quick thought. The focus isn't on the process; it's on the powerful output.
The goal here is to record meetings and transcribe them not just to get a text file, but to pull real business value out of the conversation. This is where smart AI tools really earn their keep, going way beyond a simple word-for-word transcript.
From Simple Text to Smart Summaries
Let's be real: a raw transcript of an hour-long meeting is a monster. We're talking dozens of pages of dense text that no one actually wants to read. The real power comes from HypeScribe’s ability to digest all that text and spit out a smart, concise summary.
It automatically figures out the core themes, identifies the decisions that were made, and highlights the most important discussion points. So, instead of digging through pages of back-and-forth to find the final word on the Q3 budget, you get a clean, bulleted list of takeaways in seconds.
The flowchart below shows just how simple the preparation is for getting top-notch results from the transcription engine.
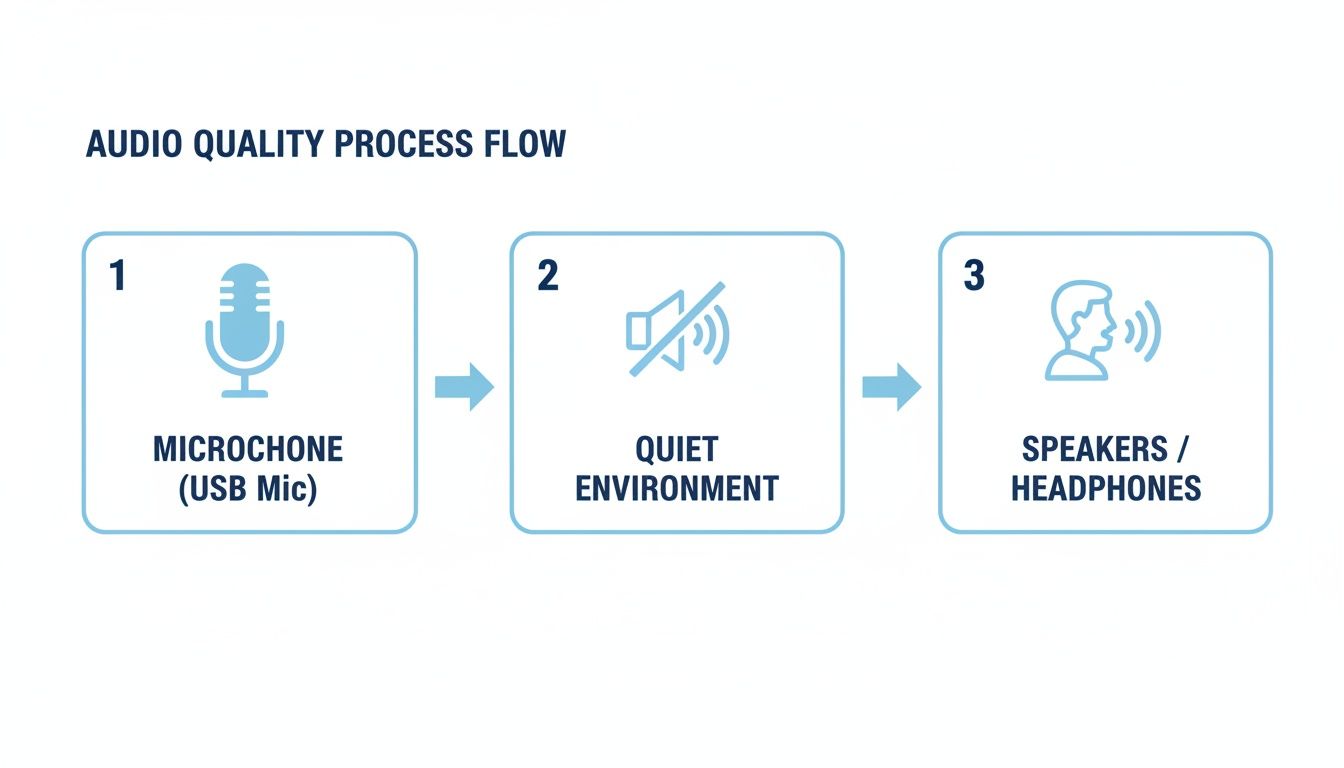
Focusing on these three things—a good mic, a quiet room, and clear speakers—is truly the foundation for turning talk into tangible results.
Automatically Generating Action Items
Think about it: how many great ideas or clear next steps get lost right after a meeting ends? One of the most practical features I've seen is the automatic generation of action items. The AI is smart enough to pick up on language that signals a task, a promise, or a follow-up.
For instance, when someone says, "Okay, I'll get the final numbers to you by Friday," the system instantly flags it, pulls it out, and adds it to a tidy "Action Items" list. This feature alone can be a game-changer for team accountability, making sure decisions from the meeting actually turn into action.
The greatest value of an AI transcription tool isn't just the text it creates, but the time it gives back. It automates the administrative burden of note-taking so your team can focus entirely on execution.
This push for efficiency is driving huge growth in the industry. The global transcription market was valued at USD 23.78 billion in 2024 and is expected to hit USD 35.50 billion by 2032. It's a clear sign that businesses everywhere are adopting tools that turn unstructured conversations into useful data. You can see more data on the transcription market's growth on reanin.com.
This whole process is a core piece of what we call conversation intelligence. To get a better handle on the concept, you can learn more about what conversation intelligence is in our detailed article. By analyzing dialogue, you start uncovering insights that lead to smarter business decisions. Suddenly, a one-hour meeting isn't just an hour of talk—it's a clear, shareable set of tasks that moves the entire project forward.
Advanced Tips for Your Transcription Workflow
Once you’ve got the hang of recording and transcribing, the real magic happens when you weave this process into your team’s daily rhythm. This is where you graduate from just taking better notes to actually building a searchable knowledge base from your everyday conversations. Let's get into the power-user strategies that make this workflow efficient, secure, and genuinely useful.
Handling Consent and Security Like a Pro
First things first: privacy and consent. The automated "this meeting is being recorded" notification is a decent start, but it's not enough. I always make it a point to verbally confirm everyone's okay with being recorded at the beginning of the call. It takes five seconds, builds trust, and makes sure everyone is on the same page.
When you start transcribing sensitive conversations—think financial planning or HR discussions—data security is non-negotiable. You absolutely need to use a service that takes this seriously. Look for platforms like HypeScribe that provide robust encryption for your files, both as they upload and while they're stored. The ability to permanently delete both the source audio and the transcript when you're done is a critical feature for maintaining control over your data.
Sharing and Exporting for Maximum Impact
Getting the transcript is only half the battle; how you share it is just as important. The right format depends entirely on what you're trying to accomplish.
For a fast-paced, collaborative brainstorm, I'll often export the transcript directly to a Google Doc. This lets the team jump right in, add comments, and flesh out ideas. It keeps the momentum going.
But for a formal client debrief or a project update for leadership, a polished, non-editable PDF is the way to go. It preserves the conversation as an official record and just looks more professional. Thinking about the audience and purpose beforehand saves a lot of headaches later.
The demand for this kind of accuracy is huge. In the United States alone, the transcription market shot past USD 32 billion in 2023, and it's projected to keep growing by about 5 percent annually through 2035. That growth speaks volumes about how essential accurate documentation has become across countless industries. You can dive deeper into these stats on the general transcription services market at Dittotranscripts.com.
Interacting with Your Meeting Content
Here’s the real game-changer: stop treating your transcript as a static wall of text you have to skim through. The best tools now have an AI chat function that lets you "talk" to your meetings. It’s like having an assistant with a perfect memory for every conversation.
Instead of spending twenty minutes scanning a transcript for a single piece of information, you can now get an answer in seconds. This completely changes how you access and use the knowledge from your meetings.
For instance, you can just ask it things like, "What were the final budget numbers Sarah proposed for the Q3 campaign?" or "Summarize John's feedback on the new design mockups." The AI instantly pulls the answer directly from the transcript. This is the pro move that turns your meeting archive from a dusty digital shelf into an interactive, searchable database you can actually use.
Common Questions About Recording and Transcribing Meetings
Even with the best tools, jumping into a new workflow to record meetings and transcribe them is going to bring up a few questions. I've found that getting clear answers upfront is the best way to make the whole process feel natural from day one. Let's walk through some of the most common things people ask when they're just getting started.
How accurate is AI transcription?
The first thing on everyone's mind is usually accuracy. Can I really trust an AI-generated transcript? It’s a fair question. Top-tier AI transcription engines can hit up to 99% accuracy, but that comes with a big asterisk: ideal conditions. This is exactly why we talked about using a good mic and killing background noise earlier—it's the single most important factor for getting a transcript you can rely on.
How Long Does Transcription Usually Take?
Okay, so what about turnaround time? The meeting's over, the file is uploaded... now what? How long are you stuck waiting? You'll probably be surprised by how quick it is.
A good rule of thumb for many services is that a transcript takes about half the length of the audio file to process. For a one-hour meeting, that's a 30-minute wait. But with faster tools like HypeScribe, I’ve seen an hour of audio get processed in less than five minutes.
That kind of speed is a game-changer. It means you can get summaries and action items out to your team while the discussion is still fresh, keeping the momentum going.
What Happens if the Audio Quality Is Poor?
Let's get real: sometimes a perfect recording just isn't possible. You might have unavoidable construction noise outside or speakers with heavy accents. While a good system is built to handle a lot, seriously poor audio will naturally lead to a less accurate transcript. In some extreme cases, if the quality is too far gone, the system might not even generate a transcript to avoid giving you a document full of nonsense.
This is why I always stress that focusing on audio quality is non-negotiable. It's not just about mics and software, either. Understanding the practical challenges of recording calls, especially during phone interactions, can help you sidestep common issues before they even start.
Ultimately, the goal is to make this whole process feel easy and dependable. By tackling these common questions head-on, you can set the right expectations and build a solid strategy for getting great results every time.
Ready to transform your meetings from conversations into actionable outcomes? With HypeScribe, you can get fast, accurate transcripts, AI-powered summaries, and clear action items in minutes. Stop taking notes and start focusing on what matters. Try HypeScribe for free today and see the difference.


