A Guide to Flawless Premiere Pro Captions in 2026
Adding Premiere Pro captions isn't just a nice final touch anymore—it’s a critical part of video editing. If you want to grab and hold viewer attention in a world where most people watch with the sound off, mastering captions is non-negotiable. It makes your work more accessible, more engaging, and far more effective, especially on social media.
Why You Can't Afford to Skip Captions in Modern Video
It wasn't that long ago that adding captions was a slow, painful, and manual chore. Now, it's a core part of my editing workflow, and for good reason. It’s not just about accessibility anymore; it’s about survival in a sound-off world.
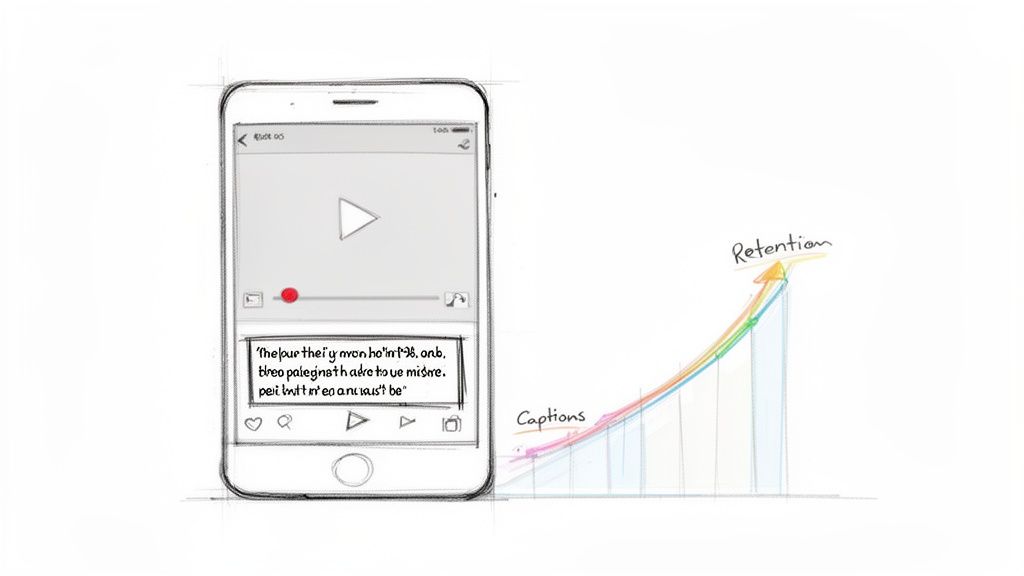
I’ve seen it time and time again with client projects: videos with clean, well-timed captions just perform better. The boost in viewer retention isn't small, either. It's a total game-changer.
The Business Case for Captioning Every Single Video
The logic is painfully simple: if people can't understand your video without sound, they’ll just keep scrolling. The data doesn't lie. A staggering 85% of video content on social media is consumed on mute. That makes your captions the primary way you communicate your message.
Captions have gone from an accessibility feature to a fundamental engagement tool. If you don't use them, you're choosing to ignore the vast majority of your audience on platforms like Instagram, Facebook, and TikTok.
This reality has pushed automated transcription to the forefront of video editing. Adobe has thankfully stepped up, building powerful Speech-to-Text features directly into Premiere Pro that automate what used to be a tedious and expensive process. Before these tools became standard, professional captioning could run you anywhere from $1 to $3 per minute. Now, Premiere can whip through an hour of audio in less than 30 seconds with surprisingly high accuracy.
Beyond Engagement: The Technical Advantages
But it's not just about helping people follow along. Captions give you some serious technical advantages that can dramatically increase your video's reach. Understanding these benefits is key to getting the most out of your work.
Here’s what else captions do for you:
- Improved Accessibility: First and foremost, captions open up your content to viewers who are deaf or hard of hearing. This is a crucial part of creating inclusive content for everyone. You can dive deeper into this with our guide on https://www.hypescribe.com/blog/what-is-closed-captioning and why it matters.
- Enhanced SEO: Search engines can't "watch" your video, but they absolutely crawl the text in your caption file. Learning how captions improve video SEO is a smart move that can give your content a huge discoverability boost on Google and YouTube.
- Better Comprehension: Even for viewers with the sound on, captions can be a huge help. They clarify complex terms, cut through background noise, and make it easier to understand speakers with heavy accents.
How to Generate Captions Natively in Premiere Pro
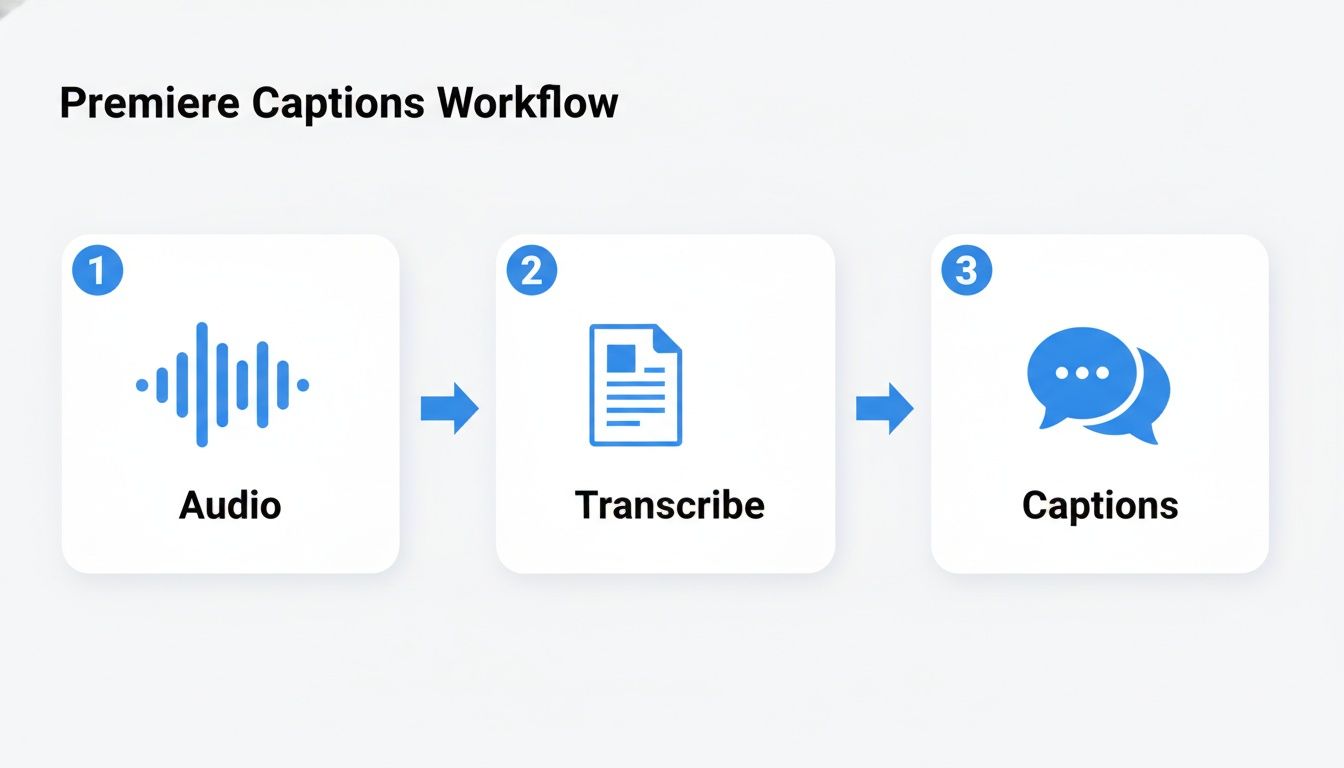
Alright, let's dive into Premiere Pro's own captioning tools. You can forget about typing out every single word by hand; the built-in "Speech to Text" feature is your best friend for getting a solid first draft on the timeline. I've found it's the perfect starting point for most of my projects, especially when I'm working on shorter content like brand videos or quick social media clips.
The whole operation runs out of the Text panel. If you don't see it, just go up to Window > Text. This little panel is your command center for both transcribing your audio and then turning that text into actual Premiere Pro captions. It’s where the magic happens, as the AI turns spoken dialogue into a workable script.
Kicking Off the Transcription
Before you do anything else, you need to tell Premiere Pro exactly which audio to listen to. This is a small but crucial step that a surprising number of editors miss. If your timeline has multiple audio tracks—dialogue, music, sound effects, etc.—you’ll get a far cleaner transcript by isolating just the speech.
You can select your entire sequence or, if you're just working on a small part, set In and Out points to define the specific section. Once you're ready, head over to the "Transcript" tab inside the Text panel and click "Transcribe." A dialog box will pop up with a few important options.
- Audio Analysis: This is where you pick your audio source. You can choose to analyze a mixdown of all your audio or, as I almost always recommend, select only the specific tracks that contain clean dialogue.
- Language: Premiere Pro supports a whole bunch of languages. Just make sure you pick the right one for your audio, otherwise the results can be... interesting.
- Speaker Recognition: If you've got multiple people talking, ticking this box can be a real time-saver. It will try to label who is speaking, which really helps keep the transcript organized.
Now, just hit "Transcribe." For a short video, this process is incredibly quick—I’m often looking at a full transcript in under a minute.
From Transcript to Timeline
After the AI does its thing, the full transcript appears right there in the Transcript tab. This is your first chance to scan for any mistakes. AI has gotten seriously good, but it still stumbles over unique names, company jargon, or branded terms.
My advice? Don't get bogged down perfecting the transcript at this stage. You can double-click any word to fix it, but the goal here is just a quick pass to catch any glaring errors. The real fine-tuning is much easier once the captions are on the timeline.
Once you’ve given it a quick once-over, here comes the best part. Click the "Create captions" button (it's the little CC icon) at the top of the panel. Another box will appear, letting you set some ground rules for your captions, like the maximum length of a caption line and how long it should stay on screen.
Adobe is constantly improving these workflows. In fact, many of the recent updates to Adobe's AI-powered tools in Premiere Pro are focused on making exactly this kind of work faster and more intuitive.
With one last click, Premiere Pro automatically generates a brand-new caption track on your timeline, slicing up the entire transcript into perfectly timed segments. Just like that, you've gone from raw audio to a fully functional caption track in only a few minutes, ready for you to style and polish.
When to Use a Third-Party Service for Better Accuracy
Look, Adobe Premiere Pro’s built-in transcription tools have gotten pretty good over the years. For a straightforward talking-head video with clean audio, they can get the job done quickly. But let's be real—most projects aren't that simple.
When I’m staring down a long-form interview, dealing with thick accents, or trying to decipher audio with background noise and cross-talk, the native "Speech to Text" feature starts to show its cracks. The time I spend correcting errors and retiming lines quickly cancels out the initial convenience. That’s when I turn to a dedicated transcription service.
For those tougher jobs where accuracy is everything, my go-to is HypeScribe. I’ve found its AI consistently delivers a cleaner transcript, especially with multiple speakers or less-than-perfect audio. We're not talking about a small improvement here; it's the difference between a few quick proofreading passes and spending hours manually fixing every other line. This workflow has been a lifesaver on everything from complex corporate videos to documentaries shot in the field.
My HypeScribe-to-Premiere Workflow
Integrating an external service like HypeScribe into your Premiere project is simpler than you might think. Instead of transcribing inside Premiere, the first thing you'll do is export your primary dialogue track. A clean MP3 or WAV file is perfect. This gives the transcription AI just the speech, free from music and sound effects, which is crucial for getting the best results.
You then upload that audio file to HypeScribe. The turnaround is usually just a few minutes, even for longer files. What you get back is a transcript that’s shockingly accurate, even with challenging audio that would have stumped Premiere's native tool. The secret is that its AI is trained on a much broader and more difficult dataset, so it’s better equipped to handle real-world audio problems.
My philosophy is simple: let the right tool do the right job. By starting with a hyper-accurate transcript, you offload the most tedious work to a specialized service. This frees you up to focus on what matters in the edit suite—pacing, style, and storytelling—not just correcting typos.
Once the transcript is ready, you just need to export it as an SRT file. Think of the SRT as the universal key that brings everything back together, containing both the text and the precise timestamps for every single caption.
Bringing Your SRT Captions Into Premiere Pro
Getting that polished SRT file into your project is the easy part. Just import it like you would any other media (File > Import). Premiere instantly recognizes it as a caption file.
At its core, the workflow is a simple loop: audio out, text in. You're just outsourcing the heavy lifting to a more powerful engine.
Now, drag the imported SRT from your Project panel onto your timeline, placing it on a track above your video clips. A new caption track will appear, and voilà—your captions are on the screen, perfectly synced to the dialogue thanks to the timestamps baked into the SRT.
A couple of things to note once it's on the timeline:
- Format: Premiere will create the track using the modern "Subtitle" format. This is great because it unlocks all the powerful styling options in the Essential Graphics panel.
- Timing: Even with near-perfect transcription, you might want to adjust the cadence for readability. You can easily do this by dragging the edges of the caption blocks on the timeline, just like any other clip.
Deciding which workflow to use often comes down to the specific project's needs. Here's a quick breakdown of when I choose one over the other.
Premiere Pro Native vs HypeScribe Workflow Comparison
| Feature | Premiere Pro Native 'Speech to Text' | HypeScribe + SRT Import |
|---|---|---|
| Best For | Short-form content, clean single-speaker audio, quick turnarounds for drafts. | Long-form projects, interviews, multiple speakers, noisy audio, or when maximum accuracy is required. |
| Accuracy | Good, but struggles with accents, jargon, and poor audio quality. Often requires significant manual correction. | Excellent (99%+), even with difficult audio. Requires minimal proofreading. |
| Workflow | Fully integrated. Transcription happens directly on the timeline. | Export audio, upload to service, import SRT. Adds a couple of extra steps outside of Premiere. |
| Cost | Included with a Creative Cloud subscription. | Paid service, typically priced per minute of audio. |
| Speaker Detection | Can attempt to differentiate speakers, but often needs manual correction. | Advanced speaker identification is highly accurate. |
Ultimately, both workflows have their place. For a quick social clip, staying inside Premiere makes sense. But for any project where caption quality is a priority and my time is valuable, the HypeScribe-to-SRT method is my standard operating procedure. It consistently delivers better results and saves me from the headache of endless corrections.
How to Design Captions That Match Your Brand
Let's be honest: default captions are boring. They get the job done, but they won't help your videos pop. This is where we go beyond basic text and turn your Premiere Pro captions into a design element that actually reinforces your brand.
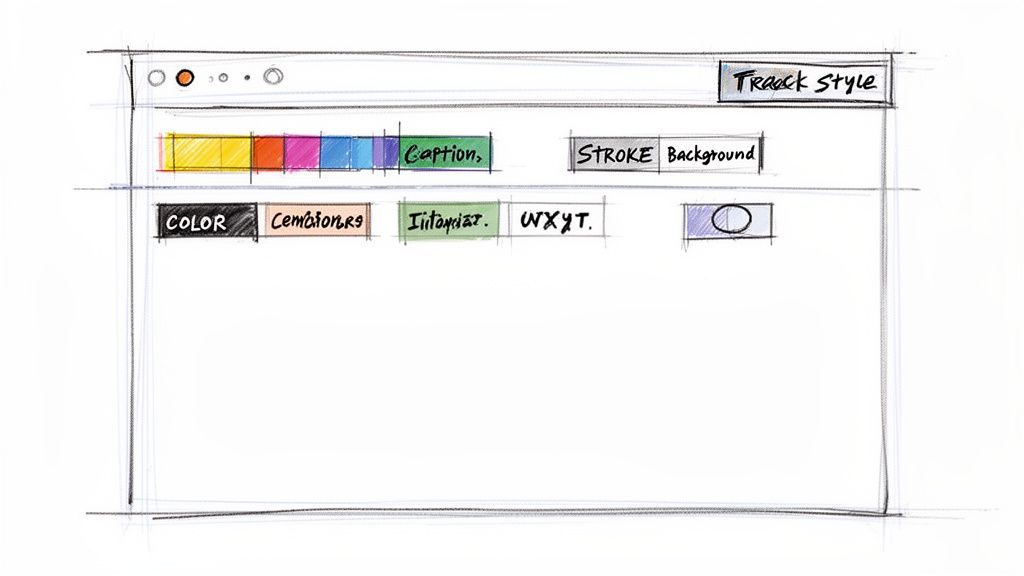
It all happens in the Essential Graphics panel. The moment you select a caption block on your timeline, this panel becomes your creative command center. Think of it as your chance to make every caption a deliberate part of your video's visual identity.
Customizing Your Caption Appearance
The first thing to do is ditch the default look. Over in the "Edit" tab of the Essential Graphics panel, you’ll find all the tools you need to take control. This isn't just about making captions readable; it's about making them look good.
For instance, something as simple as changing the font to your brand’s typeface can make a world of difference. You can also dial in your brand’s exact hex codes for the text color, instantly creating a more cohesive and professional feel.
Your captions are a visual extension of your brand. Treat them with the same design care you would your logo or lower thirds. Consistent styling makes your content instantly recognizable.
I always, always add either a background or a stroke (an outline around the letters). This is my personal non-negotiable for readability. A subtle, semi-transparent black background ensures your text is perfectly clear whether it’s over a bright sky or a dark, moody shot.
Saving Time with Track Styles
Styling every single caption manually is a fast track to a headache. That's why "Track Styles" are an absolute game-changer in the Premiere Pro captioning workflow.
A Track Style is basically a preset for your caption track. Once you’ve dialed in the perfect look on one caption—the right font, color, size, and background—you can save it as a master style.
Here’s the simple workflow I use:
- Perfect one caption: Select a single caption clip and use the Essential Graphics panel to get it looking exactly right.
- Create the style: At the top of the panel, find the "Track Style" dropdown and choose "Create Style."
- Name it and watch the magic: Give your new style a clear name, like "Brand Style - White on Black." Premiere will automatically apply that style to every single caption on that track.
This one move ensures total consistency. Better yet, if a client comes back with a change—say, they want a different font color—you just update the Track Style, and every caption updates instantly. It's a massive time-saver.
Understanding How Caption Formats Affect Styling
The secret to all this creative control lies in the caption format itself. When you generate captions in Premiere Pro, it defaults to the "Subtitle" format. This is exactly what you want, as it unlocks the full power of the Essential Graphics panel.
However, if you work in broadcast, you've probably dealt with older, more rigid standards. Closed caption formats like CEA-608 and the more modern CEA-708 have historically dictated the rules. In fact, industry reports show that nearly 70% of professional broadcast editors now prefer the CEA-708 format because it offers much more flexibility for styling and positioning than the ancient 608 standard. You can see a great breakdown of how these standards impact modern editing workflows on YouTube.
For most of us creating content for social media and the web, sticking with Premiere's "Subtitle" format is the best bet. It gives you the freedom to create the kind of rich, branded captions that grab attention online.
How to Export Your Captions Correctly
Alright, you’ve done the hard work. You've transcribed, timed, and styled your captions to perfection. Now for the final, crucial step: getting your video and captions out into the world.
How you export from Adobe Premiere Pro isn't just a technical setting; it's a strategic choice that depends entirely on where your video will be seen. This decision determines whether your captions are permanently burned into the video or if viewers can toggle them on and off.
Don't just gloss over this part. The data shows just how important captions have become. A massive 80% of viewers use them, and for many, it's not even about accessibility anymore. Over 65% simply prefer them for better focus and comprehension. This trend has even led YouTube to report that captioned videos see a 40% increase in views on average. Understanding your export options is key to meeting these modern viewer habits.
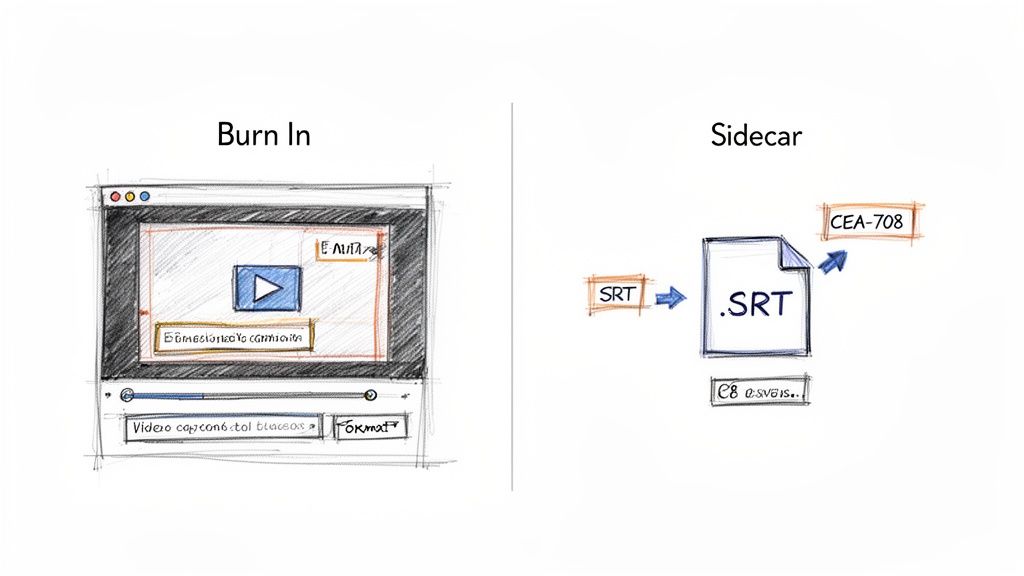
Choosing Between Burned-In and Sidecar Captions
When you open Premiere Pro's Export window, head straight to the "Captions" tab. This is where you’ll face the big decision: "Burn Captions into Video" or "Create Sidecar File."
Burn Captions into Video (Open Captions): This option basically flattens your styled text right onto the video frames, making them a permanent part of the picture. Think of them like a lower-third graphic. This is my go-to for social media platforms like Instagram, TikTok, or Facebook, where videos often autoplay on mute. If you want to grab attention immediately with your designed captions, burning them in is the only way to guarantee they'll show up and look exactly how you designed them.
Create Sidecar File (Closed Captions): This exports a separate text file—most commonly an SRT file—that contains all your caption text and timing information. This is the standard for platforms like YouTube and Vimeo, as it gives viewers control to turn captions on or off. The major tradeoff? The platform itself controls the styling, so all that beautiful design work you did in the Essential Graphics panel will likely be lost.
My rule of thumb: If the video is for social media and you spent time designing the look of your captions, burn them in. For platforms like YouTube or Vimeo, where viewer control is the norm, export a sidecar file.
A Quick Look at Advanced Export Formats
Beyond the common SRT file, you might run into other formats, especially if you're delivering for broadcast or specific streaming services. The two you might see are CEA-608 and CEA-708. These are closed caption standards that can be embedded directly into the video file instead of living as a separate file.
CEA-608: This is the old-school, legacy standard. It’s extremely limited in what it can do with styling, fonts, and placement. I'd only ever use this if a broadcaster specifically demanded it.
CEA-708: This is the modern standard for digital TV and streaming. It gives you far more flexibility with styling, colors, and opacity, making it the better choice if you need to embed styled closed captions.
For most online creators, a simple SRT file is the most versatile and widely supported option. If you want to get into the weeds of the format, we have a great guide that explains what an SRT file is and how it all works.
Ultimately, picking the right export setting is what ensures your accessible, engaging video shows up exactly as you intended for your audience.
Answering Your Top Premiere Pro Caption Questions
No matter how long you've been editing, captions in Premiere Pro can still throw you a curveball. I've spent countless hours troubleshooting these exact issues, so I've put together this quick-hit guide to solve the most common problems I see pop up. Think of this as the advice I'd give you if we were sitting in an edit bay together.
How Do I Fix Transcription Errors in Premiere Pro?
This is way easier than it looks. Once Premiere’s auto-transcription is done, that transcript lives in your Text panel. If you spot a typo or a misheard word, just double-click it directly in the panel and type your fix. It's that fast.
What about timing? If a caption appears too early or hangs on too long, you can adjust it right on your timeline. Just grab the edge of the caption clip and drag it, the same way you’d trim any other piece of media. For more complex fixes, like combining two short captions or splitting a long one, use the merge and split buttons at the top of the transcript panel.
A little pro tip I learned the hard way: always give the transcript one final proofread before you click "Create Captions." It saves a ton of headaches down the line.
Can I Have Multiple Caption Languages in a Project?
Absolutely, and it's a super common workflow for anyone creating content for a global audience. The trick is to create a separate caption track for each language you need. So, you'll have C1 for English, C2 for Spanish, C3 for French, and so on.
When you go to export, you can embed all of them into the file as closed captions. This lets viewers on platforms like YouTube simply toggle to their preferred language. The only catch is when you need burned-in (open) captions. Since those are part of the video itself, you’ll have to export a separate video file for each language you want burned in.
My Captions Look Different After I Export Them!
Ah, the classic problem. You've spent ages designing the perfect caption style in the Essential Graphics panel—custom font, drop shadow, a branded background color—only for it to vanish or look completely wrong in the final export.
This almost always comes down to a mismatch between your fancy styling and the technical limitations of your export format.
Here's the deal: if you want your custom styles to look exactly as they do in your timeline, you must choose "Burn Captions into Video" (Open Captions) when you export. This makes the text a permanent part of the video pixels.
If you export as a traditional Closed Caption file (like CEA-608), almost all of your styling will be stripped away to meet the format's old-school specifications. For a happy medium, the newer CEA-708 format can retain some styling while still being a toggle-able caption, but you're at the mercy of the platform or device playing it back.
When Premiere’s built-in tools are causing more work than they're saving—especially with tricky audio—it might be time to switch up your workflow. HypeScribe is designed to deliver incredibly accurate transcripts right from the start, saving you from that painful, word-by-word correction process. Stop fixing mistakes and get back to creating with a transcript you can actually trust. Find out how HypeScribe can overhaul your captioning process.


