Best Format for YouTube: The 2026 Upload Guide

You’ve finished editing. The cut looks clean, the audio sounds good, and you’re finally at the export screen staring at options that feel designed to punish beginners. MP4, MOV, H.264, bitrate, frame rate, AAC, VBR, CBR. One wrong click and you’re convinced your video will look soft, upload slowly, or get chewed up by YouTube.
That moment matters more than most creators realize.
The format for youtube isn’t just a technical box to tick before uploading. It shapes how your video looks on phones, laptops, TVs, and tablets. It affects how quickly YouTube processes your file. It influences whether viewers stay, skip, scrub around, or click away. And it extends beyond the file itself into thumbnails, descriptions, chapters, captions, and transcripts.
A lot of newcomers treat formatting like admin work. Experienced creators learn that formatting is part of the creative strategy. The export settings decide how polished your video feels. The aspect ratio decides how naturally it fits the feed. The description and chapters decide whether a viewer can find the answer they came for. Captions decide whether someone can follow along in a noisy office, on a train, or in a second language.
Why the Right YouTube Format Is Your Secret Weapon
A new creator usually asks one question first: “What settings should I export with?”
The better question is: “What kind of viewing experience am I creating?”
That shift changes everything.
If you upload in the wrong format, the result is rarely dramatic in an obvious way. Your video doesn’t burst into flames. It just performs a little worse. It may take longer to process. It may look slightly muddy after compression. Your thumbnail may be sharp, but the actual playback may feel less polished. Viewers don’t announce that they left because your export choices were sloppy. They just leave.
Format is part of the viewer experience
Think about two creators making the same tutorial. One uploads a properly encoded widescreen file with clear audio, readable captions, clean chapters, and a thumbnail that matches the video’s promise. The other uploads a mismatched file with cramped framing, weak text formatting, and no structure in the description.
Both may have good advice. Only one feels easy to watch.
Practical rule: Viewers rarely praise formatting directly, but they constantly react to it through watch behavior.
That’s one reason format choices are strategic. You’re not only preparing a file for YouTube. You’re reducing friction for the person on the other side of the screen.
Format also affects what kind of content works
Creators often chase trends without noticing that different formats serve different goals. In Q1 2024, long-form YouTube videos averaged 1,500 views per video, while Shorts averaged 650 views per video, according to Statista’s comparison of top YouTube formats by average views. That doesn’t mean Shorts are useless. It means format should match the job.
A short vertical clip can earn fast exposure. A longer tutorial can build trust, depth, and search value. If you’re still learning the platform side of publishing, a practical walkthrough like this complete guide on how to post on YouTube helps connect the export step to the rest of the publishing workflow.
Good formatting supports growth quietly
A strong format strategy helps in three places:
- Playback quality: Your video stays crisp after upload and reprocessing.
- Discoverability: Your aspect ratio, thumbnail, title support, and description formatting help the right viewer notice and understand the video.
- Accessibility: Captions, transcripts, and chapters make the content useful to more people.
That’s why format isn’t boring. It’s a powerful tool. A beginner sees settings. A seasoned creator sees outcomes.
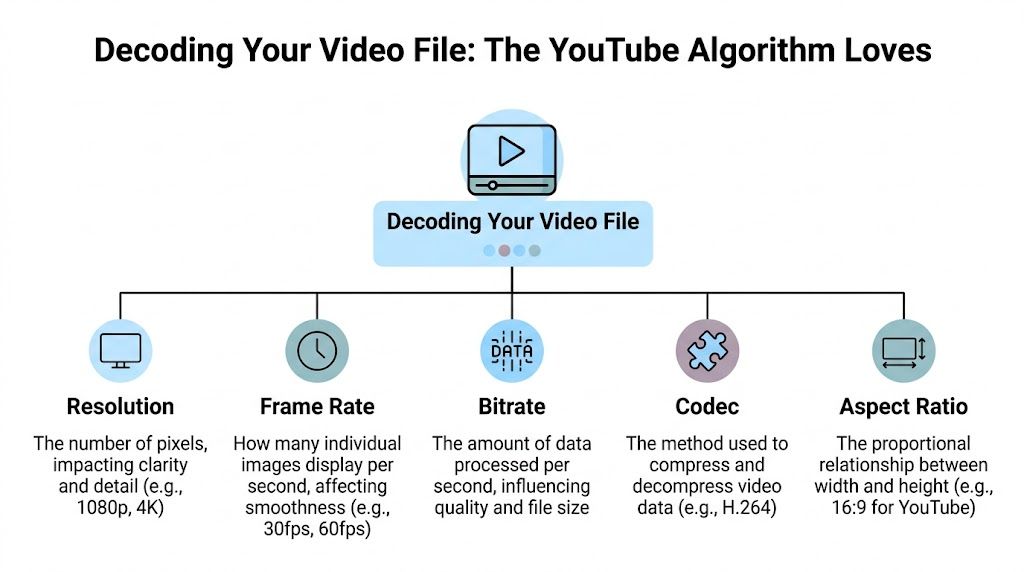
Decoding Your Video File The YouTube Algorithm Loves
You export a video that looks sharp in your editor. After upload, it comes back softer, takes longer to process than expected, or sounds slightly off on some devices. That usually is not an algorithm mystery. It is a file format decision.
A video file looks like one item on your desktop, but it is really a small system of parts working together. Once you know what each part does, the export menu starts to make sense, and your choices become strategic instead of guesswork.
Your file works like a shipped package:
- The container is the box that holds everything together.
- The codec is the packing method for the video.
- The audio codec is the packing method for the sound.
For YouTube, the safest standard package is MP4 with H.264 video and AAC-LC audio.
The box matters, but the packing method matters more
An MP4 file is the box. It carries the video stream, audio stream, and metadata in a format YouTube reads well across devices and browsers.
The H.264 codec is how the video is compressed inside that box. Beginners often hear “compression” and assume it means visible damage. A better way to read it is this: compression decides how to keep the detail viewers notice while trimming data they will not miss. The goal is not just a smaller file. The goal is a file YouTube can process efficiently without sacrificing the viewing experience.
The AAC-LC audio codec handles the sound side of that job. It keeps speech, music, and effects in a standard format YouTube can ingest reliably, which helps avoid odd playback issues after re-encoding.
Why YouTube prefers familiar file structures
Creators keep returning to MP4 and H.264 for a practical reason. As explained in Uppbeat’s breakdown of video formats, this pairing is widely used because it balances compression and compatibility well.
That balance matters because YouTube does not only host the exact file you upload. It ingests it, processes it, then creates multiple versions for different screens, internet speeds, and playback conditions. If your original file arrives in a format YouTube already handles cleanly, processing tends to be more predictable. That can mean fewer surprises with quality, fewer compatibility hiccups, and a smoother path from upload to publish.
A clean source file helps your video travel well.
What each file part changes for the viewer
A lot of beginner frustration comes from mixing up settings that solve different problems. Here is the plain-English version:
- Resolution affects visible detail.
- Frame rate affects how motion feels.
- Bitrate affects how much visual information is available each second.
- Codec affects how efficiently that information is packed.
- Aspect ratio affects the shape of the frame.
These settings work together, not separately. Resolution is a good example. A 4K file sounds impressive, but if the bitrate is too low, that extra pixel count does not buy you much. It is like printing a giant poster from a blurry photo. The canvas is bigger, but the source detail is still limited.
Codec choice works the same way. Two files can have the same resolution and frame rate, yet one holds up better after upload because its compression method preserved detail more effectively before YouTube touched it.
A reliable baseline for beginners
If you want a starting point that works for most standard uploads, use this checklist:
- Container: MP4
- Video codec: H.264
- Audio codec: AAC-LC
- Aspect ratio: Match the content type, often 16:9 for standard YouTube videos
- Resolution and bitrate: Choose based on your footage quality and publishing goal
If you want a clearer explanation of why some file types behave better online than others, this guide to the best video format for online publishing gives useful background in plain language.
Good format choices support growth in subtle ways. They help YouTube process your upload cleanly, help viewers get stable playback, and give your content a stronger starting point before titles, thumbnails, chapters, and captions do their part.
Choosing the Best Export Settings for Quality and Speed
Resolution, frame rate, and bitrate are the three dials that matter most during export. If codecs are the packing method, these are the choices that determine how much detail you keep and how heavy the package becomes.
Most creators get stuck because all three sound equally important. They aren’t. They solve different problems.
Resolution decides how detailed the image can be
Resolution is the pixel count of your video, such as 720p, 1080p, or 4K. More pixels usually mean more detail, but only if the footage was captured well and exported with enough bitrate to support it.
For many channels, 1080p is the practical baseline. It looks good, exports reasonably fast, and doesn’t produce oversized files. 4K can make sense when your source footage is high quality, your subject has lots of fine detail, or you want extra room to crop in editing.
A useful mindset is this: resolution sets the ceiling for sharpness. It doesn’t guarantee sharpness by itself.
Frame rate decides how motion feels
Frame rate affects motion. 24 fps feels more cinematic. 30 fps feels natural for most talking-head videos, tutorials, interviews, and educational content. 60 fps is helpful when the motion itself matters, such as gaming, sports, fast demonstrations, or screen recordings with lots of cursor movement.
A common beginner mistake is exporting everything at a higher frame rate just because it sounds better. If your footage was recorded at 30 fps, exporting at 60 fps won’t magically improve it. It usually just creates a larger file.
Match your export frame rate to your source footage unless you have a specific reason to change it.
Bitrate is the quality-to-file-size trade-off
Bitrate is where many creators either overshoot or sabotage themselves. It controls how much data your file uses every second. More bitrate usually means better retained detail, but it also means larger files and slower uploads.
YouTube’s official guidance creates a useful anchor. According to YouTube’s recommended upload encoding settings, standard frame rate bitrate recommendations range from 1 Mbps at 360p to 35 to 45 Mbps at 4K, and a one-hour 1080p video at the recommended 8 Mbps generates a file around 3.6 GB.
That one number is enough to show why bitrate isn’t just a quality setting. It directly affects upload time, processing time, and storage.
YouTube recommended bitrate for SDR uploads
ResolutionStandard Frame Rate (24, 25, 30 fps)High Frame Rate (48, 50, 60 fps)360p1 Mbps1.5 Mbps480p2.5 Mbps4 Mbps720p5 Mbps7.5 Mbps1080p8 Mbps12 Mbps1440p16 Mbps24 Mbps2160p (4K)35 to 45 Mbps53 to 68 Mbps
How to choose settings by video type
Different videos benefit from different priorities.
Talking-head videos usually don’t need extreme frame rates. Clean audio, stable lighting, and a sensible bitrate matter more than pushing every spec upward.
Tutorials and screen recordings often benefit from extra clarity because text and cursor movement need to stay readable. In those cases, a stronger resolution choice and careful bitrate setting can help.
Fast-moving footage benefits from higher frame rates when the motion is part of the value.
Here’s a simple way to decide:
- Pick 1080p when you want dependable quality without huge files.
- Choose 4K when your source supports it and detail matters.
- Stick to 30 fps for most educational, business, and commentary content.
- Use 60 fps only when smoother motion helps the viewer understand what’s happening.
- Follow YouTube’s bitrate ranges instead of guessing wildly high.
Speed versus polish is a real trade-off
Creators often ask whether they should lower quality to upload faster. The answer is usually no, but you also don’t need to export absurdly large files. A balanced file gives YouTube enough information to work with without wasting hours in upload and processing.
If you’re comparing export choices and want a broader explanation of why some files move through publishing workflows more smoothly than others, this article on the best video format for online workflows is a helpful companion read.
The goal isn’t the biggest file. It’s the cleanest file that makes sense for the viewer and your workflow.
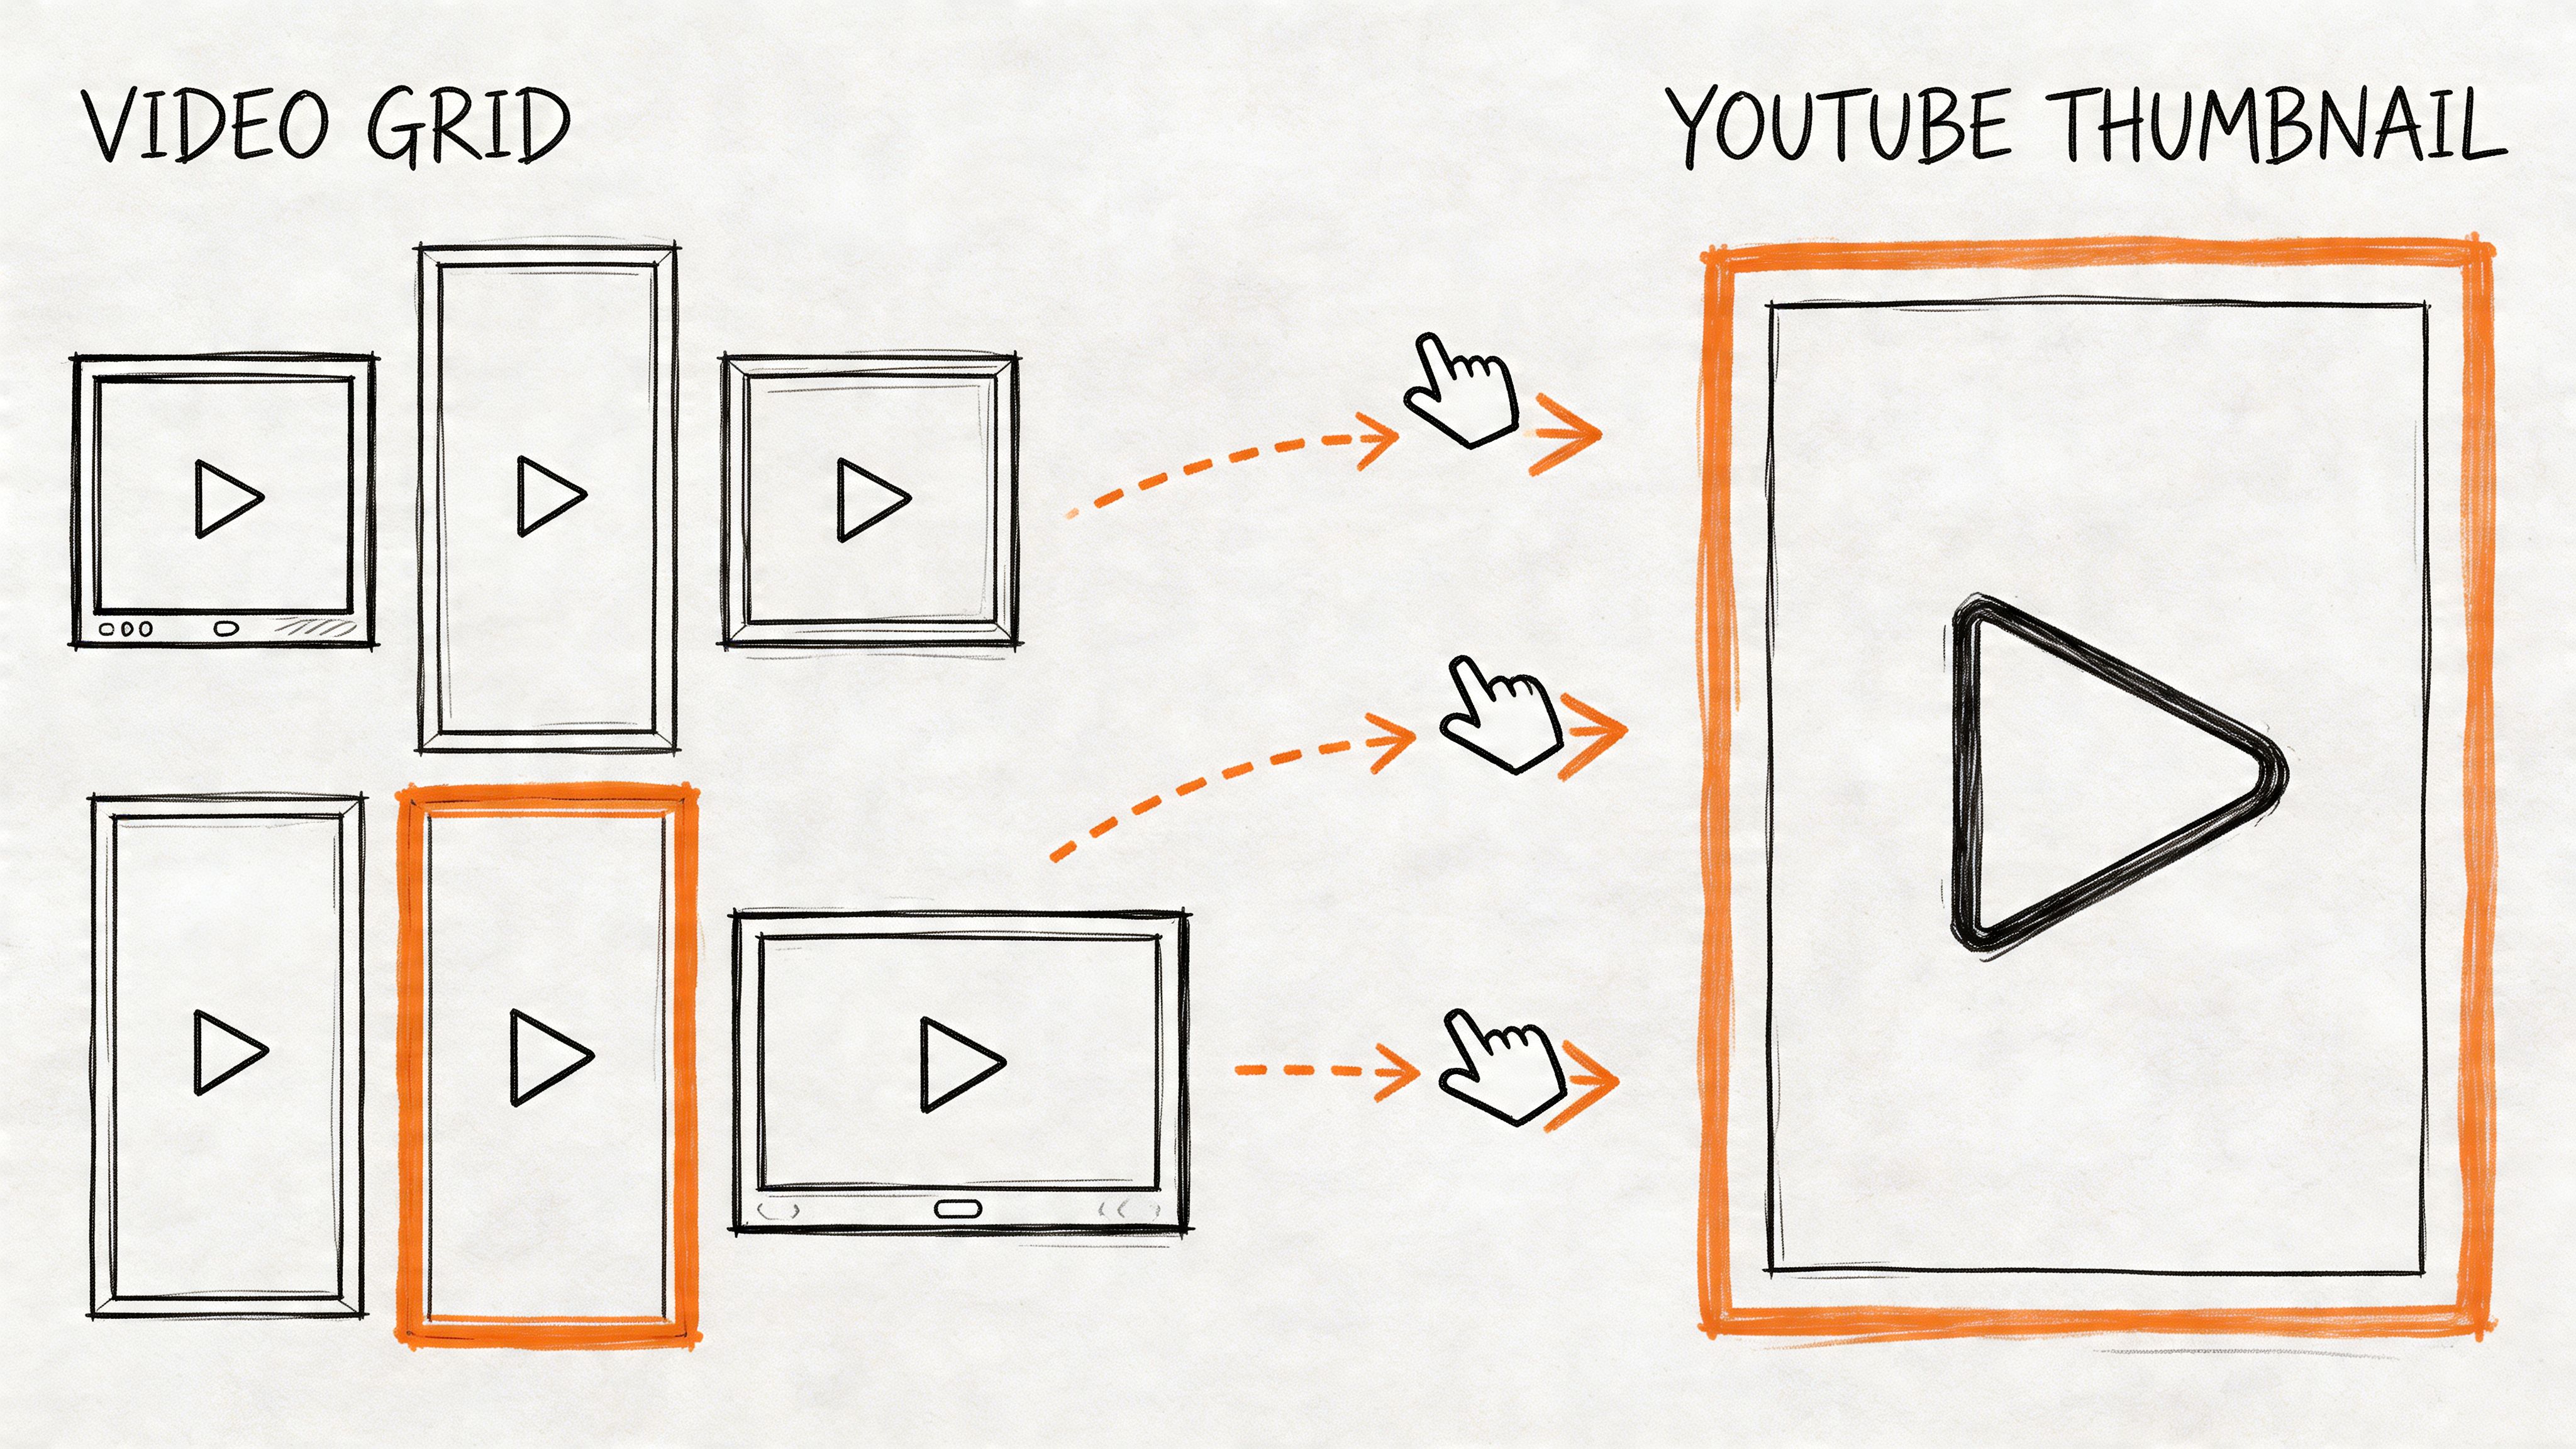
Mastering Aspect Ratios and Thumbnails for Clicks
A video can be perfectly exported and still struggle if it’s framed for the wrong viewing context. Aspect ratio decides how your content fits the screen before a viewer ever judges the content itself.
For standard YouTube videos, 16:9 is the familiar widescreen shape. It fits desktop playback, TV viewing, and most horizontal embeds naturally. For Shorts, 9:16 is the vertical format that fills a phone screen.
That difference sounds cosmetic. It isn’t.
When to use 16 by 9 and when to use 9 by 16
A tutorial, interview, webinar, review, or screen-share usually belongs in 16:9. It gives you room for faces, slides, product shots, and screen capture without crowding the frame.
A quick tip, reaction, teaser, product snippet, or compact lesson often works better in 9:16 because it feels native on mobile. YouTube Shorts reached 90 billion daily views by 2024, according to Zelios’ overview of short-form video growth. That’s why understanding vertical framing matters. If you ignore it, you limit how naturally your content fits one of YouTube’s biggest discovery surfaces.
Shoot with repurposing in mind
If you want one recording session to feed both long-form and Shorts, compose more carefully while filming.
A few habits help:
- Leave headroom and side space: This gives you room to crop a horizontal shot into vertical later.
- Keep key text centered: Text at the far edges often gets lost when cropped for Shorts.
- Avoid clutter near frame edges: What looks balanced in 16:9 can become awkward in 9:16.
If you use tools for planning clips, edits, and post assets together, this roundup of social media content creation tools can help you build a cleaner repurposing workflow.
Your aspect ratio should match the place where people will first encounter the content, not just the way you prefer to edit.
Thumbnails are part of the format for youtube
Many beginners separate file formatting from thumbnail design. On YouTube, they work together. Your thumbnail is the packaging visible in search, suggested videos, and home feeds. If the frame shape and thumbnail message fight each other, the click suffers.
A strong thumbnail usually does three jobs:
- Signals the topic fast
- Creates curiosity without confusion
- Stays readable at small sizes
Keep the design simple. One idea, one focal point, very little text. If you want sharper practical examples, this guide on how to master eye-catching thumbnails is worth studying because it focuses on making thumbnails readable and clickable instead of just flashy.
A thumbnail doesn’t need to look “designed.” It needs to look understandable.
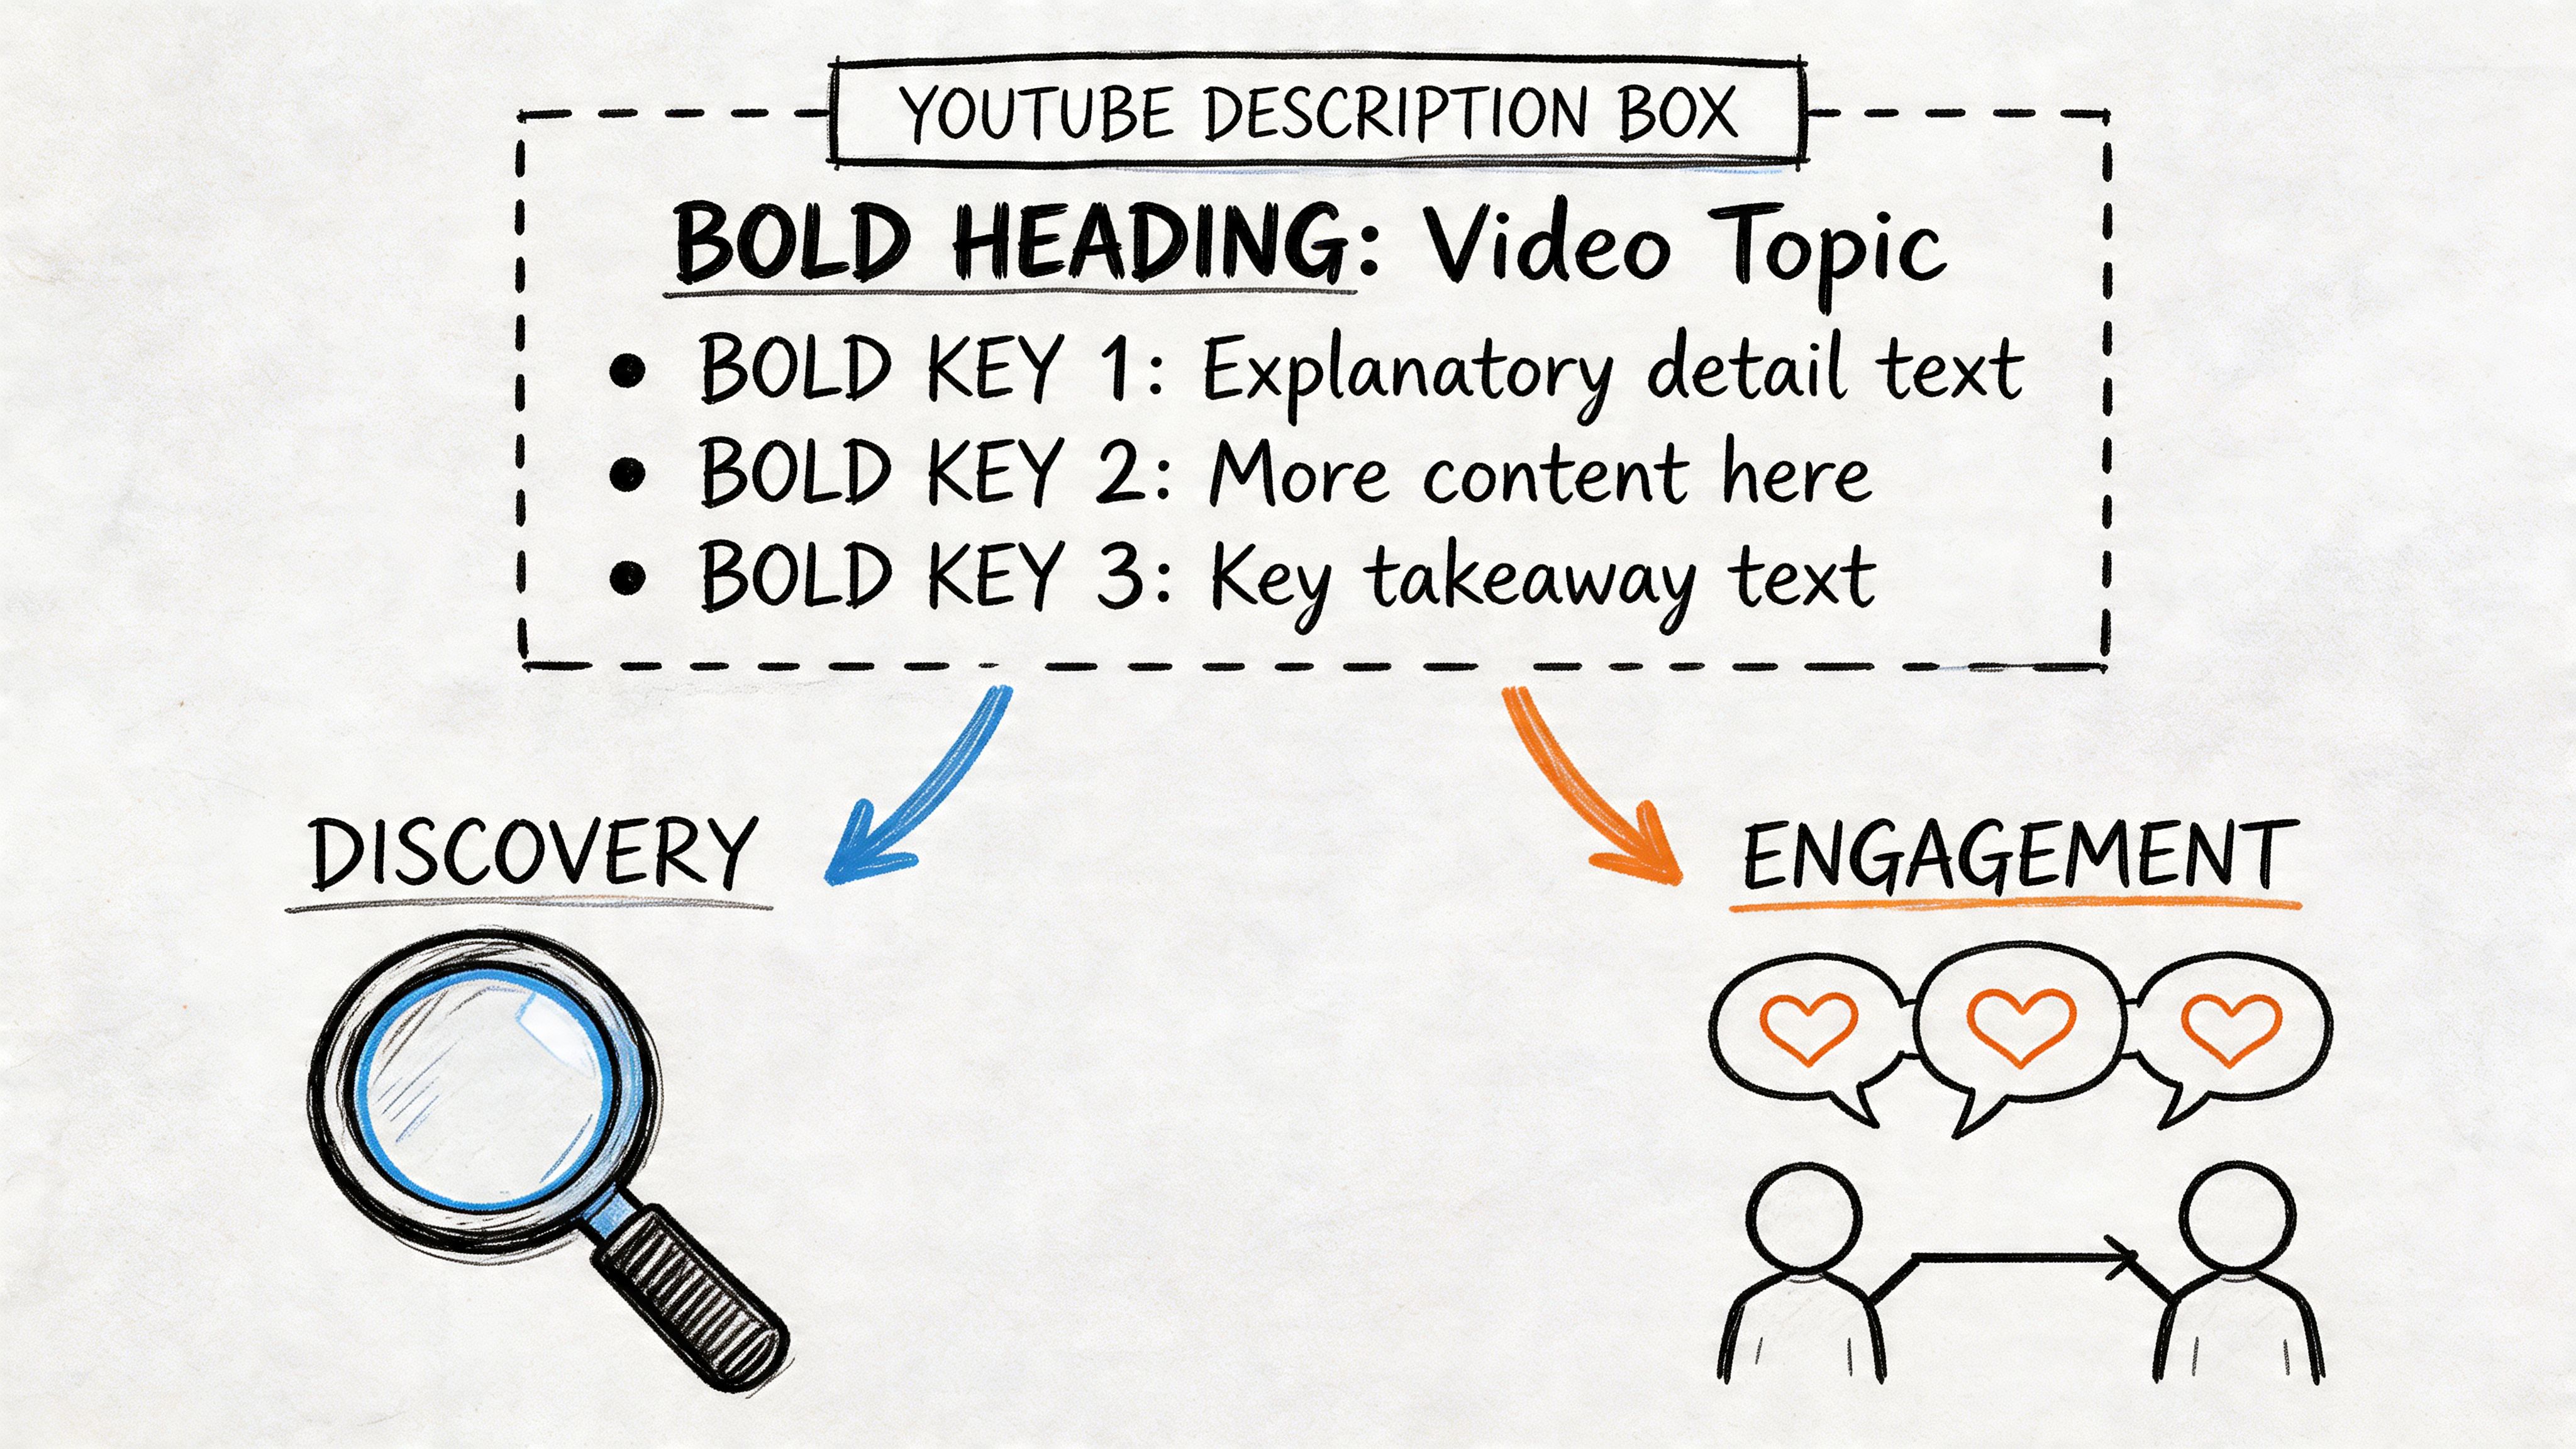
How to Format Descriptions for Discovery and Engagement
A lot of creators spend hours perfecting the edit and then type a rushed description in under a minute. That’s backwards. The text around your video helps viewers decide whether your content is relevant before they commit to watching.
When broad categories are crowded, smaller sub-niche searches become more valuable. Syllaby’s discussion of low-competition YouTube niches notes that properly formatted descriptions and video chapters help creators capture long-tail traffic by making it easier for viewers to find specific answers within broader topics.
Write the first lines for humans first
The opening lines of your description do heavy lifting. They should tell the viewer what the video helps them do, who it’s for, and why it’s worth their time.
Good opening description copy tends to include:
- A direct promise: What problem the video solves
- A clear context clue: Who the video is for
- A natural keyword mention: The phrase someone might have searched for
For example, if your video teaches export settings, your first lines might mention format for youtube, exporting from Premiere Pro, and reducing blurry uploads. Not by stuffing terms. Just by being precise.
A simple description structure that works
Use a predictable layout so people can scan it:
- Hook and topic summary in the first lines
- Short supporting context about what the viewer will learn
- Chapters
- Relevant links or resources
- Extra notes, if needed
That structure helps both search visibility and viewer confidence. A clear description tells people they’ve found the right video.
How to create chapters correctly
Chapters are one of the most overlooked formatting tools on YouTube. They make longer videos feel less intimidating and more useful. For the viewer, chapters act like bookmarks. For the creator, they improve navigation and help your video serve multiple search intents.
Use timestamps like this:
- 0:00 Intro
- 0:42 MP4 vs MOV
- 2:10 Best H.264 settings
- 4:03 Bitrate mistakes
- 6:20 Thumbnail formatting tips
A few practical rules matter:
- Start with 0:00
- List timestamps in chronological order
- Write labels that explain the benefit, not just the segment name
- Keep chapter names short enough to scan quickly
A chapter titled “Fix blurry uploads” is more useful than one titled “Bitrate section.”
This walkthrough shows how creators commonly structure descriptions and timestamps in practice:
Chapters make long videos feel easier to use
Viewers don’t always watch linearly. They jump to the exact moment that solves their problem. That isn’t a failure. It’s often a win. If your video helps someone quickly, they’re more likely to trust your channel and return later for a full watch.
That’s especially useful in crowded topics where many creators cover the same broad subject. Better formatting helps your version feel more useful.
Generating Captions and Transcripts to Broaden Your Reach
Captions are often treated like a final checkbox. They’re much more than that. Good captions make your video easier to understand, easier to search, and easier to use in more situations.
A viewer may be watching in a loud café, in an office with the sound low, or in a language that isn’t their first. Captions support all of those cases. They also help when your content includes technical terms, names, product labels, or fast speech that listeners might miss.
Auto-captions are a starting point, not the finish line
YouTube’s automatic captions can be useful as a draft, but they often struggle with:
- Industry terminology
- Speaker names
- Accents
- Punctuation
- Timing that feels natural to read
That matters because captions aren’t only about having words on screen. They need to be readable at the pace people can follow. Bad captions create friction. Good captions disappear into the viewing experience.
Transcript files give you more control
When you upload a proper caption file such as SRT or VTT, you get more control over accuracy and timing. That usually leads to a cleaner result than relying on whatever YouTube guesses from the audio.
A transcript also gives you useful material beyond captions. You can turn it into:
- Show notes
- Blog summaries
- Quote snippets
- Email content
- Searchable internal documentation
That matters for educators, researchers, consultants, and teams who need to reuse spoken content instead of letting it vanish inside a video file.
A faster workflow for YouTube transcripts
If you don’t want to type captions manually, one option is to use a transcription tool that accepts a YouTube link and generates text you can export in caption-friendly formats. HypeScribe does that with YouTube URLs, then lets users export transcripts in formats such as Docs, Word, PDF, TXT, and Markdown, or work from the generated text to build captions and summaries. If you’re editing caption timing after the transcript stage, this guide to working with Premiere Pro captions is a practical next step.
Accurate captions help three audiences at once: people who need accessibility support, people who prefer reading while watching, and people who are trying to locate specific information quickly.
Why captions belong in your format strategy
Captions aren’t separate from the format for youtube. They’re part of how the video is delivered and understood.
A well-formatted upload with weak captions still leaves value on the table. A properly captioned video becomes easier to reference, easier to reuse, and easier to understand across a wider range of viewing conditions.
That’s why experienced creators don’t ask, “Should I add captions?”
They ask, “What’s my most efficient way to make them accurate?”
Troubleshooting Common YouTube Format and Upload Issues
Even when your export settings are solid, YouTube can still produce moments that make you think something broke. Usually, there’s a normal cause behind it.
Black bars on the sides or top
If your video has black bars, the file shape and the content inside it don’t match. Side bars usually mean vertical footage was placed inside a horizontal frame without proper reframing. Top and bottom bars often mean horizontal footage was forced into a different canvas.
Fix it in the editor, not after upload.
- Check sequence settings: Match the timeline aspect ratio to the intended upload format.
- Scale footage intentionally: Don’t just drop clips into a mismatched sequence and hope YouTube sorts it out.
- Preview on a phone and desktop: A frame that looks acceptable on one screen can look awkward on another.
The video looks blurry right after upload
This is one of the most common beginner panics. In many cases, your file is fine. YouTube processes lower-quality playback versions first, then higher-quality ones later.
The fix is often patience.
Wait for processing to finish before judging the quality. If the blur remains long after processing, then check whether your export bitrate, resolution, or source footage quality was too low.
Audio is out of sync
Audio sync issues often come from timeline mismatches, variable frame rate source clips, or glitches introduced during export.
Try this sequence:
- Check the original file before upload to see whether the problem already exists.
- Confirm your timeline settings match your footage.
- Re-export with standard settings if the source was captured in a less stable format.
- Avoid stacking too many conversion steps between recording and final export.
Processing failed or the upload stalls
This usually points to a file issue rather than a content issue. The file may be corrupted, exported in an unusual format, or interrupted during upload.
A practical recovery path looks like this:
- Re-export as MP4 with H.264 and AAC-LC
- Use a local file rather than a cloud-synced temporary file
- Rename the file
- Try a fresh upload after confirming the exported file plays correctly on your computer
Most YouTube format problems come from mismatches. Wrong canvas, wrong frame rate, wrong export assumptions, or too much trust that the platform will fix messy source files for you. Clean choices upstream prevent hours of frustration later.
If you want your YouTube videos to be more than watchable, if you want them searchable, reusable, and easier to caption, HypeScribe can help turn spoken video into clean text you can use for transcripts, summaries, notes, and caption workflows. It fits especially well when your publishing process includes long tutorials, interviews, lectures, or repurposed video content.


