Master Recording with iPhone: Pro Tips for 2026

A source agrees to talk, but only for five minutes while walking between meetings. A client asks for a quick screen demo before the end of the day. A lecturer starts covering the exact material you'll need later, and your notebook is nowhere near enough. In those moments, recording with iPhone stops being a convenience and becomes your production kit.
That's why I treat the iPhone less like a phone and more like a field recorder that happens to fit in a pocket. Used carelessly, it gives you thin audio, shaky footage, clipped speech, and a pile of files you never revisit. Used well, it can handle interviews, lectures, voice notes, tutorials, reference video, and rough-cut content that's good enough to publish or pass into a professional workflow.
What is often missed is what happens after capture. A recording isn't useful just because it exists. It becomes useful when you can search it, quote it, summarize it, and pull action items from it without re-listening to everything from the start.
Your iPhone Is a Professional Recording Studio
An iPhone earns its place in a professional kit because it is fast, reliable, and almost always within reach when a usable recording matters more than a perfect setup.
On quick-turnaround jobs, that changes the outcome. I use the phone for street interviews, client walk-throughs, reference footage, pickup narration, and spoken notes that need to become something useful later, not just sit in the camera roll. The advantage is not that it matches every dedicated recorder or camera. The advantage is that it captures the moment cleanly enough to survive editing, review, and transcription.
Field rule: The best mobile recording setup is the one you can start in seconds and trust later.
Professional results usually come from a few repeatable habits.
- Get the phone close to the source: Distance hurts clarity faster than almost any setting can fix.
- Keep the device stable: A braced grip, a wall, or a small support usually does more for quality than fancy movement.
- Record with the end use in mind: Clear speech, simple file naming, and a quiet opening save time when the file needs to be transcribed, searched, summarized, or clipped.
That last point separates useful recordings from forgotten ones. If your goal is a podcast segment, meeting recap, interview quote bank, or searchable lecture archive, capture is only step one. The file has to hold up when you hand it to an editor, run it through transcription, or pull action items into a knowledge system. That is also why a workflow built around spoken content helps. This guide on podcasting with iPhone is a solid companion if you need repeatable mobile recording habits that feed a publishing pipeline.
Even niche recording communities arrive at the same basics. The setup advice in these EVP app best practices applies far beyond paranormal use because the fundamentals stay the same: control noise, handle the mic consistently, and monitor what you capture.
Used that way, the iPhone stops being a backup device. It becomes the first link in a workflow that turns live moments into transcripts, summaries, decisions, and publishable content.
Mastering High-Quality Audio on Your iPhone
Audio quality determines whether an iPhone recording stays useful after capture. If the speech is clear, you can transcribe it, search it, summarize it, and pull action items from it. If the speech is distant or smeared by room echo, every step after recording gets slower.
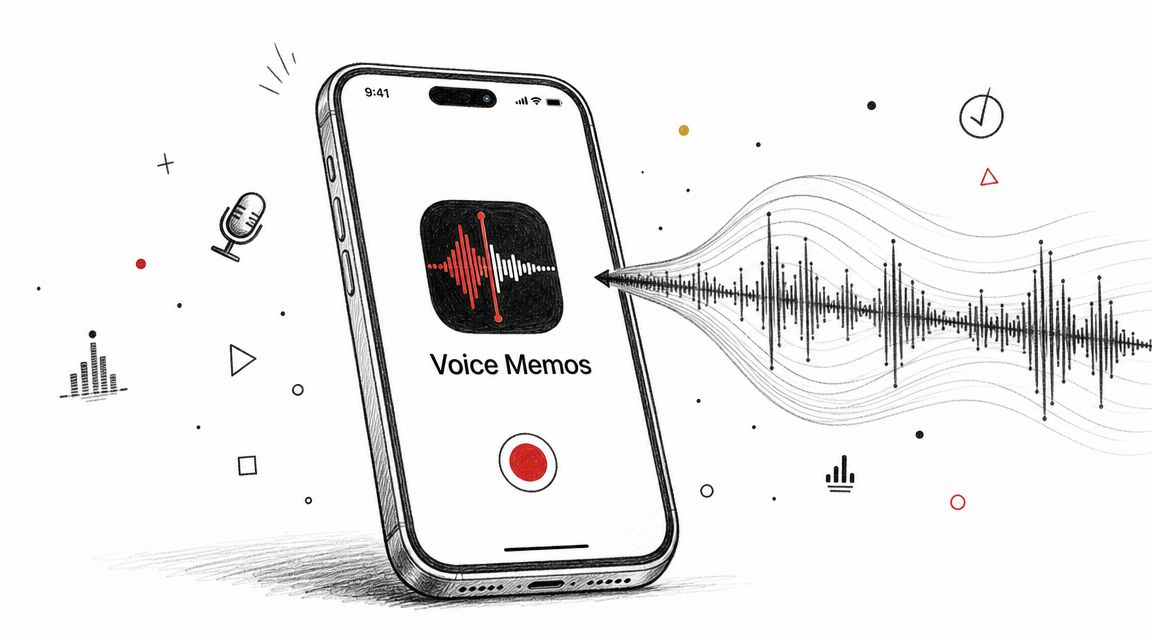
Start with Voice Memos the right way
Voice Memos is good enough for real work if you treat it like a capture tool instead of a scratchpad. I use it for interviews, field notes, approval feedback, and quick spoken recaps that need to become text later. It records fast, saves fast, and gives you enough editing control to clean up the file before it leaves your phone.
A few habits make a visible difference:
- Set your position before you speak: The first seconds often carry names, context, and the reason for the recording. Don't waste them on handling noise.
- Leave a second of clean room tone: That quiet lead-in helps with trimming and makes the opening easier to review.
- Control distance first: On iPhone, mic placement does more than settings do. Move the phone closer and the recording usually improves immediately.
- Trim right after the take: Remove dead air, false starts, and table bumps while the session is still fresh.
If your iPhone offers voice-processing options such as Voice Isolation in supported contexts, use the speech-focused setting in noisy offices, cafés, and event spaces. It usually gives spoken audio a cleaner starting point than a wider ambient capture.
If the goal is usable speech, record closer than feels polite, then back off only if the sound gets harsh.
Built-in mic versus external mic
The built-in mic works well in a quiet room, especially for solo notes or backup capture. It falls apart faster once the room gets reflective, the speaker turns away, or you need the file to hold up under transcription.
Here's the practical trade-off:
| Mic option | Best use | Main advantage | Main risk |
|---|---|---|---|
| Built-in iPhone mic | Fast notes, backup capture, quiet rooms | Always available | Picks up room sound quickly |
| Lavalier mic | Interviews, presenters, walking pieces to camera | Keeps mic close to mouth | Fabric rustle if poorly placed |
| Shotgun mic | Directional pickup in front of camera | Better focus on subject | Less forgiving if framing shifts |
| Desktop USB-C mic | Voiceovers, remote calls, desk tutorials | Stable spoken-word quality | Not mobile |
The three external mic types that solve real problems
Lavalier mics for interviews and lectures
A lav mic is the fastest way to improve spoken-word recording on iPhone. Clip it high on the chest, keep it clear of jewelry and jacket edges, and listen for fabric noise before recording begins.
Lavs are strong when consistency matters more than speed. Interviews, lectures, internal training, and client explainers all benefit because the mic-to-mouth distance stays steady. That steadiness also helps transcription tools separate words cleanly, which means fewer corrections later.
Shotgun mics for run-and-gun recording
Shotgun mics help when the phone stays pointed at the subject and you want cleaner front-facing pickup without putting a mic on the person. They fit handheld reporting, simple documentary work, and sideline coverage where you need to capture winning game moments without building a full audio rig.
The trade-off is precision. Aim matters. If framing shifts or the speaker moves off-axis, the audio changes right away.
Desktop USB-C mics for controlled narration
For narration, screen tutorial commentary, and desk-based voice notes, a USB-C mic gives the most repeatable results. It reduces room variability and makes retakes match more closely.
Consistency matters even more if the recording is headed into a content pipeline. To keep spoken files even and easier to process afterward, use a workflow built around automatic sound leveling for spoken recordings. Clean, steady levels make transcripts easier to review and make summaries more reliable.
Small habits that prevent ruined takes
Good mobile audio usually comes from restraint, not gear.
- Put the phone in Airplane Mode when you can: Interruptions break concentration and can wreck a strong take.
- Pick the room before you pick the app: Curtains, carpet, and soft furniture beat glass and bare walls.
- Check the first lines with headphones if possible: A moving waveform does not confirm clean audio.
- Run a backup for anything you cannot repeat: A second phone or recorder in the room is cheap insurance.
- Name the file clearly right away: “Client kickoff May 24” is useful. “New Recording 47” is not, especially once the file goes to transcription or into HypeScribe for summaries and action items.
Editing can clean up edges. It cannot restore missing detail from a distant mic, heavy echo, or clipped speech. Get the source right, and the rest of the workflow gets easier.
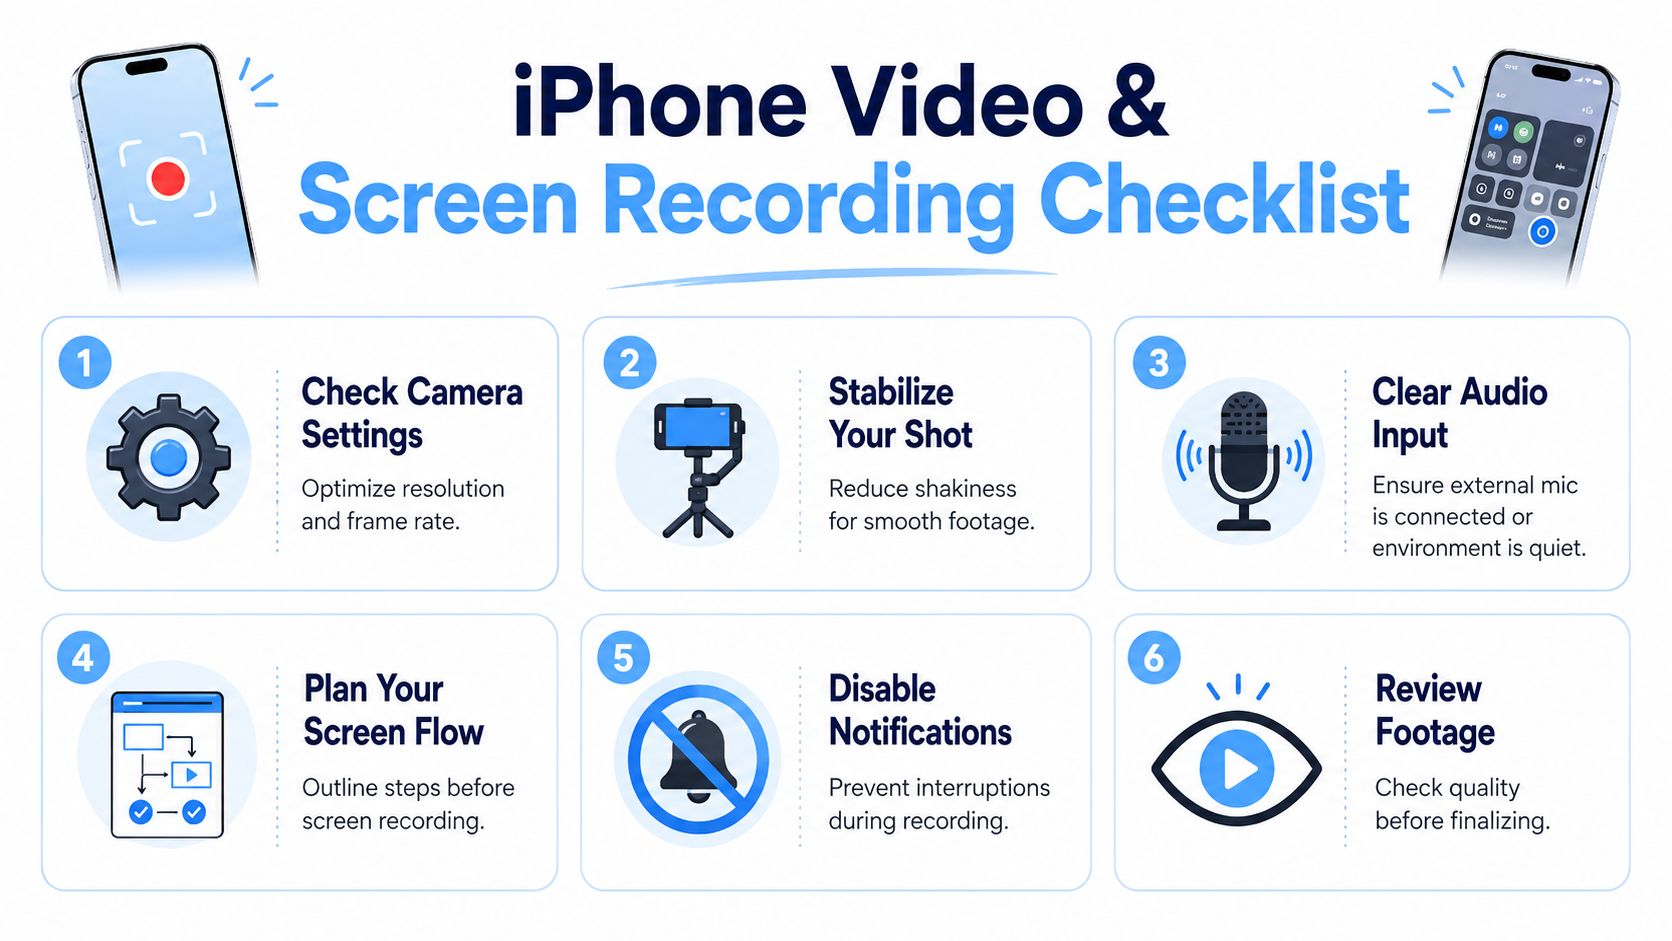
Capturing Polished Video and Screen Recordings
Video on iPhone is easy to start and surprisingly easy to get wrong. Most weak footage comes from three avoidable mistakes: unstable framing, bad light placement, and recording before the shot has been simplified.
What makes iPhone video look intentional
Professional-looking footage rarely comes from complicated camera moves. It comes from control.
Start with these decisions:
- Pick resolution based on use: If you need editing flexibility, cropping room, or archive quality, record higher. If speed and lighter files matter more, reduce that burden.
- Choose frame rate for the job: Match the feel you want and stay consistent within the project.
- Lock your body before you lock your shot: Lean against a wall, brace elbows, or use a tripod. Stability reads as quality immediately.
- Simplify the background: A plain wall, window light, or clean office corner often beats a busy space.
If you shoot people, face them toward soft light whenever possible. Window light from the front or slight side angle usually looks better than overhead room light. If the subject is backlit and the face is dim, move them or move yourself.
For creators who want more dynamic sports footage or highlight clips, studying how professionals capture winning game moments is useful because the same fundamentals apply on iPhone: anticipate action, stabilize the frame, and protect audio even when visuals are fast.
A quick visual walkthrough helps before you record your own clips:
A practical setup for talking-head and b-roll shots
For a simple talking-head recording with iPhone:
- Place the phone at eye level.
- Step back enough to avoid the distorted “too close” look.
- Clean the lens.
- Record a short test and replay it with headphones.
- Keep takes organized by topic, not by “one long roll.”
For b-roll, slow down physically. Most shaky iPhone footage happens because people move as if they're taking snapshots. Video needs a slower body rhythm. Pan less than you think. Hold each shot a bit longer than feels natural.
Good mobile video is usually boring while you're shooting it. That's a compliment.
Screen recording without silent failures
Screen recording is one of the most useful built-in iPhone tools for tutorials, bug reports, walkthroughs, and quick product demos. The common failure is simple: the capture works, but the narration is missing.
To screen record with audio, you must add Screen Recording to Control Center in Settings, then long-press the Screen Recording icon to reveal and activate the microphone toggle before starting, as described in this screen recording guide.
That workflow matters because microphone capture is not something you should assume is on.
Screen recording checklist
- Add the control first: If Screen Recording isn't in Control Center, fix that before anything else.
- Long-press before recording: That's where the microphone toggle appears.
- Turn off notifications: Pop-ups ruin tutorials and client demos.
- Rehearse the app flow once: Hesitation and wrong taps are more distracting on screen than on camera.
- Mind your voice distance: The same guide notes a useful iPhone principle for voice capture. Recording level is affected by mic distance, so don't crowd the phone and cause distortion.
What doesn't work is trying to narrate casually in a noisy room while tapping through an app for the first time. If the screen flow matters, script the order of taps on paper first.
Solving Advanced iPhone Recording Scenarios
A client calls while you are away from your desk, or an interview suddenly grows from one camera to two phones and a backup angle. Those are the moments where iPhone recording gets exposed. The capture itself is usually easy. Keeping it clean, organized, and usable for editing or transcription is the part that separates a quick save from a mess.
Recording phone calls on iPhone
Standard iPhone call recording is still limited, so the dependable fallback is physical capture. The most reliable method is to put the call on speakerphone and record it with a second device or dedicated recorder placed near the iPhone's speaker, according to this call recording walkthrough.
Use a simple setup:
- Put the call on speakerphone.
- Place a second phone or recorder close to the iPhone speaker.
- Record in a quiet room.
- Do a quick level check so one voice is not too low and the other is not distorted.
Distance decides whether the result is usable. If the recorder is too far from the phone, the remote voice gets washed out fast. Add HVAC noise, traffic, or a reflective room, and transcription accuracy drops with it. If you use a hardware recorder with a cable connection, a telephone recording adapter is usually needed to route the signal cleanly, as noted in the same guide.
Keep the goal in mind. If the recording needs to become notes, a transcript, or action items later, prioritize speech clarity over convenience. A plain speakerphone capture with clean diction is more useful than a fancy setup that fails halfway through. If your workflow starts with Voice Memos, it helps to know how to transcribe a voice memo on iPhone before these recordings start piling up.
One more practical point. Get consent where required, and confirm the rules that apply in your location before you record any call.
Multi-iPhone shoots without chaos
Multi-iPhone shoots solve one problem and create another. You get extra coverage, but you also get more files, more sync work, and more chances to lose track of the take that mattered.
The fix is still simple and very professional:
- Create a visible and audible sync point: Clap once where every phone can catch it.
- Roll early on every device: Late starts are harder to repair than a few extra seconds of dead space.
- Assign one phone as the reference audio source: That gives the edit and the transcript a clear master.
- Rename clips right after the take: Wide, close, host, guest, demo, overhead.
- Keep framing jobs separate: One phone should not drift between being a locked shot and a roaming detail camera.
A two-iPhone setup is often enough for interviews, tutorials, and product demos. One locked wide shot covers continuity. One tighter angle gives you cut points and visual variety. Adding a third device only helps if you already have a clean ingest process.
That workflow matters after the shoot. Editors need sync points. Transcription tools work better when one audio track is clearly the main source. Summaries and searchable notes are easier to trust when filenames still reflect what happened in the room. On quick-turnaround jobs, I would rather have two disciplined iPhone angles and one strong audio source than four clips with vague names and no obvious master.
Advanced iPhone recording is really production discipline under pressure. The phone can capture the moment. Your system decides whether that moment turns into footage you can cut, words you can search, and information you can use.
From Capture to Content Preparing Files for Transcription
A strong recording that never becomes usable text is only half-finished work. That gap is common. Many people can capture interviews, lectures, meetings, or video notes on iPhone, but they still end up stuck with a manual transcription process for notes, summaries, or sharing, as described in this discussion of the transcription gap.
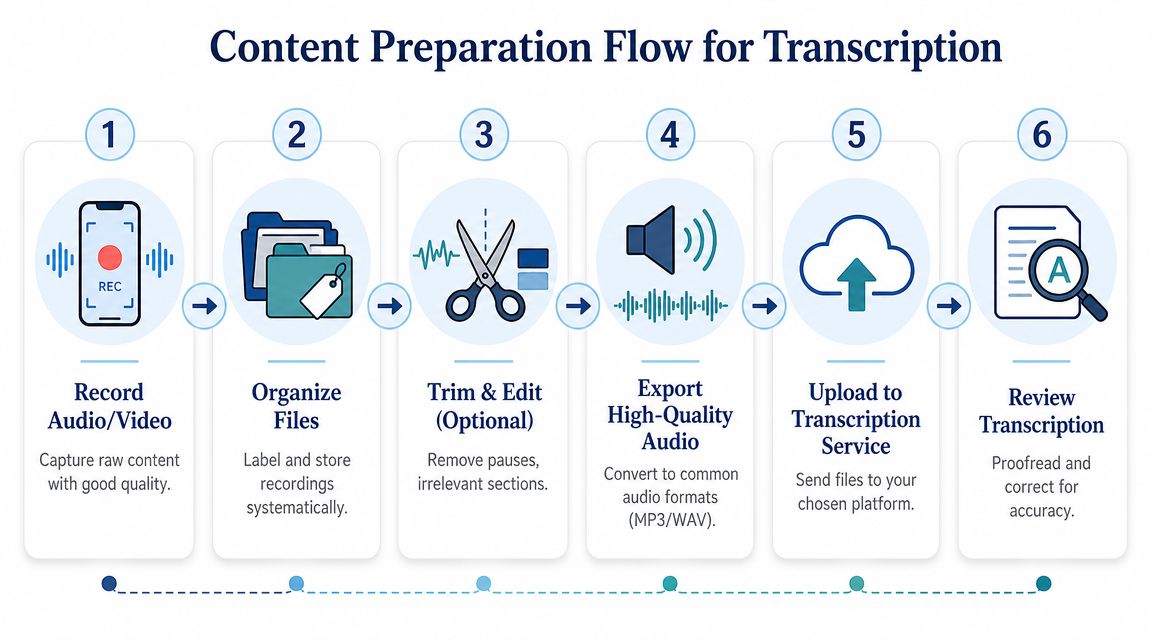
Make your files easier to work with before upload
The easiest transcription jobs start with organized source files.
Use this habit stack:
- Rename files immediately: “Interview with Dr Lee” is useful. “New Recording 47” is not.
- Trim obvious dead space: Remove false starts and accidental pocket recording.
- Keep the highest-quality practical export: Don't over-compress before transcription if you can avoid it.
- Separate sessions by topic: Long mixed recordings are harder to search and summarize later.
For iPhone-originated media, common formats are usually easy to move through AirDrop, cloud storage, or a desktop handoff. Audio memos are often the simplest starting point because they're lighter than full video files while preserving the speech you need.
Record for transcript quality, not just playback quality
A file can sound acceptable to your ear and still be annoying to transcribe. The biggest causes are overlapping speakers, mumbled names, and bad starts.
Do this at the beginning of important recordings:
| Habit | Why it helps later |
|---|---|
| State names clearly | Makes notes and speaker review easier |
| Avoid talking over each other | Improves transcript readability |
| Pause between topics | Helps summary and action-item extraction |
| Keep the phone close to the main speaker | Produces cleaner source audio |
That's the reason I frame recording with iPhone as a knowledge workflow, not just a capture workflow. If the end goal is quotes, searchable notes, summaries, or follow-up tasks, then the recording should be shaped for that destination from the start.
A practical handoff for transcription
One sensible workflow is simple: record on iPhone, export or share the file, then upload it to a transcription tool that can turn the spoken content into text you can use. If you work with Apple voice notes often, this guide on how to transcribe a voice memo on iPhone outlines the export-and-upload process clearly.
For teams and solo professionals who want transcripts, summaries, and action items from uploaded iPhone audio or video, HypeScribe is one option. It supports uploaded audio and video files, including common iPhone-exported formats, and is built around turning spoken content into searchable text rather than leaving it as an archive you never revisit.
The broader point matters more than the tool choice. Don't let your recording workflow end at “saved to phone.” The useful finish line is text you can search, share, and act on.
Your Recording Checklist for Any Situation
A good iPhone recording starts before you tap Record. The checklist changes with the job, but the goal stays the same: capture material that still holds up when you need to quote it, edit it, transcribe it, or turn it into action items later.
For journalists in the field
- Protect the quote first: If the story depends on what someone said, clean speech matters more than polished visuals.
- Work close: iPhone mics fall off quickly with distance, especially outdoors or in reflective rooms.
- Run a backup if the interview matters: A second phone or recorder is cheap insurance for one-time conversations.
- Capture names and roles early: That saves time later when you are logging clips or checking transcript speaker labels.
- Record room tone for a few seconds: It helps in cleanup if you need to smooth edits in post.
For students recording lectures
- Pick the seat for audio, not comfort: A stable spot near the lecturer usually beats the middle of the room.
- Start the app before class starts: Friction causes missed openings, and the first minute often sets up the whole lecture.
- Bring power and storage: Long recordings fail for boring reasons like low battery or a full phone.
- Mark topic changes in your notes: Even rough timestamps make review, summarizing, and transcript scanning much faster.
- Check playback during a break if you can: Finding out two hours later that a bag blocked the mic is painful.
For teams recording meetings
- Choose the recording position on purpose: Put the phone where the primary discussion happens, not just where there is table space.
- Reduce mechanical noise: Shut doors, mute alerts, move coffee cups away from the phone, and stop table tapping.
- Get speakers to identify themselves at the start: This helps if you need searchable notes with clear attribution.
- Set the output before the meeting begins: A file meant for a verbatim transcript is handled differently from one meant for a short summary and action list.
- Name the file immediately after recording: Date, team, and meeting topic are enough to make retrieval easier later.
For creators shooting content
- Lock down the phone: A tripod, clamp, or fixed surface does more for perceived quality than commonly realized.
- Fix the light before you frame the shot: Window light or a simple constant light is usually enough.
- Decide whether the extra angle is worth the edit time: Multi-phone shoots can look better, but they also add syncing, storage, and file-management work.
- Slate takes if you are recording more than one clip: A spoken take number at the start helps during editing and transcript review.
- Rename clips while the context is fresh: That habit saves real time once footage starts piling up.
If you're building a repeatable spoken-content setup, Fame's podcasting equipment checklist is a useful reference for thinking through the supporting gear around the iPhone, especially for creators who are moving from casual recording into a more structured production habit.
A final check matters. Ask one question before every session: will this recording be useful after capture? If the answer is yes, the file should be easy to identify, clean enough to transcribe, and structured enough to turn into notes people will put to use.
If your iPhone recordings are piling up as voice notes, interviews, lectures, meetings, or screen captures, turn them into something usable. HypeScribe lets you upload spoken content and turn it into searchable transcripts, summaries, and action items so the recording doesn't stop at capture.


