How to Transcribe a Voice Memo on iPhone: 3 Easy Methods
We’ve all been there. You’ve captured a brilliant idea on a walk or recorded an important meeting, only to realize you now have to type it all out. Manually transcribing is a drag. But what if you could turn those spoken words into text without the tedious work?
Getting your iPhone Voice Memos transcribed is actually easier than you might think. From a clever built-in workaround to dedicated apps, you can transform your audio recordings into an editable document and save yourself a ton of time. In this guide, I'll walk you through the methods I've personally used and tested.
Your Guide to Turning iPhone Voice Memos into Text
Sometimes, the best way to get your thoughts down is to just speak them. You can capture a more natural, fluid train of thought without being stuck behind a keyboard. The real magic happens when you can easily convert that recording into text you can actually use.
This guide will show you a few practical ways to do just that, so you can spend more time on your ideas and less on the admin.
What We Will Cover
We'll start with a simple trick using features already on your iPhone. From there, we’ll explore how powerful AI-driven transcription apps can deliver stunning accuracy and speed, turning a chore into a simple, automated task.
This is all about making your workflow more efficient, whether you're:
- A student trying to capture lecture notes.
- A journalist recording interviews on the fly.
- A professional who needs to document meeting minutes and action items.
- A writer or creator who prefers to draft content by speaking.
For a great overview of the general process beyond just Voice Memos, check out this guide on how to create a transcript from any audio file.
By the time you're done here, you’ll know exactly how to get your voice memos transcribed and can pick the method that works best for you.
Comparing iPhone Voice Memo Transcription Methods
Before we dive into the step-by-step instructions, here’s a quick look at the different methods we'll cover. This table should help you decide which approach is the right fit for your situation based on your need for speed versus accuracy.
Each option has its strengths. The built-in features are great for a quick and dirty transcript, while specialized AI tools are the way to go when you absolutely need accuracy and speed for important recordings.
A Clever Workaround Using Your iPhone's Built-In Tools

Sometimes the best solution is already in your pocket. Before you even think about downloading a new app, there's a surprisingly effective trick for getting a quick transcription using your iPhone’s built-in Dictation feature. It's perfect for short, clear recordings and, best of all, it's completely free.
The basic idea is simple: you play your voice memo out loud from a second device while your iPhone "listens" and types out the words in an app like Notes. All you need is your iPhone and another device—like a laptop, an iPad, or even a friend's phone—to play the audio from.
This method is my go-to when I need a rough draft of something I've recorded on the fly, like a quick blog post idea or a spoken to-do list. In just a few minutes, you can turn that audio into usable text.
How The Two-Device Trick Works
Getting this set up is easier than it sounds. First, you just need to get the voice memo off your iPhone and onto that second device. The quickest way is to hit the Share button in the Voice Memos app and send the file over using AirDrop, email, or a messaging app.
Once you have the audio file ready on your other device, here’s what you do:
- On your iPhone, open up a new note in the Notes app (or any app with a text field).
- Tap the little microphone icon on the keyboard to turn on Dictation.
- Now, press play on your voice memo on the second device. Make sure the volume is up and the sound is clear.
You’ll see your iPhone start typing out the words as it hears them. It’s a fantastic, no-cost way to figure out how to transcribe a voice memo on iPhone without installing anything extra.
My Personal Tip: Find a quiet spot for this. Dictation’s biggest weakness is background noise. Playing your memo in a silent room can make a world of difference in the accuracy of the final text.
Of course, this built-in method has its limits. It can get confused by multiple speakers, thick accents, or any kind of background chatter. If you're transcribing a crucial interview or a multi-person meeting, you'll probably want to reach for a more powerful tool.
When You Need Flawless Accuracy, Turn to AI Apps
Let’s be honest: the built-in iOS tools are fine for a quick note to yourself, but they just don't cut it when accuracy is everything. If you're trying to transcribe a critical client meeting, a detailed interview for an article, or a university lecture packed with technical terms, you need something more powerful. This is where dedicated AI transcription apps really shine.
These tools are built from the ground up for one thing: turning your spoken words into clean, accurate text. Many of them run on sophisticated AI models like OpenAI's Whisper, which gives them a massive advantage over the basic dictation feature on your phone. They're much better at untangling conversations with multiple people, filtering out background café noise, and correctly spelling industry-specific jargon.
Why a Dedicated App is a Game-Changer
The biggest difference you'll notice is the incredible accuracy and speed. Forget about listening to your recording and typing it out manually. With these apps, you just upload your Voice Memo, and the AI does the heavy lifting in a fraction of the time. I've seen one-hour interviews transcribed in just a few minutes—it completely changes how you work.
And it's not just about getting a wall of text. These modern tools come packed with features that make the final transcript genuinely useful:
- Speaker Labels: The AI can often tell who is speaking and automatically label them (e.g., "Speaker 1," "Speaker 2"), which is a lifesaver for interviews and meeting notes.
- Clickable Timestamps: Most apps add timestamps to the text. If a sentence seems off, you can click it and instantly hear the original audio to verify.
- Flexible Export Options: Once it's done, you can export your transcript as a Word doc, PDF, plain text file, or even subtitles.
For a look at how specialized these tools can get, check out Klap.app's podcast transcription tool. It’s a great example of how this technology is being adapted for specific needs, handling all sorts of audio inputs with impressive results.
The real shift here is that these apps don't just transcribe—they create structured, easy-to-navigate documents. It’s the difference between simple dictation and creating an intelligent record of your conversations.
Making AI Work with Your iPhone Voice Memos
The best part is how seamlessly these apps work with your iPhone. By 2025, many leading services can hit over 95% accuracy, even with tricky accents or less-than-ideal recording conditions. They're designed to work perfectly on any iPhone running iOS 15 or later, and since the transcription happens on their servers, it won’t drain your phone’s battery.
The process couldn't be simpler. Just open your recording in the Voice Memos app, tap the "Share" button, and pick your transcription app from the share sheet. The file gets sent over, and the AI takes it from there. This direct workflow makes getting a high-quality transcript from any recording almost effortless.
If you want to explore the technology behind this magic, our guide to the best auto transcribe software is a great place to start.
How to Choose the Right Transcription App for Your Needs
https://www.youtube.com/embed/EopQzPJ_snI
Sifting through the App Store to find the right transcription tool can feel like a chore. There are dozens of options, and they all claim to be the best. The real secret is to ignore the marketing hype and focus on what you actually need to get done.
A good way to start is by figuring out your "must-haves." Do you need a transcript that's 99% accurate for a legal deposition, or is a rough draft of a meeting's key points good enough? Are you recording sensitive conversations that demand top-notch privacy? Just answering those two questions will help you cut through the noise and zero in on the right solution.
Key Factors to Consider
When you need to transcribe a voice memo on your iPhone, don't just grab the first free app you see. A few key details separate the genuinely useful tools from the ones that just waste your time.
- Accuracy and Reliability: This is the big one. The whole point is to get a usable transcript. Look for apps that are upfront about their accuracy rates, especially those built on modern AI that can handle messy real-world audio with background noise and multiple accents.
- Pricing Models: Most apps fall into two camps: pay-as-you-go (per minute or per hour) or a monthly/annual subscription. If you only need to transcribe something once in a while, pay-as-you-go makes sense. But if you’re transcribing regularly, a subscription almost always offers better value.
- Privacy and Security: This is critical if you’re dealing with confidential information. Take a minute to review the app's privacy policy. A huge plus is any app that offers offline transcription, which means your audio file is processed directly on your iPhone and never uploaded to a server.
The demand for these tools from students, researchers, journalists, and podcasters has exploded. We’re now seeing some incredibly powerful apps that do more than just transcribe—they can identify different speakers, translate languages, and even record high-quality audio, all in one place.
This simple decision tree can help guide your choice.
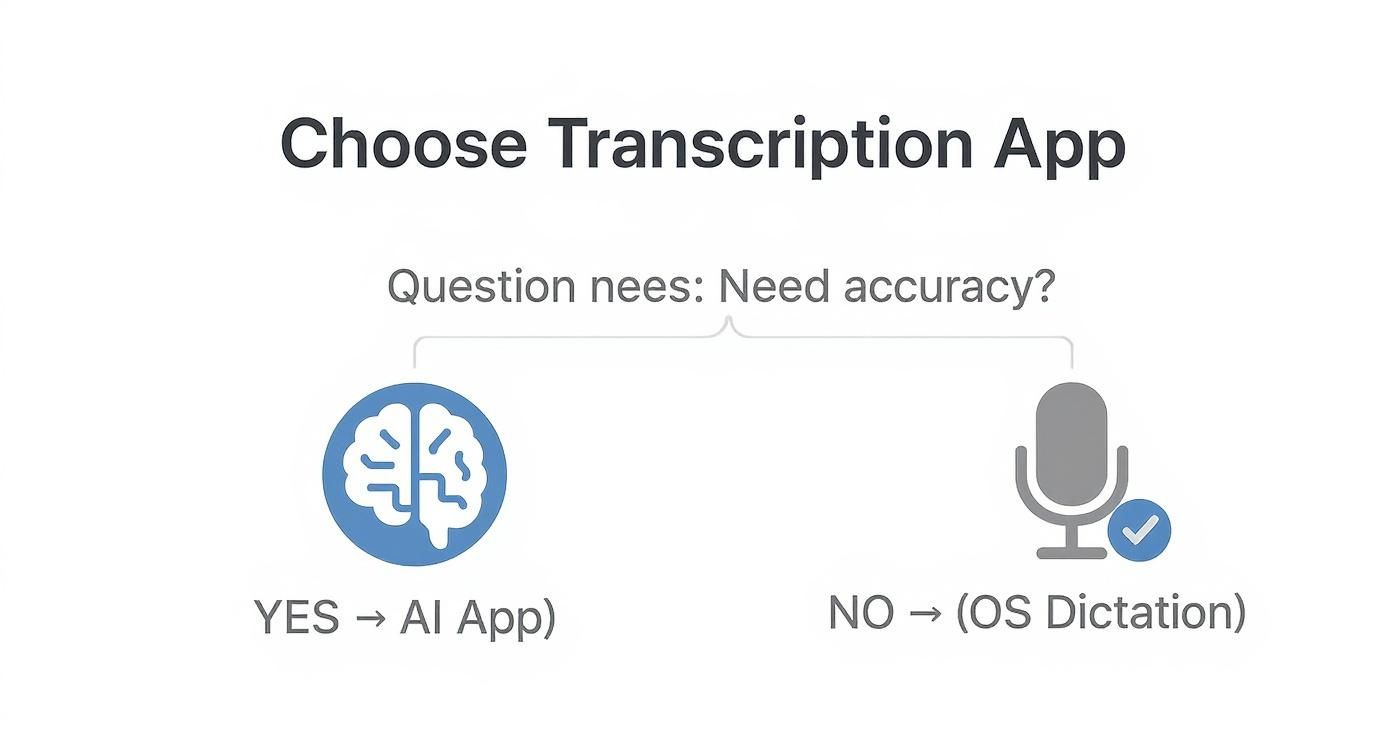
As you can see, it really boils down to one question: how important is accuracy? If you need a clean, reliable transcript, a dedicated AI app is the way to go.
For a deeper dive into different transcription methods, check out our guide on how to convert audio to text online for free.
Tips and Tricks for Getting a Flawless Transcription
Here’s a simple truth I’ve learned over the years: the final quality of your transcript is almost entirely dependent on the quality of your original recording. AI transcription is incredibly powerful, but it’s not magic. Feeding it a clean, clear audio file is the single best thing you can do for an accurate result.
Think of it this way: if a human would struggle to understand what's being said, the AI will too. A few small adjustments before you even press record can make a world of difference.
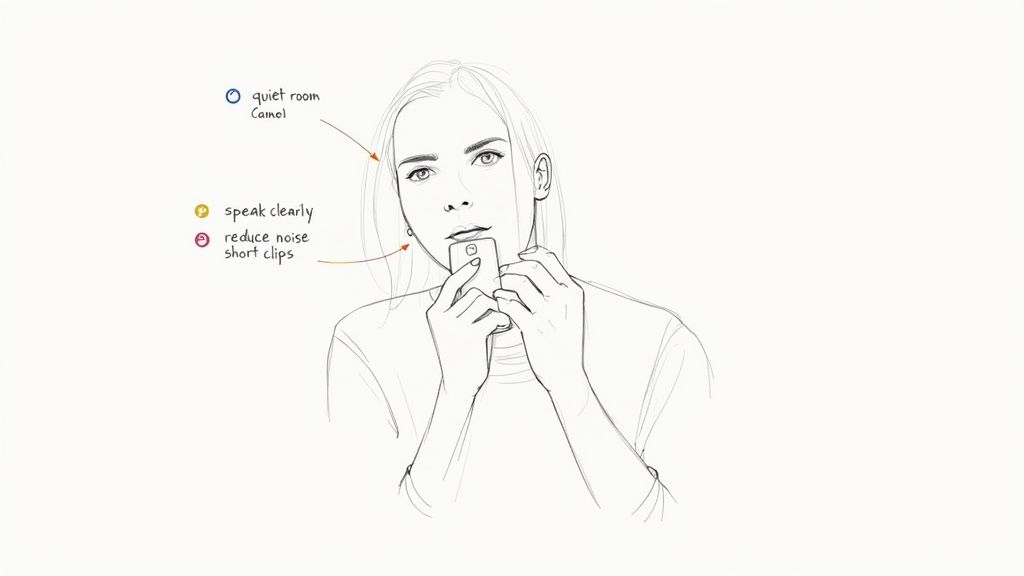
Tame Your Recording Environment
Your surroundings matter. A lot. A quick thought captured in a quiet office will always transcribe better than a brilliant idea dictated in a loud coffee shop.
Before you start recording, take 30 seconds to scout your location and minimize distractions.
- Kill the background noise. Turn off the TV, music, or that noisy fan. If you're in a car, a simple clip-on mic can help isolate your voice from road and engine sounds.
- Dodge the echo. Hard, empty rooms are your enemy. Find a space with soft surfaces—think carpets, curtains, or even a closet full of clothes—to absorb sound and prevent reverberation.
- Get friendly with the mic. Keep your iPhone's microphone relatively close to your mouth and speak clearly at a consistent volume. Try not to fidget with the phone, as this creates rustling noises that can muddy the audio.
The Pro Tip: It's all about improving the signal-to-noise ratio. You want your voice (the signal) to be way louder and clearer than everything else (the noise).
Prep Your Audio Files for Success
For longer recordings like interviews or important meetings, a little prep work can save you a headache later. Transcribing a massive, two-hour file in one go can sometimes be slow and clunky.
Breaking up a long voice memo into smaller, more manageable chunks—say, 15-20 minute segments—often leads to faster processing. It’s also good practice to make sure your file format is ready. While most services handle the iPhone’s native M4A format just fine, knowing how to convert a voice memo to MP3 can be a handy trick for maximum compatibility with other audio tools.
Common Questions About Transcribing Voice Memos on iPhone
Even with the best tools, you’ll probably have a few questions when you start transcribing your recordings. Let's clear up some of the most common ones so you can get accurate text without any headaches.
Getting these details sorted out from the start will save you a ton of time later.
How Long Does It Really Take to Transcribe a Voice Memo?
This is the big one, and the answer really depends on the path you take. If you’re using your iPhone’s built-in dictation feature, you're looking at a real-time job. A 10-minute recording will take you 10 minutes to play back and capture. Simple, but not exactly fast.
On the other hand, a good AI transcription service completely changes the game. The technology has gotten so good that a dedicated platform can process audio up to 40 times faster than real-time. Think about that: a full one-hour voice memo can be turned into a complete, accurate transcript in less than two minutes. You can dig into how this tech boosts productivity over at MeowTXT.com.
For anyone facing a deadline, that kind of speed is a lifesaver.
Can I Trust Third-Party Apps with Sensitive Recordings?
It’s smart to be cautious, especially if you're transcribing confidential meetings or personal notes. Your first move should always be to check the app's privacy policy before you upload a single file. Don't just skim it.
Look for services that explicitly state they use strong encryption for your files, both while they're being uploaded and when they're stored. They should also be crystal clear about how your data is handled and how long they hold onto it.
Pro Tip for Maximum Security: Some apps offer on-device or offline transcription. This is the gold standard for privacy because your audio file is processed entirely on your iPhone and never touches an external server. It gives you total peace of mind.
Do I Need to Convert My Voice Memo from an M4A File?
Thankfully, no. This used to be a common annoyance, but not anymore. The M4A format that your iPhone uses for voice memos has become a widely accepted standard.
Just about every modern transcription service or app is designed to work with M4A files directly. You can hit the "Share" button in the Voice Memos app and send your recording straight to your tool of choice. It cuts out the tedious step of file conversion, making the whole process way more direct.
Ready to turn your voice memos into searchable, usable text in just a few clicks? HypeScribe uses powerful AI to deliver not just fast transcriptions but also smart summaries and key takeaways. Move from conversation to action without missing a beat. Give it a try today and see how simple transcription can be. Visit https://www.hypescribe.com to get started.


