How to Reduce MOV File Size: Ultimate Guide 2026

You've got a MOV file that should have been a quick upload, and instead it's blocking everything. It won't email. It crawls into cloud storage. Your editing app made a perfectly clean export, but now the file is too big for the next step that matters most.
That happens all the time with footage from iPhones, QuickTime exports, screen recordings, and professional editing timelines. MOV is common because it plays nicely in Apple workflows and many production environments. It's also common for those files to be larger than you need for review, sharing, transcription, or client delivery.
The good news is you usually don't need special hardware or a deep post-production background to reduce MOV file size. You just need to pick the right method for the job. Sometimes that means a fast export in QuickTime Player. Sometimes it means opening HandBrake and making smarter codec and resolution choices. Sometimes it means using FFmpeg because you've got a folder full of files and no patience for clicking through menus.
The wrong move is treating every file the same. A rough preview clip, a training recording, a legal interview, and a final master should not get the same compression treatment. The best workflow depends on how much quality you can give up, how much control you need, and whether the file can leave your device at all.
That Huge MOV File Is a Problem We Can Fix
A typical version of this problem looks like this. You export a video, check it once, and then hit the first bottleneck. The upload stalls, the sharing platform rejects it, or a teammate messages back saying the file is too large to download comfortably.
MOV files often come from tools that prioritize image quality, editing flexibility, or compatibility inside Apple-heavy workflows. That's useful during capture and post-production. It's not useful when you need a smaller delivery copy by the end of the day.
The practical answer is to stop thinking in terms of “compress this file somehow” and start thinking in terms of “what kind of smaller version do I need.” A fast preview copy needs one approach. A polished client-facing file needs another. An archive should usually stay large.
Practical rule: Keep the original MOV untouched. Make smaller delivery versions from copies, not from your only source file.
If you need the fastest path, QuickTime Player can get you a smaller file with very little setup. If you need more control over quality, file size, and format, HandBrake is the better middle ground. If you need repeatable, batch-friendly compression, FFmpeg is hard to beat.
There isn't a need for all three. The requirement is for the one that matches the situation in front of them.
Why Your MOV File Is So Big
A MOV file isn't “big” just because it ends in .mov. MOV is a container. It's similar to a suitcase. The suitcase holds the contents, but the suitcase itself doesn't decide whether you packed light or stuffed it with winter coats.
Inside that MOV container are the primary size drivers. Apple's support community has explained this for years. MOV files are already compressed in some form, and making them smaller usually means exporting to smaller dimensions and lower data rates, with a quality trade-off, as discussed in Apple's QuickTime export discussion.
The four levers that actually matter
Codec is the encoding method used for the video stream. Some codecs are efficient. Some are not. If your MOV contains a less efficient codec, the file can be much larger than a modern alternative at similar perceived quality.
Resolution is the frame size. A 4K video carries far more visual data than a 1080p version, so it usually takes much more space.
Frame rate is how many images appear each second. High frame rates are great for sports, fast movement, and slow motion work. They're often unnecessary for webinars, tutorials, talking-head videos, and screen recordings.
Bitrate is the amount of data allocated to the video over time. This is often the biggest practical dial in compression. More bitrate usually means more detail retention and a bigger file. Less bitrate usually means a smaller file, along with more visible compression if you push it too far.
What you're trading when you shrink a file
Every attempt to reduce MOV file size is a balancing act between size, image quality, playback compatibility, and time spent tweaking settings.
Quick exports trade control for speed. Manual encodes trade speed for better results. Professional delivery often means making different versions for different purposes.
If you work around broadcast, branded content, or review workflows, understanding that trade-off matters well beyond one file. A strong guide to modern TV production is useful here because production decisions upstream often determine the kind of delivery files you'll need downstream.
If you also need a plain-English breakdown of containers and codecs, this video format comparison guide is a helpful companion read.
A smaller file is not automatically a better file. The best export is the smallest one that still looks right for its actual use.
The Quickest Method Using QuickTime Player
If you're on a Mac and need a smaller file right now, start with QuickTime Player. It's built in, it's clean, and it's good for one-off exports when “good enough” is the priority.
This is the method I'd use for a fast review copy, a casual upload, or a quick share with a teammate who doesn't need the original quality. It's not the method I'd use when I need detailed control over bitrate, codec behavior, or final delivery specs.
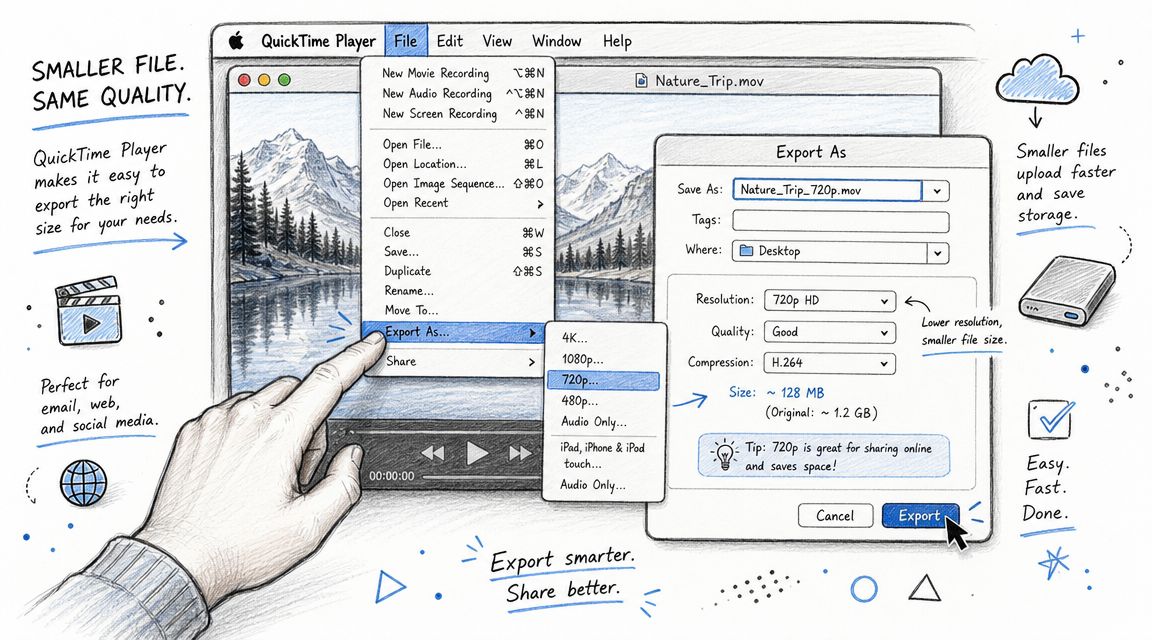
How to do it
- Open the MOV file in QuickTime Player.
- Click File.
- Choose Export As.
- Pick a lower output option than your source file needs.
- Save the exported file with a new name so you don't overwrite the original.
- Check the new file size and play it back before sending it anywhere.
That's the whole workflow. QuickTime keeps the decision-making simple, which is exactly why it's useful.
When QuickTime is the right choice
QuickTime works best when the file only needs to be smaller, not optimized perfectly.
- Fast preview delivery. You need to send a review copy and don't want to open a full encoding app.
- Low-friction sharing. The clip is personal, internal, or disposable enough that precision doesn't matter much.
- Mac-only convenience. You want something already installed and familiar.
Where it falls short
QuickTime doesn't give you much room to shape the result. You won't get the kind of precise tuning that makes a big difference when file size targets are tight.
That means:
- Less control over quality. You can lower export size, but you can't finely tune the encode.
- Less control over codec choice. For many users, the app hides the details that matter.
- Less control over repeatability. If you need to process multiple files the same way, QuickTime gets tedious quickly.
If QuickTime gets you under your upload limit and the video still looks fine, stop there. Don't overcomplicate a simple job. If the result still looks too large or too soft, move to HandBrake.
For Maximum Control Use the Free HandBrake App
HandBrake is the tool I recommend most often because it sits in the sweet spot. It's free, available across major desktop platforms, and powerful enough for serious compression without forcing you into command-line work.
It also makes the theory practical. You can directly change the codec, resolution, frame rate behavior, and quality settings that determine whether your MOV shrinks intelligently or just gets mangled.
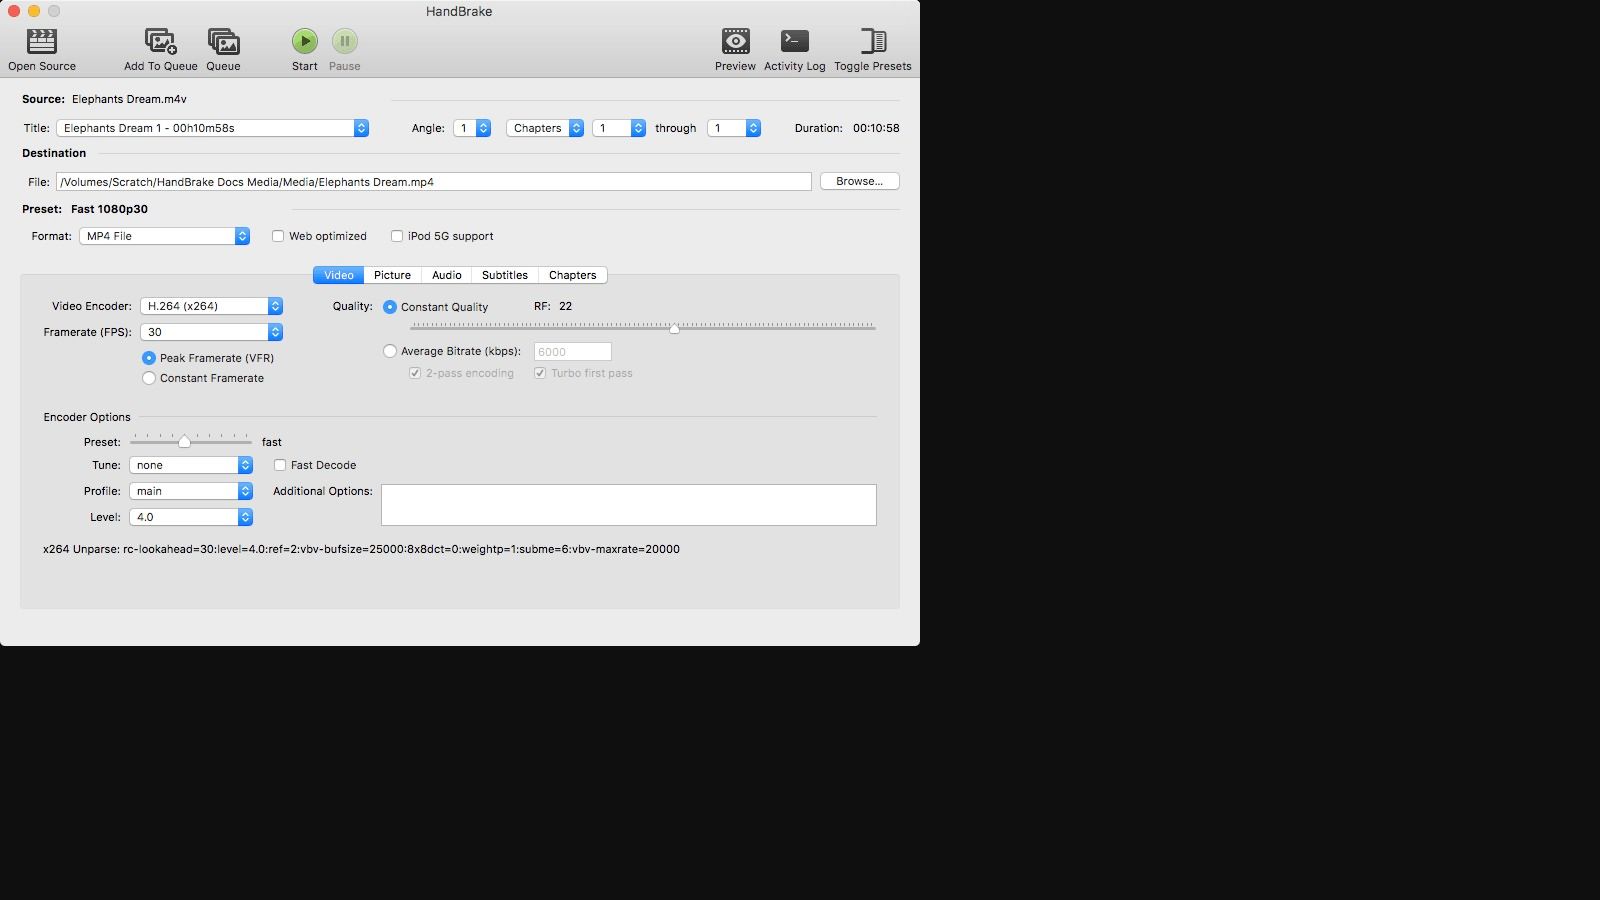
Start with a preset, then adjust the important bits
Open the MOV file in HandBrake and choose a preset that's reasonably close to your goal. That gets you moving fast without locking you into bad defaults.
Then check these areas carefully:
- Format. For most delivery use, MP4 is the practical choice.
- Video codec. If compatibility matters most, H.264 is the safe option. If file size matters more and playback support is acceptable, HEVC/H.265 is usually the better compression choice.
- Dimensions. If the viewer doesn't need full resolution, scale down.
- Framerate. Don't preserve high frame rates unless the content benefits from them.
- Quality control. HandBrake's Constant Quality mode is often the simplest way to get a good balance.
According to Compresto's MOV compression guide, switching to HEVC/H.265 can provide about 25% to 50% better compression than H.264 at similar visual quality. The same source notes that exporting 4K to 1080p can make the output about 75% smaller, and dropping 60 fps to 30 fps can cut size nearly in half. Those aren't magic tricks. They're the normal result of changing the settings that matter most.
The settings that usually make the biggest difference
If your source is oversized because it came from an editing or capture workflow, these changes usually move the needle fastest:
- Switch to HEVC/H.265 when playback support isn't a concern.
- Downscale to 1080p if the destination is review, web, training, or internal sharing.
- Leave frame rate alone unless you know you can reduce it. Motion-heavy footage is less forgiving than a screen recording.
- Use Constant Quality instead of chasing a random target file size unless you have a strict upload limit.
Compress the file for its destination, not for your pride. Most viewers never benefit from settings meant for editing masters.
A solid HandBrake workflow for most people
Use this as a practical starting point:
- Load the MOV file.
- Pick a general or web-friendly preset.
- Change the codec to HEVC/H.265 if compatibility allows.
- Set dimensions based on viewing needs.
- Keep audio reasonable. Don't over-focus on audio unless it's a music-heavy project.
- Preview a short section if the source is important.
- Encode, then compare the result beside the original.
If you work with lots of exported assets and format conversions in parallel, this explainer on converting OGG to MP4 is another reminder that container and codec decisions matter beyond MOV files too.
A quick demo helps if you're new to HandBrake:
Quick and dirty versus professional HandBrake use
The quick version is simple. Choose a preset, switch resolution down, and encode.
The better professional version takes a few more minutes. Watch a preview. Compare detail in shadows, gradients, text edges, and motion. Keep a versioned naming system. Save presets for recurring jobs. That's where HandBrake stops being “just a free converter” and starts becoming part of a reliable delivery workflow.
Automate Compression with FFmpeg Commands
FFmpeg is what you use when clicking around in a GUI starts wasting your time. It looks less friendly at first because it runs in a terminal, but that's exactly why it's powerful. You can repeat the same workflow precisely, script it, and run it across batches of files without babysitting each export.
For power users, FFmpeg is often the cleanest way to reduce MOV file size at scale.
A fast web-friendly conversion
This is a practical general-purpose command when you want a smaller, widely compatible file:
ffmpeg -i input.mov -c:v libx264 -crf 23 -preset medium -c:a aac output.mp4
That command converts the MOV into an H.264 MP4 with AAC audio. It's a solid default for review copies, uploads, and general sharing.
A smaller file with more aggressive compression
If size matters more than speed, push the preset slower and raise compression:
ffmpeg -i input.mov -c:v libx264 -crf 28 -preset slow -c:a aac output-small.mp4
The higher CRF value usually means more compression and lower visual quality. This is the kind of setting you test, not one you apply blindly to a final deliverable.
Watch for text and motion: Screen recordings, subtitles, and fast action reveal bad compression earlier than a talking-head clip does.
A higher-efficiency HEVC encode
If you want a stronger size-to-quality ratio and your playback environment supports it:
ffmpeg -i input.mov -c:v libx265 -crf 28 -preset medium -c:a aac output-hevc.mp4
This is often a smart choice for storage reduction, internal archives of non-master files, and modern-device sharing workflows.
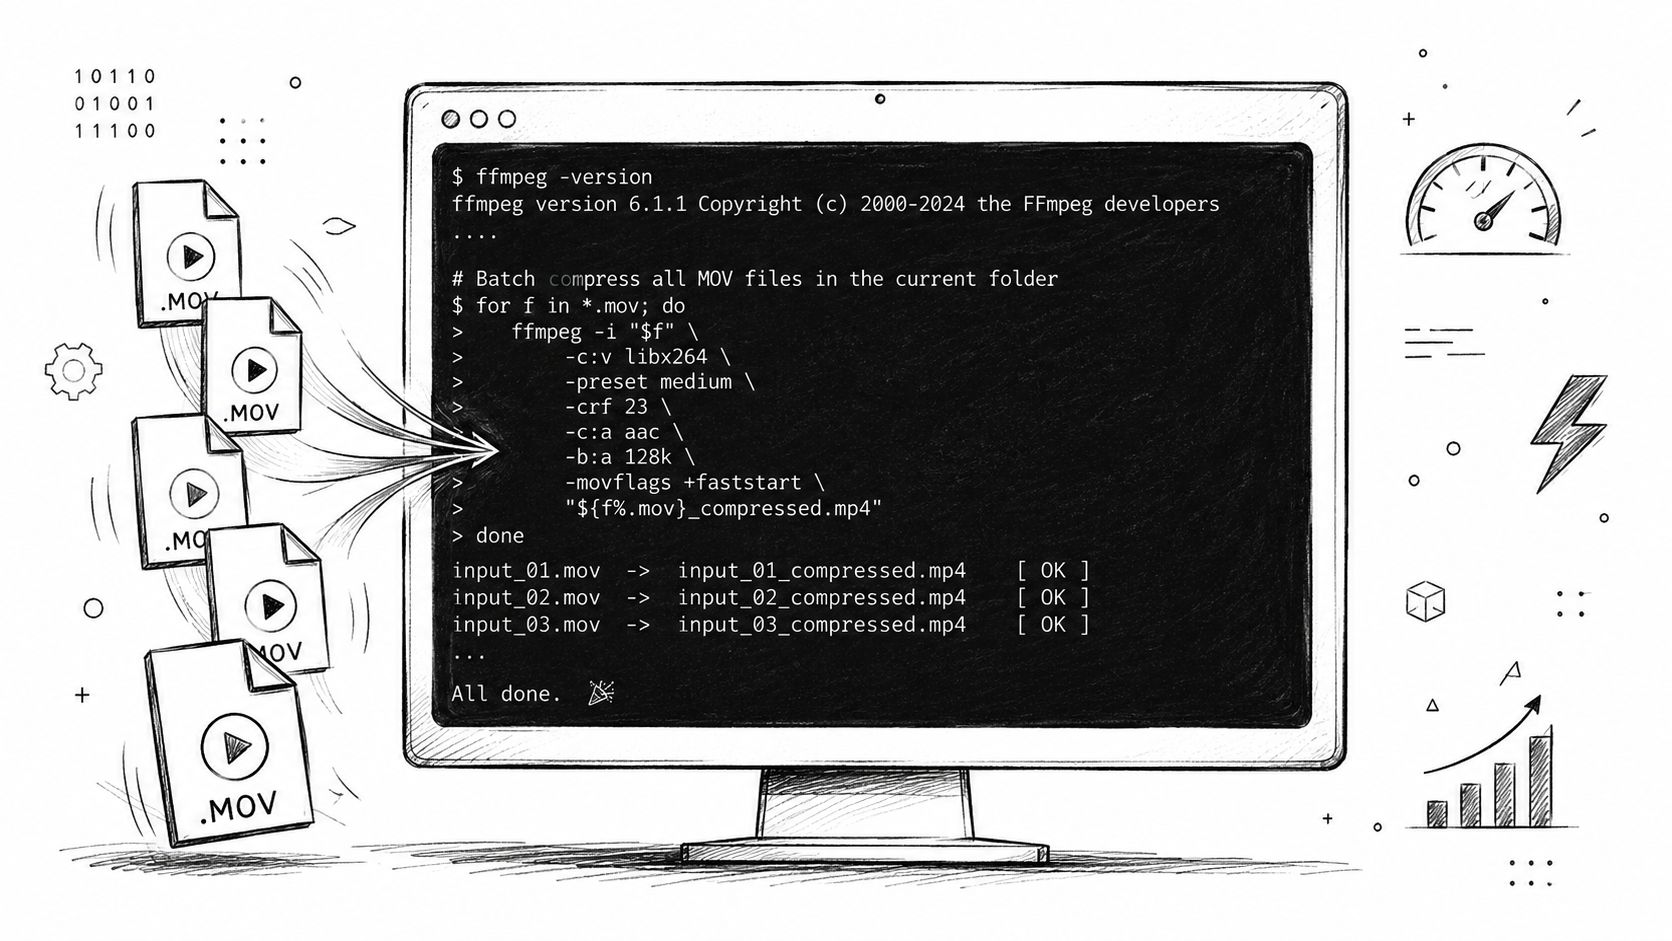
Batch work is where FFmpeg pays off
If you're processing folders of interviews, meetings, classes, or repeated exports, FFmpeg becomes much more attractive than QuickTime or even HandBrake. You can build simple scripts that apply one consistent rule across a whole batch.
For teams that also handle audio-heavy workflows, this walkthrough on how to convert FLAC to MP3 speaks to the same broader point. Once you're comfortable with conversion logic, format work becomes much easier to standardize.
A practical rule for FFmpeg is to keep a small library of tested commands. One for fast previews. One for HEVC. One for aggressive compression. Don't reinvent the workflow every time.
Choosing Your Method Local vs Cloud Compression
The tool choice isn't just about convenience. It's also about privacy, upload time, and operational friction.
A lot of guides treat online compression as the default. That's fine for low-stakes files. It's not fine for every workflow. Meeting recordings, interviews, internal training footage, client review cuts, and sensitive documents on screen all raise a different question. Should this file leave the device at all?
CursorClip's browser compressor highlights an important shift in the market. Some tools now run FFmpeg-style processing in the browser and keep files on-device rather than uploading them to the cloud, as described on CursorClip's MOV compressor page. The same page also notes a 200 MB limit for that local browser workflow. That detail matters because “local in browser” and “works for every large file” are not the same thing.
Compression Method Comparison
| Method | Best For | Ease of Use | Privacy | Control |
|---|---|---|---|---|
| Desktop apps like QuickTime, HandBrake, FFmpeg | Sensitive files, larger projects, repeat workflows | QuickTime is easy, HandBrake is moderate, FFmpeg is advanced | Strong, because files can stay on your device | Medium to very high |
| Browser-based local processing | Smaller sensitive files when you want no upload | Usually simple | Strong, because processing can stay on-device | Usually limited |
| Traditional cloud compressors | Casual one-off jobs, non-sensitive files, convenience-first users | Usually easiest | Weaker, because files are uploaded | Usually low to medium |
How to choose without overthinking it
Use desktop tools when the file is large, the contents are private, or you need predictable output.
Use browser-based local tools when privacy matters but you don't want to install software and your file fits the tool's limits.
Use cloud compressors when the file isn't sensitive and speed of access matters more than control.
There's also a broader workflow angle here. If your process includes generating video derivatives, captions, or alternate delivery versions, tools in adjacent categories can be useful too. For example, an AI video generator can be relevant when teams are already transforming video assets and need format-friendly outputs as part of a larger pipeline.
If a file contains confidential material, don't let “it was easier” become the reason it got uploaded to the wrong place.
The smartest workflow is rarely the fanciest one. It's the one that matches the sensitivity of the file, the size of the job, and your tolerance for manual work.
Frequently Asked Questions About Reducing MOV Size
Can you reduce MOV file size without losing quality
Sometimes, but not usually in the way people mean it.
If the original export is inefficient, you may be able to re-encode it more intelligently and keep the visible quality very close. But in most real-world cases, making a video much smaller involves some trade-off. The goal isn't “zero loss.” The goal is “no meaningful loss for this use case.”
Should you convert MOV to MP4
Often, yes.
MOV and MP4 are both containers. In day-to-day delivery, MP4 is usually the more practical choice because it's widely accepted across platforms, sharing tools, and browsers. If the MOV exists mainly because of your capture or editing workflow, exporting a delivery copy as MP4 often makes more sense than insisting on keeping MOV all the way through.
Keep MOV when you need it for a specific workflow. Switch to MP4 when compatibility and easier sharing matter more.
Why did my compressed file get bigger
That usually happens for one of three reasons:
- You re-encoded to a less efficient setup. A poor codec or export choice can inflate the file.
- You exported at a higher bitrate than the source really needed. Bigger settings can create bigger files even after “compression.”
- You changed containers without reducing the video data meaningfully. A new file extension alone doesn't guarantee a smaller result.
If a compressed file grows instead of shrinking, check the codec, resolution, frame rate, and quality settings first. Those are almost always the actual cause.
If your smaller MOV files are heading into transcription, meeting notes, interview analysis, or searchable archives, HypeScribe is a practical next step. You can upload video or audio, generate fast transcripts and summaries, and turn recordings into useful text without adding more manual work to the process.


