MP3 to M4A Audio Converter: A Complete 2026 Guide

You've got an MP3 on your desktop, your phone, or in a shared folder. It might be a recorded interview, a lecture, a team meeting, or a rough voice memo you need to upload somewhere else. The file plays fine, but the next step in your workflow doesn't quite love it. Maybe your iPhone handles M4A more cleanly. Maybe you want a smaller upload. Maybe you just want a cleaner path from recording to transcription.
That's where an MP3 to M4A audio converter stops being a throwaway utility and becomes part of the job. The conversion itself is easy. The useful part is choosing the right method, the right settings, and the right privacy tradeoff for the file you're handling.
Getting Started with Audio Conversion
A common situation looks like this. You recorded a long interview as an MP3, you need to send it for transcription, and you don't want to wait forever for the upload to finish. The file already sounds acceptable. You're not trying to remaster it. You're trying to make it easier to move, easier to store, and easier to use in the next tool.
That's why people convert to M4A in the first place. Educators do it with lecture recordings. Journalists do it with field interviews. Operations teams do it with call recordings. Anyone working with spoken audio hits the same question sooner or later. Keep the MP3, or turn it into something more efficient for the next step.
If your source audio came out of a video file first, get the extraction right before you convert. This walkthrough on how to get audio from video is useful when the underlying problem starts one layer earlier.
Where conversion actually helps
The biggest win usually isn't “better sound.” It's smoother handling.
- Uploads get easier: Smaller, more efficient files are less annoying to move through web apps and shared drives.
- Apple playback gets simpler: M4A fits neatly into Apple-heavy workflows.
- File organization improves: Standardizing recordings into one delivery format saves time when you're sorting interviews, meetings, or lecture archives.
Practical rule: Convert with a purpose. If you don't know why you're converting, you probably won't choose the right settings.
The right mindset before you start
Treat conversion as packaging, not magic. You're taking a file that already exists and shaping it for a specific job. For spoken-word audio, that job is often transcription. For music, it may be device compatibility or library management. For client recordings, privacy may matter more than convenience.
Once you look at it that way, the decisions get easier. You're not asking, “How do I change this file type?” You're asking, “What version of this audio will work best next?”
Why You Should Convert MP3 to M4A
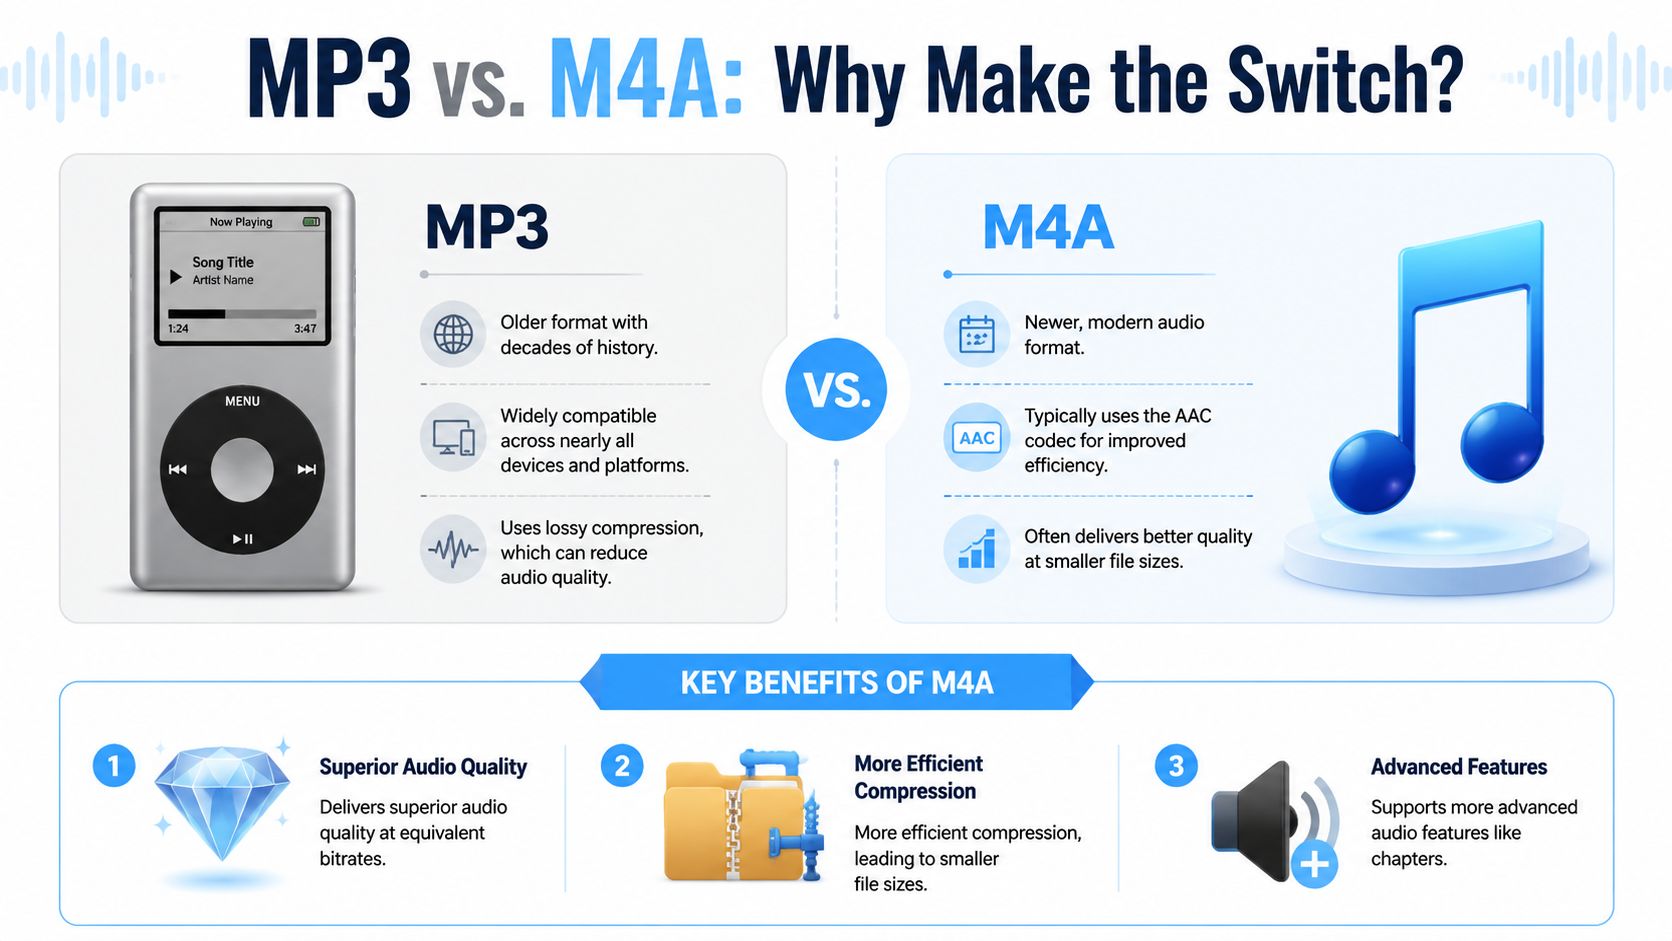
The short answer is efficiency. M4A is an MPEG-4 audio container most commonly associated with AAC, while MP3 uses MPEG-1/2 Audio Layer III. In practical use, AAC is generally more efficient at similar bitrates and often produces smaller files for comparable perceived quality, as noted in this practical guide to MP3 to M4A conversion and production defaults.
Consider shipping. MP3 is the older, proven container that fits almost everywhere. M4A with AAC is the newer container that usually packs the cargo more efficiently. You still have audio in the box. The difference is how well that box travels through modern apps and devices.
Why M4A became so common
A major reason is historical. The rise of AAC inside MPEG-4 audio set the technical foundation for the M4A ecosystem, and Apple's use of the M4A extension in iTunes and iOS made the format highly visible in the consumer market. Practical comparison guides also note that M4A usually offers better sound quality than MP3 at similar bitrates, while MP3 remains the safer fallback when broad compatibility matters, according to this overview of M4A and MP3 differences.
That tradeoff still defines the format choice now.
| Format | What it's good at | Where it falls short |
|---|---|---|
| MP3 | Legacy compatibility across devices and software | Less efficient compression at similar listening targets |
| M4A with AAC | Smaller files for comparable perceived quality, especially in Apple-centered workflows | Not always the safest choice when universal compatibility is the only priority |
When converting makes practical sense
Convert an MP3 to M4A when your goal is tied to workflow.
- You use Apple devices regularly: Playback and library handling are often cleaner.
- You need a more efficient upload file: This matters for meetings, interviews, and lecture recordings.
- You want control over file size without blindly crushing the audio: AAC gives you a more modern target.
Don't convert just because M4A sounds newer. Convert because your playback environment, upload path, or storage needs make it the better package.
That distinction matters. Good conversion choices come from the destination, not from the file extension.
Using Desktop Converters for Quality and Privacy
If the audio is sensitive, desktop conversion is the safest habit. Your file stays on your machine, and you get full control over what the encoder does. That matters for client interviews, internal meetings, legal recordings, and unpublished media.
Why desktop tools are usually the reliable option
A lot of people think conversion is just a wrapper change. It usually isn't. In practical converters, MP3 is typically decoded and then re-encoded to AAC inside an MPEG-4 container. That's why tools expose controls for bitrate, channels, and quality, as explained in this breakdown of how MP3 is converted into M4A.
That also explains why desktop software is useful. You're not just clicking “save as.” You're deciding how the new AAC file should be built.
A simple desktop workflow with Audacity
Audacity is a good example because it's widely available and easy to understand.
Open Audacity and import the MP3 file. Once the waveform appears, listen to a short section first. This catches the obvious problems early, especially with damaged recordings or exports that already have clipping.
Then go to the export menu and choose the option that outputs M4A or AAC, depending on how the build and encoder are presented on your system. If your setup uses an external library or codec helper, install that first so the export option appears properly.
When the settings panel opens, focus on the controls that matter:
- Codec choice: Choose AAC if the tool lets you pick the codec inside the M4A container.
- Channels: Use stereo for music. Use mono for speech if file size matters more than spatial detail.
- Quality target: Don't max it out automatically. Match it to the job.
What to choose for different jobs
For spoken recordings, conservative settings usually work well because intelligibility matters more than width or sparkle. For music, keep stereo and avoid aggressive compression settings that flatten detail.
If you work with video-derived material, this guide to extracting audio from video with freeware tools can help before you even get to the conversion stage.
Desktop conversion is the better choice when privacy matters, when you need repeatable settings, or when you have multiple files to process the same way.
The desktop advantage most people miss
Batch work.
If you've got a folder full of interview cuts, lecture segments, or call recordings, desktop software saves time because you can keep your settings consistent across the set. That consistency helps later when you're archiving files or feeding them into a transcription workflow.
It also helps with metadata. Titles, dates, and project names stay cleaner when you handle conversion in one controlled environment instead of hopping between browser tools.
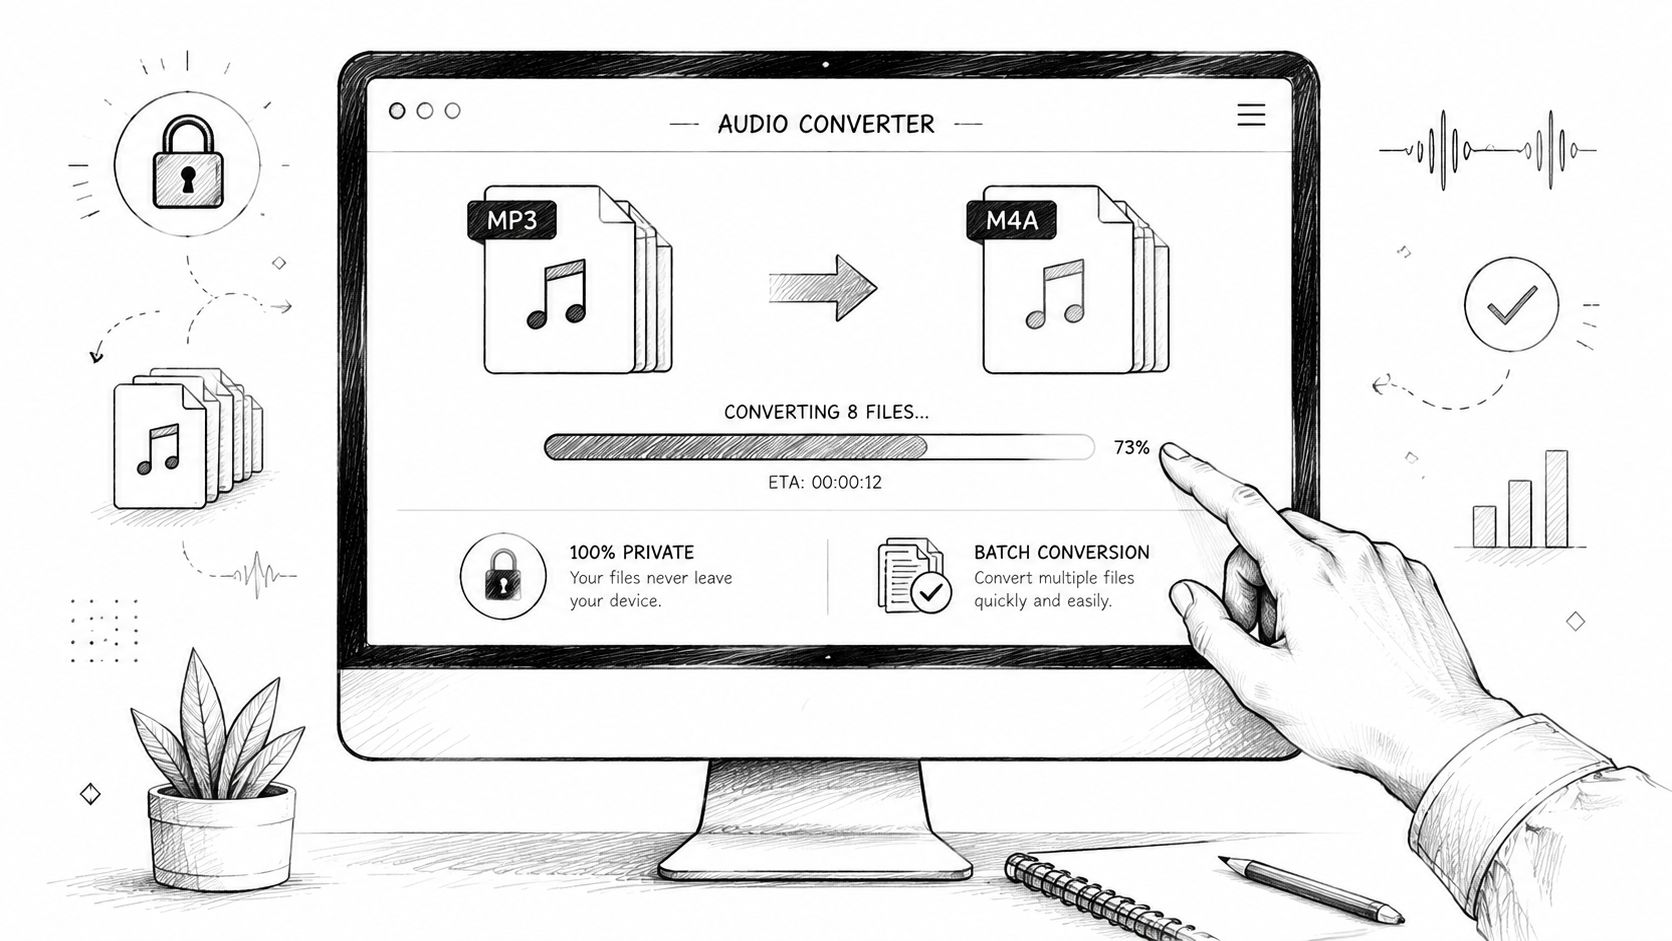
Choosing an Online Converter for Speed and Simplicity
Sometimes you don't need a full desktop setup. You have one file, one task, and a short deadline. That's where an online converter makes sense.
The mistake is choosing one based only on the homepage. A decent online MP3 to M4A audio converter should be judged on three things. What happens to your file, how much control you get, and how much friction the interface adds.
The privacy question matters first
Most guides bury the most important detail. Is the conversion happening on a remote server, or locally in your browser?
That's not a minor technicality. A browser-based converter can process files locally without uploading them, which is important when the audio includes personal recordings, client material, or internal business conversations. This privacy gap is called out clearly in this discussion of local versus server-based MP3 to M4A conversion.
How to compare online tools quickly
Use this checklist before you upload anything:
| Check | What to look for | Why it matters |
|---|---|---|
| Processing location | Clear statement about local browser processing or file upload | Sensitive files shouldn't go somewhere you didn't expect |
| Settings access | Ability to choose output format and at least basic quality options | One-click tools are fast, but often too blunt |
| Interface clarity | Clean upload, convert, download flow | Fewer steps means fewer mistakes |
| File handling language | Plain explanation of deletion or retention | You need to know what happens after conversion |
Which kind of online tool fits which job
If the file is routine and non-sensitive, a simple upload-and-convert tool is fine. You're trading some control for speed.
If the file includes interviews, customer calls, or unpublished content, look for a converter that explicitly says processing happens locally in the browser. That gives you much of the convenience of a web app without sending the source file away.
If a converter says it's “secure” but never explains whether the file is uploaded, treat that as incomplete information.
The best online choice isn't one brand for everyone. It's the tool whose file handling matches the sensitivity of your audio.
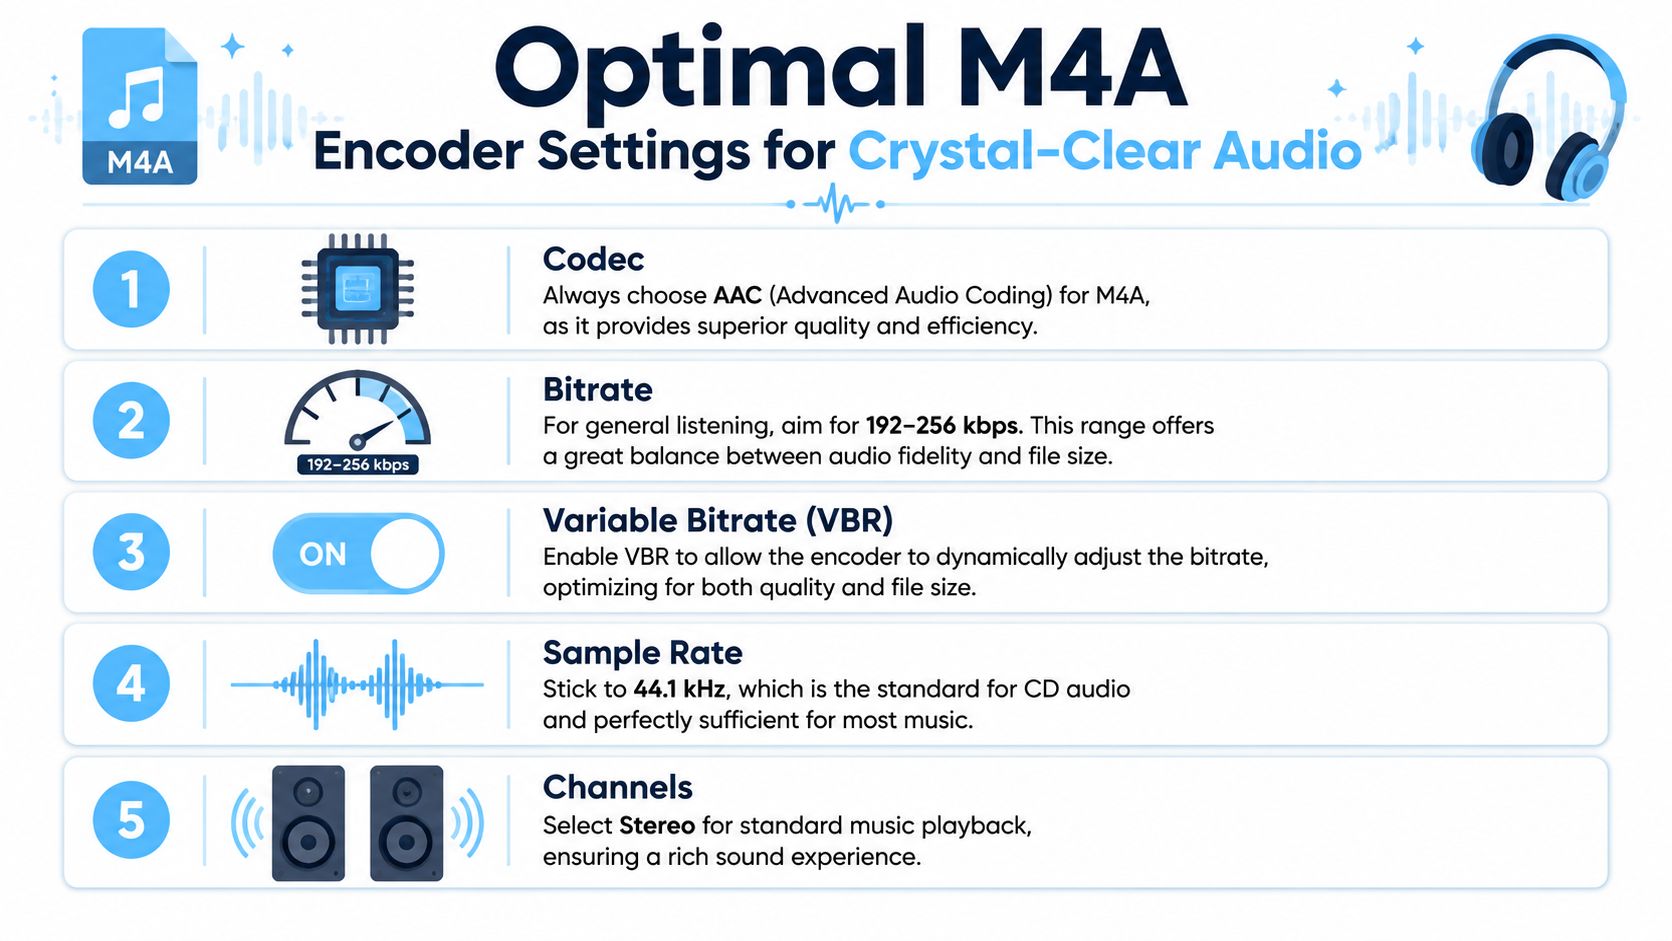
Optimal Encoder Settings for Crystal-Clear Audio
Most bad conversions happen because people leave the defaults alone. The settings aren't there for decoration. They decide whether your M4A file is efficient and usable, or just a different kind of compromise.
For music, the common delivery default is 44.1 kHz. For video-related audio, 48 kHz is the standard. Stereo is typically used for music, while mono is often the smart choice for voice when file size matters, based on long-standing production defaults outlined in this reference on audio delivery settings for MP3 to M4A workflows.
Settings that work for speech
Speech doesn't need the same treatment as music. Interviews, meetings, lectures, and voice notes need clarity in the vocal range, not big stereo image or extra high-end detail.
That changes the settings I'd choose.
- AAC codec: This is the right target inside M4A for most practical workflows.
- Mono for voice-focused content: If the recording doesn't depend on stereo information, mono cuts wasted space.
- Match the sample rate to the source use case: Don't force music defaults onto video audio, or vice versa.
- Use moderate quality settings: Spoken-word files don't benefit from blindly high settings the way people think they do.
Settings that work for music
Music is less forgiving. Keep stereo unless there's a specific reason not to. Stick to the standard music sample rate of 44.1 kHz when that matches the source and destination. If the file is tied to video production, keep 48 kHz so you don't create avoidable mismatch problems later.
What not to do
The most common mistake is treating lossy-to-lossy conversion like restoration. It isn't.
Another mistake is overspecifying voice recordings. If the destination is transcription, training notes, or searchable archives, the goal is clean spoken content in a compact file. Not audiophile playback.
Lower settings for voice aren't a downgrade when the job is speech recognition. They're often the more disciplined choice.
The right encoder settings come from the destination. Music library, iPhone playback, team archive, transcription upload. Each use case asks for a different balance.
Preparing M4A Files for Transcription with HypeScribe
Once you've converted the file properly, the upload stage gets easier. That's the practical payoff. You're not getting lost in file theory anymore. You've built a version of the recording that's easier to move through a transcription workflow.
One point matters here. Converting a lossy MP3 into M4A does not restore lost fidelity. It only re-encodes the audio. The primary benefit is creating a more efficient file for a specific use case, such as Apple compatibility or faster uploads for transcription, as explained in this guide on whether MP3 to M4A conversion actually improves quality.
Why this helps transcription work
Transcription systems don't need a giant file. They need intelligible speech, stable encoding, and a format that uploads without friction. That's why a carefully made M4A file can be the better handoff format for interviews, meetings, and lectures.
If your end goal is text, this practical walkthrough on how to convert MP3 to text is the natural next step after conversion.
Metadata helps too. Keep file names clear. Preserve titles or project labels when the converter allows it. Organized audio saves time later when transcripts pile up and you need to find the right session quickly.
One more workflow shortcut
If your source starts as video and you're bouncing between media formats often, tools beyond audio-only converters can help. For teams that also handle visual content, LunaBloom AI's video app is worth a look as part of a broader media workflow, especially when the audio you need for transcription begins inside a video asset.
HypeScribe can fit after the conversion step when you want to upload spoken content and turn it into searchable text, summaries, and notes. In that workflow, M4A isn't a quality miracle. It's a cleaner package for the next tool.
If you want to turn meetings, interviews, lectures, or recordings into text without dragging files through a messy workflow, HypeScribe gives you a straightforward next step. Upload your audio or video, generate transcripts and summaries, and keep the output in formats your team can use.


