Digitising Cassette Tapes: The Complete Guide
A lot of cassette projects start the same way. You open a cupboard, loft box, or old drawer and find a stack of tapes with handwriting on the labels. Some are obvious. A mixtape, a rehearsal, a dictation cassette, a family Christmas. Others are a mystery, and that uncertainty is usually what pushes people to finally act.
Digitising cassette tapes sounds simple until you realise the core question isn't just how to transfer sound from one format to another. It's whether a given tape is worth the time, what quality target makes sense, and how careful you need to be if the recording may be fragile or irreplaceable. A cheap USB player might be enough for a throwaway radio recording. It's the wrong choice for the only copy of a parent's voice.
The good approach is to treat the job like preservation, even at home. Major institutions do exactly that. Canada's museum guidance lays out a 9-step workflow, and notes that digital audio files can become large fast. It gives the example that a 30-minute stereo recording at 24-bit/96 kHz produces about 1 GB of data in a preservation context, which shows why planning matters before you hit record (Canada's digitisation workflow guidance).
Your Introduction to Digitising Cassette Tapes
Cassette tapes were built for convenience, not permanence. The compact cassette arrived in 1963, and by the late 20th century it had become a normal way to store music, interviews, family recordings, and demos. That's why so many tape conversion jobs today aren't niche archive work. They're ordinary households trying to rescue ordinary memories before playback gets worse.
What makes this format tricky is its mix of simplicity and fragility. A cassette stores audio magnetically, but your computer needs sampled digital audio. Current preservation guidance still points to 44,100 Hz and 16-bit PCM stereo as a practical baseline for CD-ready, lossless archival files, which is why so many sensible home workflows still end with a WAV master rather than jumping straight to MP3 (TDK's analog-to-digital overview).
Practical rule: Save the tape first. Improve it second.
That mindset changes everything. Instead of chasing perfect sound on the first pass, you aim to make a stable, clean digital master that you can revisit later for track splits, restoration, and listening copies.
Gathering Your Gear The Smart Way
The hardware choice shapes the whole result. Not because expensive gear magically fixes bad tapes, but because stable playback matters more than people think. Speed drift, muffled highs, noisy outputs, and poor head alignment all get baked into the capture.
The three common hardware paths
Here's the no-nonsense version.
| Setup | Where it works well | Main compromise |
|---|---|---|
| Hi-fi cassette deck | Important recordings, music, spoken word, long-term archiving | Needs space, cables, and sometimes maintenance |
| Portable cassette player | Quick checks, low-stakes transfers, travel | Often less stable and less detailed |
| USB cassette converter | Convenience, simple one-off transfers | Quality varies a lot, and playback can be mediocre |
A proper component deck is usually the safest bet if the tape matters. A decent used deck from a home stereo system often gives better transport stability, better outputs, and better tape handling than modern all-in-one gadgets. If you're digitising cassette tapes that contain speech, rehearsal recordings, or family audio, this is usually the level where the work starts feeling worthwhile.
A portable player can still be useful. I use one mainly as a triage machine. It's good for checking whether a mystery tape is blank, damaged, or worth a full transfer. I wouldn't trust one as the only playback source for a precious cassette unless it happened to be in excellent mechanical shape.
A USB cassette converter appeals to people because it removes the cable puzzle. Sometimes that's fine. Sometimes it's the fastest path to a disappointing transfer. Build quality, head alignment, and motor stability are all over the place.
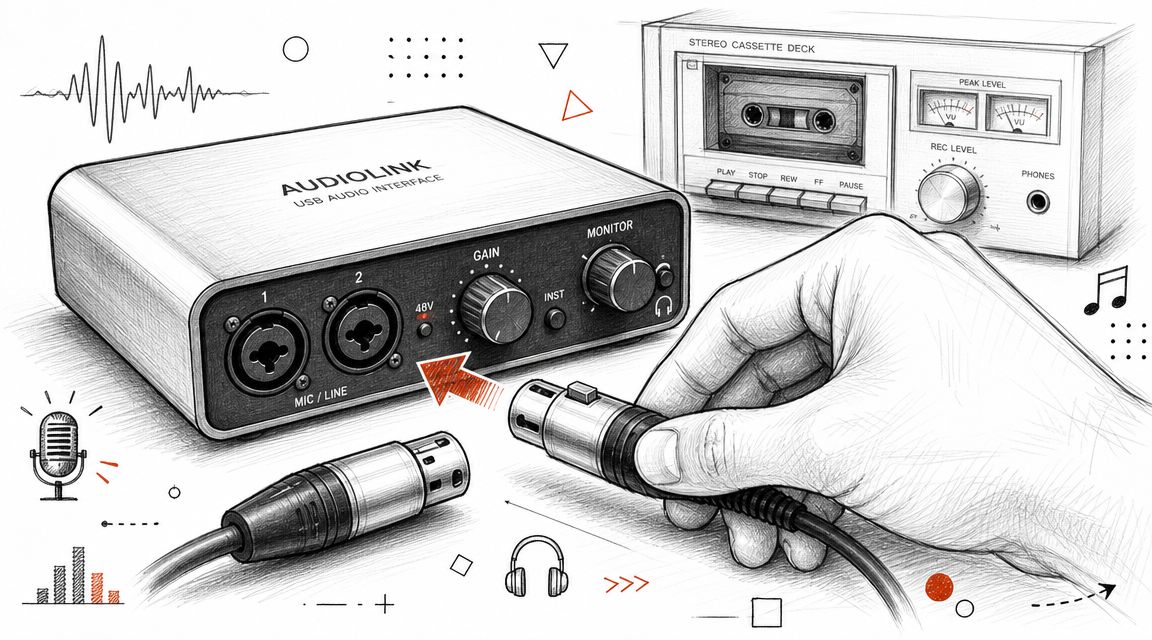
Why an audio interface matters
A USB audio interface sits between the deck and the computer. It converts the analogue output into digital audio more cleanly than the average built-in laptop input. If you already have a decent deck, this is often the smartest upgrade.
Generally, the practical sweet spot is:
- Used cassette deck: Better playback than most cheap modern tape devices.
- Basic USB audio interface: Cleaner capture and easier level control.
- Computer with Audacity: Enough for serious home transfers.
- Headphones: So you can hear problems while they happen.
If you're also comparing devices for direct voice capture and digitisation-adjacent workflows, this breakdown of an audio recorder device helps clarify where standalone recorders fit and where they don't.
Physical prep matters more than fancy gear
Before recording anything, prepare both the machine and the tape.
- Clean the tape path: Heads, capstan, and pinch roller need to be free of dirt and oxide.
- Check the cassette shell: Look for cracks, warped housings, or screws that have loosened.
- Inspect the tape pack: If the winding looks uneven or messy, don't force a full transfer yet.
- Listen for transport strain: If the player sounds laboured, stop and reassess.
A modest deck that runs smoothly will beat a fancy-looking machine with dirty heads and poor tape handling every time.
Choosing for the recording, not your ego
People often overbuy for ordinary tapes and underbuy for irreplaceable ones. That's backwards.
Use the cheap path for common music cassettes you can replace. Use the stable path for family recordings, interviews, local bands, field recordings, and anything you'll never get another chance to hear properly. When the content is unique, reliability matters more than convenience.
The Pre-Flight Checklist Before You Record
Most bad transfers are set up before recording starts. Dirty heads, a sticky roller, a tight tape pack, or careless level checks can ruin an otherwise recoverable cassette. Good results come from slowing down at the start.
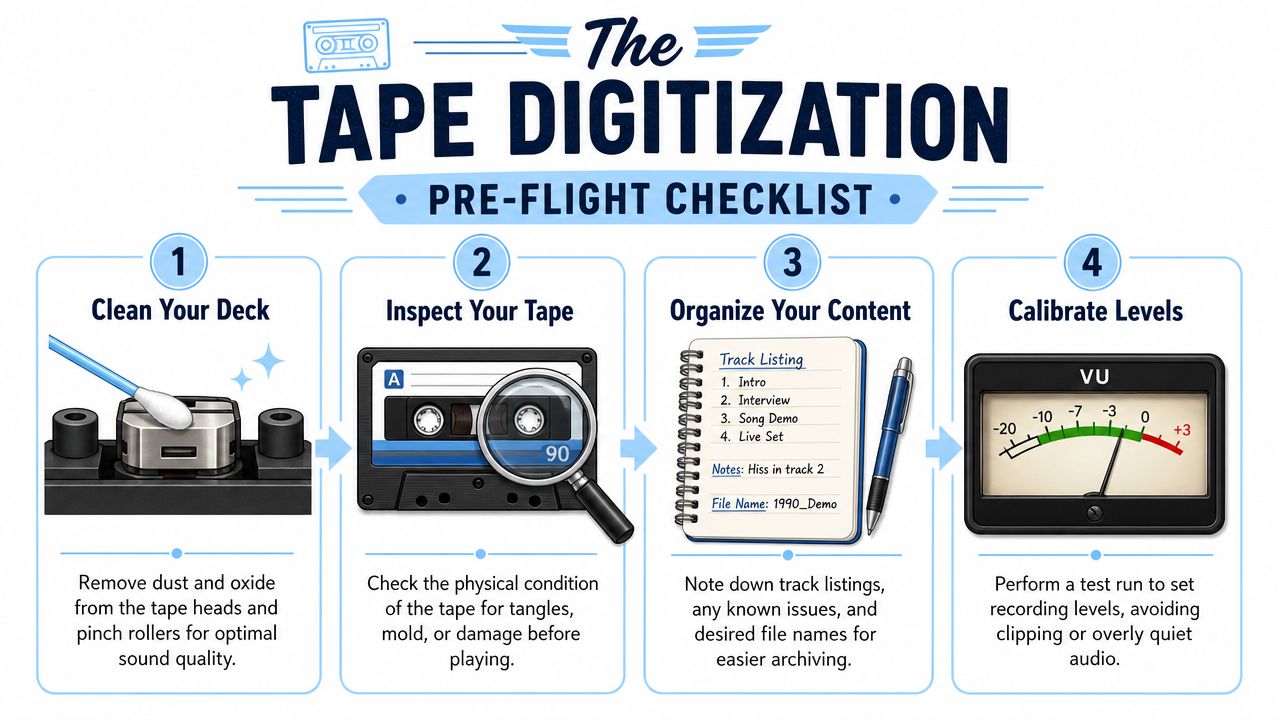
Start with the mechanics
A preservation-grade workflow puts preparation first. Canada's conservation guidance recommends cleaning playback heads, adjusting azimuth for maximum clarity, and, if the tape is stable, fast-forwarding and rewinding once to relieve stress before capture. It also advises active monitoring during transfer and says to stop immediately if the tape jams or behaves abnormally (Canada's audio tape conservation bulletin).
That advice holds up in home use too. The point isn't to make the deck look tidy. The point is to avoid chewing a tape that may only survive a few more passes.
A workable checklist
Use this routine before every important transfer:
- Clean the heads and tape path: Muffled sound often starts here.
- Inspect the cassette body: Make sure the pressure pad is present and the shell isn't binding.
- Wind the tape through once: If it moves freely, you've reduced the chance of a nasty surprise halfway through.
- Test a short section first: Listen for scraping, dropouts, or wobble before committing to a full side.
If the tape drags, squeals, or stops the machine, don't push on and hope for the best. Hope is how tapes get damaged.
Set levels before the real pass
After the mechanical check, connect the deck output to your interface or recording input and run a brief test in Audacity. Play the loudest section you can find. Watch the meters. If peaks are slamming near the top, back off the input gain.
Audacity's tape workflow recommends aiming for peaks around -6 dB during capture. That gives useful headroom and helps avoid clipping, which you can't repair later in any convincing way.
If you're unsure whether the level is right, choose slightly lower. You can raise a clean recording later. You can't unclip a distorted one.
Keep notes while you work
This doesn't need to be formal. A notepad or plain text file is enough.
Write down:
- Tape label text
- Which side you transferred
- Any obvious issues
- Rough contents or song titles
- Whether a second pass may be needed
Those notes save time later when you're naming files, splitting tracks, or deciding which recordings deserve restoration work.
Capturing The Audio The Right Way
This is the part people rush, and it's the part that benefits most from discipline. Once the tape is rolling, the job is to capture it cleanly, consistently, and with as little intervention as possible.
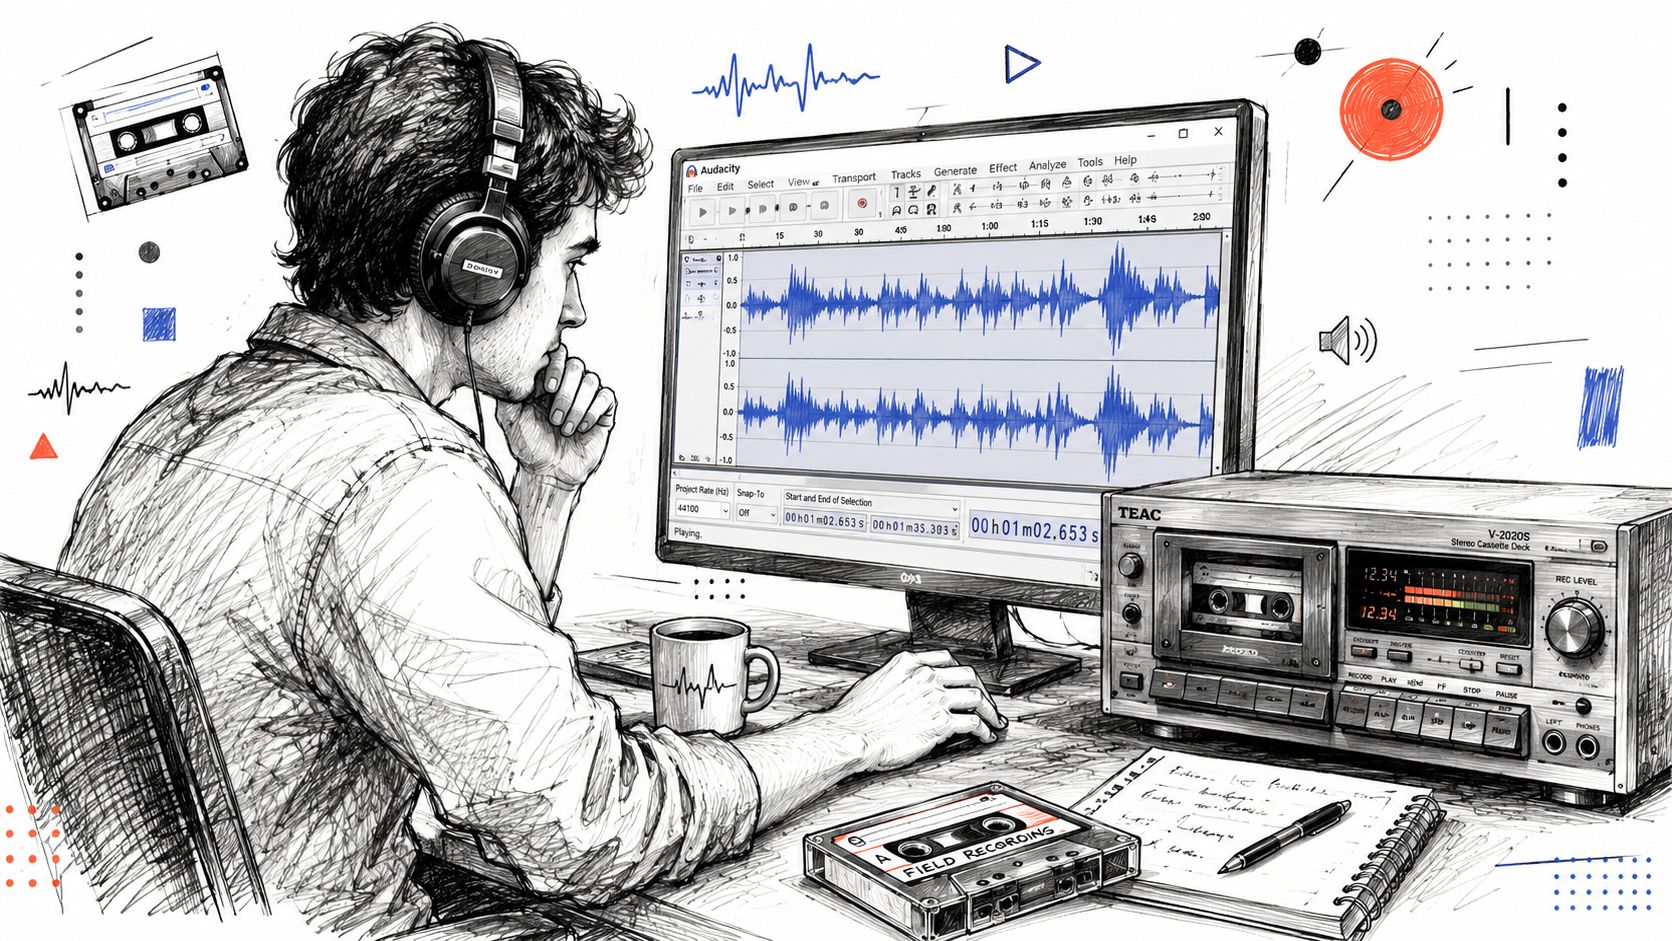
Use settings that leave room to work
Audacity's official tape workflow recommends a 44,100 Hz project sample rate and 32-bit float capture, then export to 44,100 Hz 16-bit PCM stereo WAV for the final distribution or CD-ready file. It also recommends setting recording peaks around -6 dB so you don't clip the loudest moments (Audacity's sample workflow for tape digitisation).
Those settings make practical sense. The tape itself won't suddenly become modern studio audio, but 32-bit float gives you flexibility while editing, and the -6 dB target keeps accidental overs from wrecking the capture.
Decide whether the tape deserves full treatment
Not every cassette deserves a careful restoration pass. Some only need a quick transfer for reference. Others contain one irreplaceable conversation or performance and justify extra time.
A simple triage approach works well:
| Tape type | Recommended approach |
|---|---|
| Commercial music cassette in fair shape | Straight transfer, basic cleanup if needed |
| Family speech recording | Careful capture, preserve raw master, consider restoration |
| Damaged or unstable tape | Test first, monitor constantly, don't force repeated passes |
| Unknown tape with unclear value | Short sample capture before committing to the full side |
That decision matters because restoration takes judgment. If the recording itself is weak, more processing can make it less listenable, not more.
Let the whole side run
When levels are set, cue the tape, start recording in Audacity, then press play on the deck. Don't stop every few minutes unless the machine gives you a reason. Whole-side captures preserve continuity and make later editing easier.
Listen while it records. Headphones matter here. You're checking for hum, sudden distortion, transport noise, or a tape that starts behaving differently after a few minutes.
A short demonstration can help if you want to see the basic transfer flow in action.
Save the raw file before touching anything
This is the habit that separates careful work from disposable work. Once the side is captured, save an untouched version immediately. Don't normalise it, don't noise-reduce it, and don't cut it into tracks yet.
That raw master is your fallback if later cleanup goes too far. In my experience, people regret over-editing far more often than they regret keeping an unpolished original.
From Hiss to Hits Audio Restoration Essentials
A transfer can look disappointing the moment it hits the screen. The waveform is small, there is hiss under every pause, and a voice that mattered on tape suddenly sounds far away. That is the point where people usually make the recording worse. They reach for every effect they can find.
Good restoration starts with a decision, not a preset. The job is to improve what matters most in that recording, whether that is speech clarity, musical balance, or preserving the character people remember.
Start by deciding what success looks like
A family interview, a rehearsal tape, and a copied commercial album do not deserve the same treatment. Unique material gets more patience. Replaceable material usually does not justify hours of repair unless the performance itself has special value.
The next call is technical. Some problems respond well to cleanup. Others only get exposed. Steady hiss, mild hum, and low average level are often manageable. Dropouts, mistracking baked into the original recording, and severe saturation usually force a compromise. The aim is not perfection. The aim is the best honest version of what is there.
Some tapes are worth saving because of what they contain, not because they can be made to sound polished.
Make small moves and compare often
For many cassette transfers, a short chain is enough:
- Noise reduction for constant hiss, applied lightly after sampling a true noise-only section
- DC offset correction if the waveform is visibly off-centre
- Normalisation to bring the finished file into a sensible listening range
- Manual editing for obvious bumps, false starts, long empty sections, or mechanical knocks
Heavy processing is where cassette restorations start sounding fake. Speech turns watery. Cymbals get brittle. Background ambience disappears, and with it some of the memory tied to the recording.
A simple working table helps keep judgment in place:
| Problem | First move | Common mistake |
|---|---|---|
| Steady hiss | Gentle noise reduction | Pushing until speech sounds swirly or metallic |
| Low overall volume | Normalise after cleanup | Raising distortion that was already recorded |
| Hum or low rumble | Narrow, targeted filtering | Cutting too much bass and thinning the source |
| Messy starts and stops | Manual trims and short fades | Editing away pauses that belong to the tape |
One habit helps more than any plugin. Bypass the effect and listen again. If the cleaned version sounds cleaner but less believable, back off.
Treat speech and music differently
Spoken-word tapes usually benefit most from clarity and level control. Music asks for more caution because every processing step changes tone, punch, and noise floor in ways listeners notice quickly.
If a spoken recording has uneven voice levels after transfer, a workflow built around automatic sound levelizing can help you solve the consistency problem before you start stacking denoisers and EQ. For broader background on signal flow, editing, and restoration judgement, this comprehensive guide to music technology is a useful companion resource.
The actual skill is knowing when to stop. A slightly noisy tape that still sounds natural will usually age better than a scrubbed, lifeless file.
Keep your master untouched
Raw captures should stay raw. Once ears get tired, over-processing starts to sound impressive for the wrong reasons. I have heard plenty of late-night "fixed" transfers that sounded harsh and hollow the next morning.
Keep three versions when the tape matters:
- Raw capture
- Working edit
- Listening copy
That small bit of discipline gives you room to change your mind without having to replay an old cassette again.
Archiving Your Audio and Making It Searchable
The transfer is only half the job. The part that determines whether you will ever use that recording again is what happens after capture.
A good archive starts with a decision. Keep one preservation master in WAV, then create smaller copies only for listening or sharing. For cassette, a CD-quality WAV master is usually the sensible target. Going higher will not recover detail that was never on the tape, but going lower can limit what you can do later if you need to revisit the file.
How you split the recording depends on what the tape is and how you expect to use it. A family interview often works best as one continuous master with clear notes and timestamps. A mixtape or rehearsal may be easier to live with as separate tracks. If a cassette has fragments, test recordings, or several unrelated moments on one side, break them out into individual files so no one has to hunt through twenty minutes of dead air to find the part that matters.
Name files like someone else will inherit them.
Useful metadata includes:
- Tape label or source name
- Approximate date if known
- Side A or Side B
- People speaking or performing
- Any known location or event
- Notes about condition or restoration
That small bit of admin work is what turns a folder of audio into something usable five years from now.
Speech recordings benefit most from text. If the cassette holds interviews, oral histories, meetings, lectures, or family stories, add a transcript while the context is still fresh in your mind. A tool for converting audio recordings into searchable text can make names, places, and topics findable without scrubbing through the waveform again.
HypeScribe is one option for turning spoken audio into transcript text. That matters most when the recording has research value or family value, because the words on the tape are often what people need to find, quote, or pass on.
Keep more than one copy, and keep your notes with the audio. A master on one laptop is a working file, not an archive. Store copies in separate places so a drive failure, accidental deletion, or lost computer does not put you back at the cassette deck.
This is also where judgment matters. Not every tape needs full track marking, transcripts, and detailed notes. A rough off-air recording may only deserve a clean master and a basic label. A tape of a grandparent telling stories deserves more care. Aim your effort at the value of the material, not just the fact that it is old.
Conclusion Bringing Your Audio History Into the Future
A cassette tape doesn't need to be rare to be important. Most aren't valuable because of the format. They matter because of what's on them.
Digitising cassette tapes properly means making good decisions before you press record, handling the tape carefully, capturing a clean master, and resisting the urge to overprocess. It also means finishing the job. Name the files well, keep the raw version, and store the results so you can find them later.
That old box of tapes can become something far more useful than a pile of fading plastic. It can become a stable archive of voices, songs, rehearsals, memories, and moments that were at real risk of disappearing. Once they're digitised and organised, they're no longer trapped in a machine few people still own. They're back in your life.
If your digitised cassettes include interviews, family stories, lectures, meetings, or any spoken material, HypeScribe can help turn those recordings into searchable text so the content is easier to search through, reference, and preserve alongside the audio.


